There’s an unparalleled satisfaction that comes from creating something delicious from scratch, and homemade bratwurst is no exception. Moving beyond store-bought varieties, crafting your own allows you to control every ingredient, from the quality of the meat to the nuanced spice blend. With the right tools—a reliable meat grinder and a dedicated stuffer—you’re well on your way to enjoying fresh, flavorful bratwurst right from your kitchen. This comprehensive guide will walk you through each step, transforming raw ingredients into perfectly linked sausages ready for the grill.
Essential Equipment for Homemade Bratwurst
Embarking on your bratwurst-making journey requires a few key pieces of equipment. While some items might seem specialized, they are crucial for achieving professional-quality results and can be used for various other sausage-making endeavors.
Meat Grinder
A meat grinder is the heart of homemade sausage production. It breaks down whole cuts of meat into a consistent texture.
- Manual Grinders: These are cost-effective for smaller batches, requiring physical effort.
- Electric Grinders: Ideal for larger quantities, offering convenience and efficiency.
- Grinding Plates: Most grinders come with multiple plates. You’ll typically use a coarse plate for the first grind and a finer plate for the second, depending on your desired bratwurst texture.
|
Our Picks for the Best Meat grinder in 2026
As an Amazon Associate I earn from qualifying purchases.
|
||
| Num | Product | Action |
|---|---|---|
| 1 | Meat Grinder Manual Mincer 2-in-1 Manual Meat Grinder Sausage Maker Table Mount Pork Mincer Sausage Stuffer Funnel Make Homemade Burger Patties Hand Operated Kitchen Tool FQ |

|
| 2 | Oaomi 3200W Max Electric Meat Grinder & Sausage Stuffer - Mincer Machine with Tool 2 Blade And 3 Plates, 3 Tubes & Kubbe Kit Tool for Home Kitchen Use(Black) |
|
| 3 | LEM Products BigBite #8 Meat Grinder, 0.50 HP Stainless Steel Electric Meat Grinder Machine, Ideal for Regular Use |
|
| 4 | CHEFFANO Meat Grinder, 2600W Max Stainless Steel Meat Grinder Electric, ETL Approved Heavy Duty Meat Mincer Machine with 2 Blades, 3 Plates, Sausage Stuffer Tube & Kubbe Kit for Home Kitchen Use |
|
| 5 | Meat Chopper, Hamburger Grinder, Premium Heat Resistant Smasher for Ground Beef, Burger Grinder Nylon Potato Mix Tool, Meat & Poultry Tenderizers-Black |
|
| 6 | GANIZA Food Processors, Electric Food Chopper with Meat Grinder & Vegetable Chopper - 2 Bowls (8 Cup+8 Cup) with Powerful 450W Copper Motor - Includes 2 Sets of Bi-Level Blades for Fruits/Meat/Nuts |
|
| 7 | KitchenAid Stand Mixer Attachment, Food Grinder KSMMGA, Metal Food Grinder |
|
| 8 | CHEFFANO Electric Meat Grinder, [2000W Max] Heavy Duty Meat Mincer with 2 Blades, 3 Plates, Sausage Tube & Kubbe Kit for Home Kitchen Use |
|
| 9 | Meat Grinder, Sausage Stuffer, [2800W Max] Electric Meat Mincer with Stainless Steel Blades & 3 Grinding Plates,Sausage Maker & Kubbe Kit for Home Kitchen & Commercial Using |
|
| 10 | Electric Meat Grinder, Sausage Stuffer with 3 Sausage Tubes, 2 Blades, 3 Plates, 3200W Max, Meat Grinder Heavy Duty for Home Kitchen Use, Stainless Steel (Black) |
|
Sausage Stuffer
While many meat grinders offer a stuffing attachment, a dedicated sausage stuffer provides a more efficient and consistent experience, particularly for larger batches.
- Vertical Stuffers: Often preferred for their ease of use and ability to apply steady pressure, minimizing air pockets.
- Grinder Attachments: A good starting point for beginners or those making smaller quantities, though they can be slower.
Other Indispensable Tools
Beyond the primary equipment, a few other items will streamline your process:
- Large Mixing Bowls: Essential for holding cubed meat, seasoning mixtures, and ground meat, ideally kept in an ice bath.
- Sharp Knives and Cutting Board: For precise cubing of meat and fat.
- Food-Grade Gloves: Maintain hygiene and keep your hands clean during the mixing and stuffing stages.
- Sausage Pricker (or sterilized needle): A small but mighty tool used to release trapped air bubbles in the casings, preventing bursts during cooking.
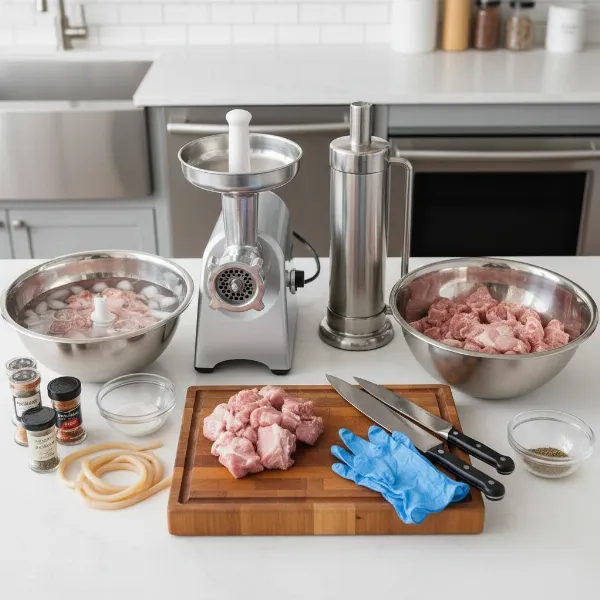 Essential tools for making homemade bratwurst, including a meat grinder, sausage stuffer, and mixing bowls.
Selecting and Preparing Your Meat
The foundation of exceptional bratwurst lies in the quality and preparation of your meat. A balanced fat-to-lean ratio is paramount for juicy, flavorful results.
Choosing the Right Cuts
Pork is the traditional choice for bratwurst due to its flavor and fat content.
- Pork Shoulder (Pork Butt): An excellent choice, offering a good balance of meat and intramuscular fat.
- Pork Back Fat: Often added to achieve the optimal fat ratio, especially if using leaner cuts or wild game.
- Other Meats: While less traditional, some recipes incorporate beef or veal for different flavor profiles.
For a truly authentic and succulent bratwurst, aim for a meat-to-fat ratio of approximately 70/30, meaning your mixture should contain about 25-30% fat. This ratio ensures your bratwurst remains moist and flavorful without being overly greasy.
The Critical Step: Cubing and Chilling
Before grinding, cut your meat and fat into 1-inch to 2-inch cubes. This size is manageable for most grinders. The most crucial step, however, is chilling. Place your cubed meat and fat, along with your grinder components (auger, blade, plate), in the freezer for at least 30-60 minutes, or until they are very cold but not frozen solid. Keeping everything thoroughly chilled prevents the fat from smearing during grinding, ensuring a distinct texture and superior juiciness in the final product.
Crafting the Perfect Bratwurst Seasoning
The distinctive flavor of bratwurst comes from its aromatic blend of spices. While regional variations exist, a classic German bratwurst typically features a harmonious combination of savory, earthy, and slightly sweet notes.
Classic Spice Blend
A fundamental seasoning profile for bratwurst often includes:
- Salt (essential for flavor and preservation)
- White Pepper
- Black Pepper
- Ground Nutmeg
- Ground Ginger
- Marjoram
- Mustard Powder
- Coriander
- Caraway Seeds
- Cardamom
These spices work together to create the characteristic German flavor. For example, nutmeg and marjoram are staples that define much of the traditional bratwurst taste.
Enhancing Your Flavor Profile
Don’t be afraid to experiment to suit your palate:
- Liquids: Incorporating ice-cold beer or a splash of ice water can add flavor and aid in mixing, ensuring the meat mixture remains hydrated and easy to stuff.
- Additional Aromatics: Onion powder or fresh garlic can deepen the savory notes.
- Subtle Heat: A pinch of cayenne pepper or smoked paprika can introduce a gentle warmth.
Mixing and Testing Your Seasoning
Once your meat is ground, gently combine it with your chosen dry spice blend. Add any liquids (like beer or ice water) gradually, mixing until everything is evenly distributed. Overmixing can lead to a tough, paste-like texture, so aim for just enough to incorporate all ingredients.
Before stuffing, always perform a taste test. Take a small portion of your seasoned meat mixture, form it into a patty, and fry it until cooked through. Taste it and adjust the seasoning as needed, adding more salt, pepper, or other spices until it’s perfectly balanced. This step is vital to ensure your entire batch of bratwurst tastes exactly how you want it.
Grinding the Meat to Perfection
The grinding process is where the texture of your bratwurst truly takes shape. Proper technique, especially maintaining cold temperatures, is key to preventing fat smearing and achieving that desirable bite.
Pre-Chilling is Paramount
Before you even start the grinder, ensure all components that will come into contact with the meat—the grinder head, auger, blade, and plate—are thoroughly chilled. Placing them in the freezer for at least 30 minutes, or even overnight, makes a significant difference. Similarly, keep your cubed meat in the freezer until you’re ready to grind. Some experts even recommend grinding into a bowl that is nested within a larger bowl filled with ice to maintain maximum coldness.
The Grinding Process: Often Two Stages
Many bratwurst recipes benefit from a two-stage grinding process:
- First Grind (Coarse): Start with a coarse grinding plate (e.g., 6mm or 1/4 inch). This initial pass breaks down the meat and fat into larger, more uniform pieces.
- Second Grind (Finer): For a classic bratwurst texture, it’s often beneficial to pass the meat through a finer plate (e.g., 3mm or 1/8 inch) for a second grind. This refines the texture and helps create a smoother, more emulsified sausage. If you plan to mix seasonings between grinds, do so after the first grind. Otherwise, add all seasonings after the final grind and mix gently.
Maintaining Cold Temperatures During Grinding
Throughout the grinding process, temperature control is your best friend. If the meat starts to warm up, the fat can “smear,” resulting in a greasy texture rather than distinct specks of fat within the lean meat. If you notice the meat getting sticky or warm, stop the process, return the meat and grinder parts to the freezer for a quick chill, and then resume. Work quickly but carefully to ensure the meat stays as cold as possible.
Preparing and Stuffing the Casings
Stuffing the seasoned meat into casings is a rewarding step, bringing your bratwurst to its final form. Attention to detail here ensures beautiful, intact links that cook perfectly.
Choosing Your Casings
The most common choices for bratwurst are:
- Natural Hog Casings: These are traditional for bratwurst, offering a natural “snap” and permeability that allows smoke and flavors to penetrate. They typically range from 28-32mm in diameter.
- Collagen Casings: An alternative that is consistent in size, easy to use, and requires less preparation. They don’t have the same “snap” as natural casings but are excellent for beginners.
Casing Preparation
- Natural Hog Casings: These come packed in salt and must be rehydrated and rinsed. Soak them in cold water for at least 30 minutes (or even overnight in the refrigerator) to remove excess salt and restore pliability. Before stuffing, rinse them thoroughly, inside and out, using a faucet to flush water through the entire length.
- Collagen Casings: Some types require a brief soak in water to make them pliable, while others can be used dry. Always check the manufacturer’s instructions.
Loading the Stuffer
Once your meat mixture is seasoned and perfectly chilled, it’s time to load your stuffer.
- Attach the Casing: Slide the prepared casing onto the stuffer’s nozzle, leaving about 3-4 inches hanging off the end. Tie a knot in this hanging end to prevent the meat from escaping.
- Fill the Stuffer: Pack the meat mixture firmly into the stuffer’s canister, pressing out any trapped air pockets as you go. Air pockets in the stuffer can lead to air bubbles in your finished sausages.
The Stuffing Process
This step requires a steady hand and consistent pressure:
- Begin Stuffing: Start slowly, allowing the meat to gently fill the casing.
- Even Filling: Use one hand to guide the casing off the nozzle, ensuring it fills evenly without becoming too tight. The goal is a firm but not taut sausage; you should be able to gently squeeze it without it bursting. Over-stuffing is a common mistake that leads to split casings during cooking. Aim to fill the casing about 75% to allow for expansion.
- Linking Bratwurst: Once the entire casing is filled, tie off the open end. To create individual links, gently pinch and twist the sausage at your desired length (typically 5-6 inches). Then, skip the next section and twist the subsequent one in the opposite direction. Continue this alternating twist pattern until all the sausage is linked.
- Dealing with Air Bubbles: Despite your best efforts, some air bubbles might get trapped. Use a sausage pricker or a sterilized needle to gently puncture these bubbles and release the air. This prevents unsightly gaps and reduces the risk of bursting when cooked.
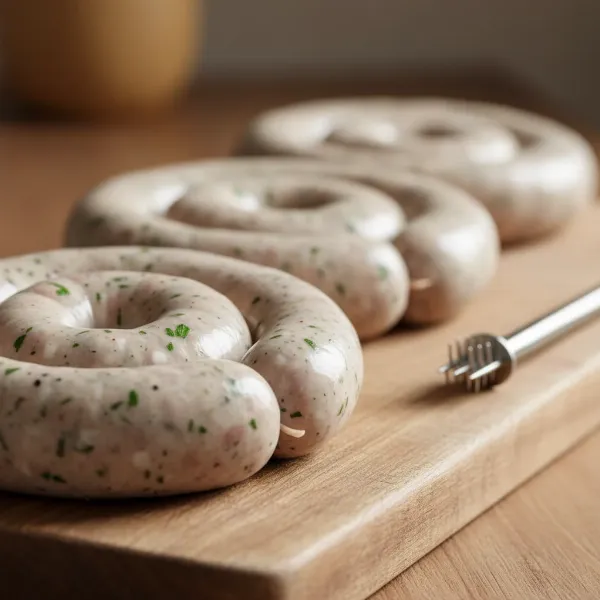 Freshly stuffed and perfectly linked homemade bratwursts on a cutting board, ready for cooking or storage.
Storing and Cooking Your Homemade Bratwurst
Congratulations! You’ve made a batch of fresh, homemade bratwurst. Now, it’s time to prepare them for storage or cook them to perfection.
Proper Storage for Freshness
- Refrigeration: Fresh bratwurst can be stored in the refrigerator for 1-2 days. Place them in an airtight container or wrap them well to prevent them from drying out.
- Freezing: For longer storage, freezing is your best option. Arrange the links in a single layer on a baking sheet and freeze until solid. Once frozen, transfer them to freezer bags or vacuum-seal them. Properly frozen bratwurst can last for several months.
- Vacuum Sealing: This method offers the best protection against freezer burn and significantly extends shelf life.
Cooking Your Homemade Bratwurst
Homemade bratwurst is incredibly versatile and can be cooked using various methods:
- Grilling: The classic method. Grill over medium heat, turning frequently, until browned and cooked through. Many enjoy poaching brats in beer and onions before grilling to enhance flavor and ensure even cooking.
- Pan-Frying: Heat a skillet over medium heat with a little oil. Cook the bratwurst, turning occasionally, until golden brown and cooked through.
- Poaching: An optional pre-cooking step, especially for grilling. Gently simmer bratwurst in a liquid (like beer, water, or broth) with onions or other aromatics for 10-15 minutes before finishing on the grill or in a pan. This helps ensure they are cooked evenly and infuses extra flavor.
Always ensure that your bratwurst reaches an internal temperature of 160°F (71°C) for food safety. A meat thermometer is your best friend here.
Frequently Asked Questions
How much fat should be in bratwurst?
A good bratwurst typically contains between 25-30% fat. This ratio is crucial for ensuring the sausage remains juicy and flavorful when cooked.
Can I use a food processor instead of a grinder?
While a food processor can finely chop meat, it doesn’t achieve the same consistent grind as a meat grinder and can sometimes over-process the meat, leading to a pasty texture. For optimal bratwurst, a dedicated meat grinder is recommended.
How do I prevent my casings from bursting?
To prevent casings from bursting, avoid over-stuffing them; fill them to about 75% capacity to allow for expansion during cooking. Additionally, use a sausage pricker to release any trapped air bubbles.
What’s the best type of casing for bratwurst?
Natural hog casings are widely considered the best for bratwurst due to their authentic “snap” and ability to absorb flavors. Collagen casings are a convenient alternative, especially for beginners.
How long can homemade bratwurst be stored?
Fresh, raw homemade bratwurst can be stored in the refrigerator for 1-2 days. When properly frozen, it can last for several months (typically 3-4 months in freezer bags, longer if vacuum-sealed).
Conclusion
Creating your own bratwurst with a Meat Grinder and stuffer is a rewarding culinary adventure that brings the flavors of authentic sausage making into your home. From selecting the right cuts and balancing the perfect spice blend to meticulously grinding and stuffing, each step contributes to a product far superior to anything you’ll find pre-made. You now possess the knowledge and confidence to transform quality ingredients into succulent, perfectly linked bratwurst. So, roll up your sleeves, fire up your grinder, and discover the immense satisfaction of crafting your own delicious sausages. What delicious bratwurst creations will you conjure up first?