As an experienced technician with a decade in the field, I understand that mastering your meat grinder involves more than just selecting the right model. It’s about precision in every step, especially when it comes to assembly. A seemingly minor detail like the locking ring plays a monumental role in both the safety and efficiency of your grinding process. Mismanage this crucial component, and you risk everything from poor meat texture to serious operational hazards. This comprehensive guide will walk you through the proper techniques to safely and effectively tighten your meat grinder’s locking ring, ensuring flawless results and extending the life of your valuable equipment.
Understanding Your Meat Grinder’s Locking Ring
At the very front of your meat grinder’s assembly, you’ll find what’s often referred to as the locking ring, also known as the screwing ring or retaining ring. This threaded component is the final piece that screws onto the grinder head, holding all the internal elements—specifically the cutting blade and the grinding plate—firmly in place against the auger, or feed screw. Its design is simple, yet its function is absolutely critical. Without it, the internal components would be loose, unable to perform their designated tasks, and potentially dangerous. The locking ring creates the necessary pressure and stability, ensuring that the blade and plate maintain constant contact and alignment, which is essential for uniform cutting and grinding.
 Close-up of a meat grinder's locking ring, cutting blade, grinding plate, and auger assembled.
Why Proper Tightening Matters
The art of tightening the locking ring lies in finding the perfect balance: not too loose, and never too tight. This delicate equilibrium directly impacts your grinding experience and the longevity of your machine.
The Risks of Under-Tightening
|
Our Picks for the Best Meat grinder in 2026
As an Amazon Associate I earn from qualifying purchases.
|
||
| Num | Product | Action |
|---|---|---|
| 1 | Oaomi 3200W Max Electric Meat Grinder & Sausage Stuffer - Mincer Machine with Tool 2 Blade And 3 Plates, 3 Tubes & Kubbe Kit Tool for Home Kitchen Use(Black) |

|
| 2 | CHEFFANO Electric Meat Grinder, [2000W Max] Heavy Duty Meat Mincer with 2 Blades, 3 Plates, Sausage Tube & Kubbe Kit for Home Kitchen Use |
|
| 3 | Meat Chopper, Hamburger Grinder, Premium Heat Resistant Smasher for Ground Beef, Burger Grinder Nylon Potato Mix Tool, Meat & Poultry Tenderizers-Black |
|
| 4 | Meat Grinder Manual Mincer 2-in-1 Manual Meat Grinder Sausage Maker Table Mount Pork Mincer Sausage Stuffer Funnel Make Homemade Burger Patties Hand Operated Kitchen Tool FQ |
|
| 5 | Electric Meat Grinder, Sausage Stuffer with 3 Sausage Tubes, 2 Blades, 3 Plates, 3200W Max, Meat Grinder Heavy Duty for Home Kitchen Use, Stainless Steel (Black) |
|
| 6 | KitchenAid Stand Mixer Attachment, Food Grinder KSMMGA, Metal Food Grinder |
|
| 7 | CHEFFANO Meat Grinder, 2600W Max Stainless Steel Meat Grinder Electric, ETL Approved Heavy Duty Meat Mincer Machine with 2 Blades, 3 Plates, Sausage Stuffer Tube & Kubbe Kit for Home Kitchen Use |
|
| 8 | LEM Products BigBite #8 Meat Grinder, 0.50 HP Stainless Steel Electric Meat Grinder Machine, Ideal for Regular Use |
|
| 9 | Meat Grinder, Sausage Stuffer, [2800W Max] Electric Meat Mincer with Stainless Steel Blades & 3 Grinding Plates,Sausage Maker & Kubbe Kit for Home Kitchen & Commercial Using |
|
| 10 | GANIZA Food Processors, Electric Food Chopper with Meat Grinder & Vegetable Chopper - 2 Bowls (8 Cup+8 Cup) with Powerful 450W Copper Motor - Includes 2 Sets of Bi-Level Blades for Fruits/Meat/Nuts |
|
When the locking ring isn’t tightened sufficiently, a small gap can form between the cutting blade and the grinding plate. This seemingly minor space leads to several significant problems during operation. Instead of cleanly slicing through the meat, the blade will push and smear it, resulting in a mushy, undesirable texture. This ineffective cutting often causes sinew and connective tissues to wrap around the auger and blade, leading to frustrating clogs that interrupt your work and demand frequent disassembly for cleaning. Furthermore, a loose assembly can cause excessive vibration and wear on the components, potentially damaging the blade, plate, or even the grinder head over time, decreasing your machine’s overall lifespan and performance.
The Dangers of Over-Tightening
While a loose ring presents its own set of challenges, over-tightening can be equally, if not more, detrimental. Applying excessive force to the locking ring can strip the threads on either the ring itself or the grinder head, rendering the components unusable. Beyond thread damage, extreme tightening puts undue stress on the grinder head and other parts, increasing the risk of cracks or stress fractures, particularly in plastic or lighter-duty metal models. An overtightened ring also makes disassembly incredibly difficult, turning routine cleaning into a strenuous, time-consuming chore. You might find yourself resorting to unconventional methods or even special tools to loosen a stuck ring, which can further damage the grinder or lead to personal injury.
Before You Begin: Safety First
Before you even think about adjusting or tightening your meat grinder’s locking ring, prioritizing safety is paramount. Proper preparation ensures that you can perform the task efficiently and without risk.
Always unplug your meat grinder from the power outlet. This step is non-negotiable. An accidental power-up while your hands are near the moving parts can lead to severe injury. Treat your grinder like any other powerful kitchen appliance, and never underestimate the potential dangers of an un-unplugged machine.
Next, ensure all components are thoroughly clean and dry. Any lingering meat residue, fat, or moisture can hinder proper assembly, contribute to corrosion, or create friction that prevents smooth tightening. Clean parts also allow for a clear visual inspection.
Finally, take a moment to inspect each component for any signs of damage or wear. Check the threads on both the locking ring and the grinder head for stripping or deformation. Examine the cutting blade for dullness or nicks and the grinding plate for any cracks or blockages. If any part shows significant damage, it’s best to replace it before assembly to ensure optimal performance and prevent further issues. Starting with clean, inspected, and undamaged parts sets the foundation for a safe and effective grinding session.
Step-by-Step Guide to Safely Tightening the Locking Ring
Achieving the correct tightness for your meat grinder’s locking ring is a straightforward process when approached systematically. Follow these steps to ensure a secure and efficient assembly every time.
-
Prepare the Grinder Head: Begin by ensuring the main grinder head is securely attached to the motor housing of your meat grinder. Some models use a locking knob on the side to fasten the head; make sure this is tightened clockwise until snug.
-
Insert the Auger (Feed Screw): Gently slide the auger into the grinder head, making sure its geared end properly aligns with the drive shaft of the motor. It should seat firmly without force.
-
Position the Cutting Blade: Place the cutting blade onto the feed screw shaft. Crucially, the flat cutting edge of the blade must face outwards, towards the front of the grinder (where the meat exits). If placed incorrectly, the meat will not be cut but rather crushed and smeared, leading to severe clogging and poor results. Ensure it sits flush against the auger.
-
Add the Grinding Plate: Select your desired grinding plate and position it against the cutting blade. Look for a notch or protrusion on the grinding plate that aligns with a corresponding slot or pin on the grinder head. This alignment is vital for the plate to sit correctly and prevent it from rotating during operation. Push it back firmly so it mates perfectly with the blade.
-
The “Finger-Tight” Rule: This is the most crucial step for the locking ring. Carefully screw the locking ring onto the threaded end of the grinder head by turning it clockwise. Tighten it only with your hand. Apply firm, consistent pressure until you feel significant resistance and the ring is snug. The goal is to eliminate any wobble or movement in the internal components without applying excessive force that could strain the threads or the parts. You want it secure, not immovable. Avoid using wrenches or pliers at this stage, as they almost always lead to overtightening and potential damage.
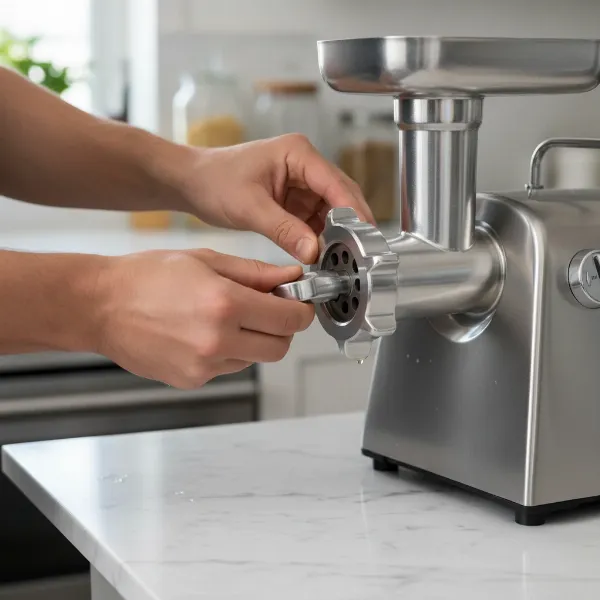 Hands demonstrating the proper finger-tightening technique for a meat grinder's locking ring.
 -
Verify Assembly: Before plugging in your grinder, give the assembled head a gentle shake. There should be no noticeable play or rattling from the internal components. Visually confirm that the cutting blade and grinding plate appear tightly seated.
By following these steps, you achieve a level of tightness that keeps everything securely in place for optimal grinding, without risking damage to your machine or frustration during disassembly.
Common Issues and Troubleshooting for the Locking Ring
Even with proper assembly, you might encounter situations that require attention to your locking ring. Knowing how to diagnose and address these common issues can save you time and prevent more significant problems.
When the Ring is Too Loose
If you notice your meat grinder producing mushy meat, or if it frequently clogs with sinew and connective tissue, the locking ring may be too loose. The inadequate pressure allows a gap between the blade and plate, preventing clean cuts.
- Solution: Unplug the grinder immediately. Disassemble the front end, ensuring the auger, blade, and plate are correctly positioned and free of obstructions. Then, re-tighten the locking ring following the “finger-tight” method described above. Sometimes, running the grinder for a few seconds can slightly warm the components, allowing for a final, gentle snugging of the ring.
When the Ring is Stuck
An overtightened or stubbornly stuck locking ring can be frustrating, especially after a grinding session when meat particles might have dried in the threads.
- Solution 1: Temperature Changes: Metal expands and contracts with temperature. If stuck, try placing the entire grinder head (unplugged and disassembled from the motor) in the freezer for about 30-60 minutes. The cold can cause the metal to contract slightly. Alternatively, dip just the very end of the grinder head (with the stuck ring) into hot, but not boiling, water for a few minutes. The heat can cause the ring to expand, potentially loosening its grip.
- Solution 2: Enhanced Grip: For a better grip, wear rubber dishwashing or gardening gloves. You can also wrap a few thick rubber bands around the locking ring for added traction.
- Solution 3: Gentle Leverage (Caution!): As a last resort, if your model’s tamper has a hole that fits over the nut, it might act as a makeshift wrench for gentle leverage. Otherwise, a strap wrench designed for jars or pipes can offer grip without damaging the surface, but use minimal force to avoid stripping threads or cracking components. Never use pliers or wrenches directly on the ring, as this can deform it.
Preventing Cross-Threading
Cross-threading occurs when the threads of the locking ring and the grinder head don’t align properly when you start to screw them together. Forcing them can permanently damage both sets of threads.
- Prevention: Always ensure the locking ring is perfectly straight when you begin to turn it. Spin it freely for a few turns to ensure it catches the threads smoothly without any resistance. If you feel any immediate resistance or grinding, stop, unscrew, realign, and try again. Never force the ring into place.
By understanding these common scenarios and applying these troubleshooting tips, you can maintain your meat grinder in optimal working condition and avoid unnecessary downtime.
Maintenance Tips for Your Meat Grinder’s Locking Ring and Components
Proper maintenance extends beyond just tightening; it involves regular care for all the components that interact with the locking ring. A well-maintained grinder performs better and lasts longer.
Regular Cleaning is Essential: After every use, fully disassemble your meat grinder. Wash all parts—including the locking ring, grinding plates, cutting blade, auger, and grinder head—immediately with warm, soapy water. Use a brush to thoroughly clean out any meat particles from the threads of the locking ring and the holes of the grinding plates. Dried meat residue can cause components to stick or become difficult to assemble/disassemble. Rinse thoroughly and dry all parts completely before storage to prevent rust and bacterial growth. Many parts are not dishwasher safe, so handwashing is often recommended by manufacturers.
Consider Lubrication (if applicable): For some metal grinders, especially those used infrequently or stored for extended periods, applying a thin layer of food-grade mineral oil or silicone spray to the metal components, including the locking ring threads, can prevent rust and ensure smooth operation. Always check your grinder’s instruction manual for manufacturer recommendations regarding lubrication. Avoid lubricating parts that come into direct contact with food unless the lubricant is explicitly food-safe.
Proper Storage: Store all your meat grinder components, including the locking ring, in a dry place. Keeping them organized and protected prevents damage, loss, and exposure to moisture. Consider using a dedicated storage box or wrapping smaller, delicate parts to prevent them from getting scratched or chipped. Storing the locking ring separately or loosely screwed onto the grinder head can also prevent it from seizing if there’s any temperature fluctuation or slight moisture.
By adopting these maintenance habits, you’ll ensure your locking ring and the entire meat grinder assembly remain in top condition, ready for countless batches of perfectly ground meat.
Conclusion
The locking ring on your meat grinder is a small but mighty component, a silent guardian of performance and safety. As we’ve explored, its proper tightening is not merely a suggestion but a critical practice that dictates everything from the texture of your ground meat to the longevity of your machine and your safety in the kitchen. Striking the balance between too loose and too tight is an acquired skill, one that ensures your cutting blade and grinding plate work in perfect harmony, preventing frustrating clogs and producing consistently excellent results.
By following the detailed steps for safe assembly, understanding the pitfalls of improper tightening, and committing to diligent maintenance, you empower yourself to harness the full potential of your meat grinder. Remember, a well-cared-for machine is a reliable partner in your culinary adventures. So, take the time to tighten that locking ring correctly—your perfectly ground meat will be your reward. What culinary creations are you excited to unlock with your perfectly assembled meat grinder?
Frequently Asked Questions
How often should I tighten the locking ring?
The locking ring should be tightened every time you assemble your Meat Grinder for use. It’s not a set-it-and-forget-it component. Each time you put your grinder together, ensure the ring is finger-tight to secure the internal components properly for optimal grinding performance and safety.
Can I use tools to tighten the locking ring?
Generally, no. Most manufacturers and experienced users recommend tightening the locking ring only by hand until it is snug. Using tools like wrenches or pliers can easily lead to overtightening, which risks stripping threads, cracking components, or making disassembly incredibly difficult. Only in rare cases of extreme tightness or a stuck ring should gentle leverage with a strap wrench be considered, and always with utmost caution.
What if my meat grinder is still clogging after tightening the ring?
If clogging persists despite proper locking ring tightness, several other factors might be at play. Ensure your meat is well-chilled, almost to the point of being partially frozen (around 27-32°F / -3 to 0°C), as cold meat grinds more cleanly. Also, check that your cutting blade is sharp and correctly oriented (flat side facing out) and that the grinding plate isn’t dull or damaged. Trimming excess sinew and connective tissue from the meat before grinding can also significantly reduce clogs.
What’s the best way to clean the locking ring?
The best way to clean the locking ring is to handwash it immediately after use with warm, soapy water. Use a small brush (like a bottle brush or a dedicated cleaning brush for grinder parts) to thoroughly scrub the threads and any crevices where meat particles might hide. Rinse it completely and dry it immediately and thoroughly to prevent rust and ensure smooth assembly for its next use.