For generations, falafel has been a beloved Middle Eastern street food, cherished for its crispy exterior, fluffy interior, and aromatic spices. While many home cooks turn to food processors, true falafel enthusiasts know that the secret to that authentic, craveable texture lies in an often-overlooked kitchen tool: the meat grinder. If you’re ready to elevate your homemade falafel from good to legendary, harnessing the power of a meat grinder is the game-changer you’ve been searching for. This comprehensive guide will walk you through every step, ensuring your falafel are perfectly textured and bursting with flavor.
Why a Meat Grinder is Your Falafel’s Best Friend
|
Our Picks for the Best Meat grinder in 2026
As an Amazon Associate I earn from qualifying purchases.
|
||
| Num | Product | Action |
|---|---|---|
| 1 | Meat Grinder Manual Mincer 2-in-1 Manual Meat Grinder Sausage Maker Table Mount Pork Mincer Sausage Stuffer Funnel Make Homemade Burger Patties Hand Operated Kitchen Tool FQ |

|
| 2 | CHEFFANO Electric Meat Grinder, [2000W Max] Heavy Duty Meat Mincer with 2 Blades, 3 Plates, Sausage Tube & Kubbe Kit for Home Kitchen Use |
|
| 3 | CHEFFANO Meat Grinder, 2600W Max Stainless Steel Meat Grinder Electric, ETL Approved Heavy Duty Meat Mincer Machine with 2 Blades, 3 Plates, Sausage Stuffer Tube & Kubbe Kit for Home Kitchen Use |
|
| 4 | Meat Chopper, Hamburger Grinder, Premium Heat Resistant Smasher for Ground Beef, Burger Grinder Nylon Potato Mix Tool, Meat & Poultry Tenderizers-Black |
|
| 5 | LEM Products BigBite #8 Meat Grinder, 0.50 HP Stainless Steel Electric Meat Grinder Machine, Ideal for Regular Use |
|
| 6 | Meat Grinder, Sausage Stuffer, [2800W Max] Electric Meat Mincer with Stainless Steel Blades & 3 Grinding Plates,Sausage Maker & Kubbe Kit for Home Kitchen & Commercial Using |
|
| 7 | GANIZA Food Processors, Electric Food Chopper with Meat Grinder & Vegetable Chopper - 2 Bowls (8 Cup+8 Cup) with Powerful 450W Copper Motor - Includes 2 Sets of Bi-Level Blades for Fruits/Meat/Nuts |
|
| 8 | Oaomi 3200W Max Electric Meat Grinder & Sausage Stuffer - Mincer Machine with Tool 2 Blade And 3 Plates, 3 Tubes & Kubbe Kit Tool for Home Kitchen Use(Black) |
|
| 9 | KitchenAid Stand Mixer Attachment, Food Grinder KSMMGA, Metal Food Grinder |
|
| 10 | Electric Meat Grinder, Sausage Stuffer with 3 Sausage Tubes, 2 Blades, 3 Plates, 3200W Max, Meat Grinder Heavy Duty for Home Kitchen Use, Stainless Steel (Black) |
|
Achieving the perfect falafel texture is paramount. Many falafel recipes fail to deliver that sought-after crispy crunch and light, airy crumb because they rely on food processors. While convenient, food processors often over-process the chickpeas, turning them into a paste rather than a coarse meal. This results in dense, heavy falafel that lack the characteristic light and fluffy interior.
A meat grinder, however, excels at creating the ideal consistency. It gently grinds the raw, soaked chickpeas and herbs, preserving their individual textures while blending them into a cohesive, pebbly mixture. This process allows the natural starches to bind without becoming gummy, ensuring your falafel maintain their shape during frying while developing that irresistible crispy crust and tender, airy core. Beyond texture, meat grinders offer efficiency and consistency, especially when preparing larger batches. And surprisingly, cleaning a meat grinder after processing falafel mix is often easier than cleaning it after grinding meat, as the chickpea mixture is less fatty and rinses away with ease.
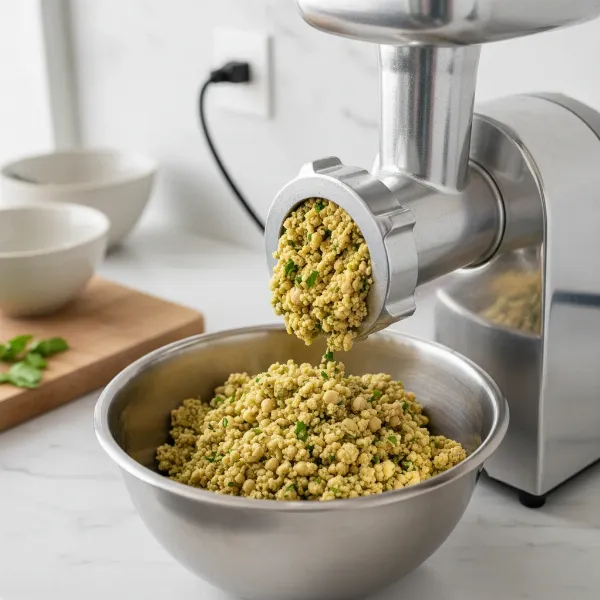 A close-up view of a meat grinder producing coarse falafel mixture, highlighting the ideal texture.
Essential Ingredients for Perfect Falafel
The foundation of exceptional falafel lies in fresh, high-quality ingredients. Here’s what you’ll need to gather:
- Dried Chickpeas (The Foundation): This is non-negotiable. Do not use canned or pre-cooked chickpeas. Canned chickpeas are too hydrated and will yield a mushy falafel that struggles to hold its shape. Dried chickpeas, when properly soaked, provide the necessary starch and drier consistency for the perfect texture.
- Aromatics:
- Onion: A medium yellow or sweet onion, roughly chopped, adds a crucial aromatic base.
- Garlic: Several cloves of fresh garlic, peeled, provide pungent depth.
- Fresh Herbs: A generous amount of fresh herbs is key to falafel’s vibrant flavor and color.
- Parsley: Flat-leaf parsley is traditional and adds a fresh, slightly peppery note.
- Cilantro: Fresh cilantro contributes a distinct, bright, and earthy flavor. Some recipes also incorporate a small amount of fresh dill or mint for additional complexity.
- Spices: These are the heart and soul of falafel, providing its signature warmth and aroma.
- Cumin: Ground cumin is a dominant spice, offering earthy, warm notes. For best flavor, toast whole cumin seeds lightly before grinding them yourself.
- Coriander: Ground coriander provides a citrusy, slightly sweet counterpoint to the cumin. Like cumin, freshly ground toasted seeds are superior.
- Salt & Black Pepper: Essential for seasoning and balancing flavors.
- Cayenne Pepper (Optional): For a touch of heat.
- Turmeric (Optional): Can add a subtle earthy flavor and a beautiful golden hue.
- Leavening:
- Baking Powder: A small amount of baking powder, added just before frying, helps the falafel achieve a lighter, fluffier internal texture. Some recipes also suggest adding a pinch of baking soda to the soaking water for the chickpeas, which can aid in softening.
“The magic of falafel happens when you respect the ingredients. Starting with dried chickpeas and fresh, vibrant herbs, then grinding them just right, is the secret to a truly authentic taste.”
Step-by-Step Guide to Grinding Falafel Mix
Mastering the grinding process with your meat grinder is crucial for perfect falafel.
Preparation is Key
- Soak the Chickpeas: Begin by thoroughly rinsing your dried chickpeas. Place them in a large bowl and cover them with at least double their volume of cold water. Add about ½ teaspoon of baking soda to the soaking water, if desired, to help tenderize them. Allow them to soak overnight, or for a minimum of 12-24 hours. The chickpeas will expand significantly and soften.
- Drain Thoroughly: This step is critical. Once soaked, drain the chickpeas very well in a colander. Shake the colander to remove as much excess water as possible. For even drier chickpeas, you can spread them on a clean kitchen towel for 15-30 minutes to air dry. Any excess moisture will make your falafel mix too wet and prone to falling apart.
- Prepare Aromatics and Herbs: While the chickpeas are drying, roughly chop your onion, peel your garlic cloves, and roughly chop your fresh parsley and cilantro. If using whole spices like cumin or coriander seeds, lightly toast them in a dry pan until fragrant, then grind them in a spice grinder or with a mortar and pestle for maximum flavor.
Assembling and Grinding the Mixture
- Combine Ingredients: In a large mixing bowl, combine the thoroughly drained chickpeas, chopped onion, garlic, and fresh herbs. Add your ground spices (cumin, coriander, salt, black pepper, cayenne, turmeric, etc.). Mix everything together well by hand.
- Set Up Your Meat Grinder: Attach your meat grinder (manual or electric) or stand mixer grinder attachment. For falafel, a medium (5mm) grinding plate is typically ideal for the first grind, providing a coarse, pebbly texture. Some experts recommend a second grind through a smaller die for ultimate fluffiness, but a single grind with a medium plate usually suffices for excellent results. Ensure all parts are securely fastened.
- Grind the Mixture: Feed the chickpea mixture through the meat grinder in small batches. Don’t overload the grinder, especially if using a smaller die. Collect the ground mixture in a clean bowl.
- Tip: If performing a second grind, transfer the once-ground mixture back through the grinder using a finer die to achieve an even lighter and fluffier consistency.
- Check the Texture: The goal is a coarse, crumbly meal, similar to fine couscous, not a smooth paste. You should still see visible flecks of herbs and chickpeas.
- Incorporate Leavening: Once all the mixture is ground, sprinkle in the baking powder. Mix it thoroughly by hand to ensure it’s evenly distributed throughout the falafel dough.
Testing Consistency
- The Squeeze Test: Take a small handful of the mixture and squeeze it firmly in your palm. It should hold together well without crumbling or being overly sticky.
- Adjusting Moisture: If the mixture feels too wet and doesn’t hold its shape, cover the bowl and refrigerate it for at least 15-30 minutes. This allows the starches to firm up and some residual moisture to be absorbed, which helps with binding. Avoid adding flour as a primary binder, as this can make the falafel dense. If it’s too dry, you can add a tiny amount of water (a teaspoon at a time) and mix thoroughly, but this is rarely needed with properly soaked and drained chickpeas.
Forming and Frying Your Falafel
With your perfectly ground falafel mix ready, it’s time for the final steps to crispy, golden falafel.
Shaping Your Falafel
- Forming Balls or Patties: You can shape the mixture into small balls (about 1.5 to 2 inches in diameter) or flattened patties. Many falafel aficionados use a specialized falafel scoop or mold, which helps create uniform shapes and a small cavity in the center, promoting even cooking. If shaping by hand, lightly wet your hands to prevent sticking. Aim for uniform size to ensure consistent cooking.
- Resting (Optional): If you have time, resting the shaped falafel in the refrigerator for another 15-30 minutes can help them firm up and hold their shape even better during frying.
Frying to Perfection
- Heat the Oil: Choose a neutral-flavored oil with a high smoke point, such as canola, vegetable, or peanut oil. Pour enough oil into a deep pot or Dutch oven to reach at least 2-3 inches. Heat the oil to between 325°F and 350°F (160°C – 175°C). Use a deep-fry thermometer to monitor the temperature; maintaining the correct temperature is crucial for crispy falafel that cooks through without burning.
- Fry the Falafel: Carefully lower a few falafel balls or patties into the hot oil, being careful not to overcrowd the pot. Frying in small batches ensures the oil temperature doesn’t drop too significantly, which can lead to greasy falafel.
- Cook Until Golden: Fry the falafel for 3-5 minutes, turning occasionally, until they are deep golden brown and crispy on all sides. The interior should be cooked through and fluffy.
- Drain: Use a slotted spoon or spider to remove the cooked falafel from the oil. Transfer them to a plate lined with paper towels to drain any excess oil.
- Serving: Serve your homemade falafel immediately while hot and crispy. They are traditionally enjoyed in pita bread with fresh vegetables (tomatoes, cucumbers, pickles), a drizzle of tahini sauce, and sometimes a spicy chili sauce. They also make a fantastic addition to salads or mezze platters.
 Golden-brown, crispy falafel served in a warm pita bread with fresh vegetables and tahini.
Troubleshooting Common Falafel Issues
Even experienced cooks can encounter challenges. Here are solutions to common falafel problems:
- Falafel Falling Apart in Oil:
- Too Much Moisture: The most common culprit. Ensure your chickpeas are very well drained after soaking.
- Over-processed Mixture: If the mix is too pasty, it lacks the structure to hold together. The meat grinder helps prevent this, but check your texture carefully.
- Oil Temperature Too Low: If the oil isn’t hot enough, falafel can absorb too much oil and disintegrate.
- Mushy or Dense Texture:
- Canned Chickpeas: As mentioned, avoid these for authentic texture.
- Over-processed Mixture: A paste-like consistency will result in dense falafel. Aim for a coarse meal.
- Too Much Flour (if added): If you tried to compensate for a wet mixture with too much flour, it can lead to a dense result.
- Lack of Flavor:
- Old Spices: Spices lose potency over time. Use fresh, aromatic spices, and consider toasting and grinding whole spices yourself.
- Insufficient Seasoning: Don’t be shy with salt and other spices. Always taste your mixture (before adding baking powder, as it changes the flavor slightly).
Conclusion
Creating authentic, restaurant-quality falafel at home is incredibly rewarding, and with a meat grinder, it’s more achievable than you might think. By starting with dried chickpeas, carefully selecting your aromatics and spices, and using the unique capabilities of a Meat Grinder, you’ll produce falafel that boasts a perfectly crispy exterior and a wonderfully fluffy, flavorful interior every time. Embrace the process, savor the aromas, and get ready to impress your taste buds. Why settle for less when you can make falafel that truly stands out? So, grab your grinder and let the falafel-making adventure begin!
Frequently Asked Questions
Can I use canned chickpeas to make falafel in a meat grinder?
No, it is strongly recommended to use dried chickpeas that have been soaked overnight. Canned chickpeas are too hydrated and will result in a mushy, dense falafel that won’t hold its shape or achieve the desired crispy texture when fried.
What is the best grinder die size for falafel?
A medium (around 5mm) grinding plate is generally ideal for the first pass, yielding a coarse, pebbly texture. Some recipes suggest a second grind through a finer die for an even lighter and fluffier result, but a single pass through a medium die often produces excellent falafel.
Can I bake or air fry falafel instead of deep frying?
While deep frying offers the most authentic crispy exterior and fluffy interior, you can bake or air fry falafel for a healthier alternative. However, the texture will be different – typically less crispy and potentially drier. If baking, brush with oil and bake at a high temperature until golden.
How long can I store falafel mix before frying?
Falafel mixture can typically be stored in an airtight container in the refrigerator for up to 2-3 days before frying. This allows the flavors to meld and the mixture to firm up slightly. For longer storage, you can freeze the shaped, uncooked falafel balls on a tray, then transfer them to a freezer bag for up to one month.