For anyone serious about food preparation, an electric meat grinder is an indispensable kitchen workhorse. From crafting homemade sausages to preparing fresh ground beef for your family, its power and efficiency save time and effort. However, like any precision appliance, your electric meat grinder relies on proper maintenance to perform at its best and last for years. One of the most overlooked yet critical aspects of this upkeep is the regular greasing of its internal gears. Neglecting this simple task can lead to premature wear, noisy operation, and even complete mechanical failure. This comprehensive guide will walk you through why greasing your meat grinder’s gears is crucial, how to choose the right lubricant, and provide a step-by-step process to ensure your appliance runs smoothly and safely.
Why Gear Greasing is Crucial for Your Electric Meat Grinder
The gears within your electric meat grinder are the heart of its powerful operation, transferring motor energy to the grinding mechanism. These components endure significant stress, friction, and heat during use. Without adequate lubrication, this constant metal-on-metal contact can quickly lead to costly problems.
Firstly, proper greasing ensures the longevity and optimal performance of your machine. Lubricant creates a protective barrier between moving parts, significantly reducing friction and preventing the premature wear of the gear teeth. This allows the gears to mesh smoothly, ensuring efficient power transfer and consistent grinding results. A well-lubricated grinder processes meat effortlessly, maintaining its initial speed and power over time.
Secondly, greasing dramatically reduces operational noise. A dry gear train will often produce a distinct grinding, squealing, or clunking sound as metal scrapes against metal. This isn’t just irritating; it’s a clear indicator of excessive wear. Fresh grease dampens these sounds, allowing your grinder to run much quieter and more smoothly.
Lastly, and perhaps most importantly for a food-contact appliance, regular maintenance, including greasing, contributes to overall machine health and prevents costly breakdowns. By preventing excessive wear, you avoid the need for expensive part replacements or, in worst-case scenarios, the complete replacement of your grinder. Using the correct food-grade grease also ensures that should any lubricant incidentally come into contact with your food, it poses no health risk.
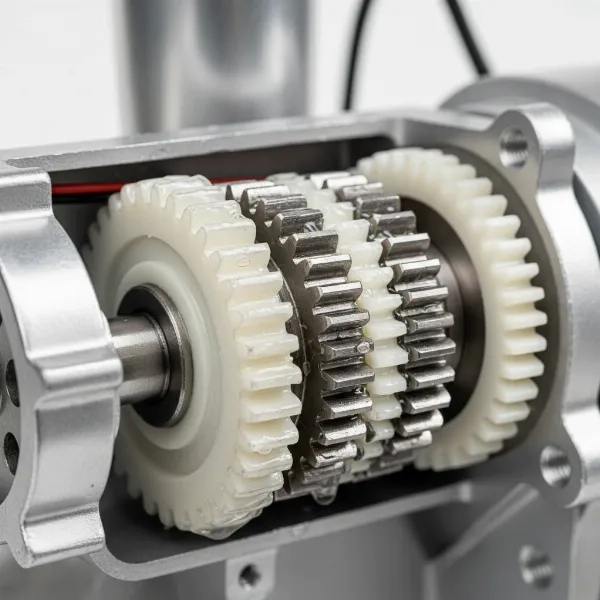 Close-up of electric meat grinder gears with fresh food-grade lubricant for smooth operation.
Identifying the Need for Greasing
Knowing when to grease your electric meat grinder’s gears is key to proactive maintenance. While manufacturer guidelines provide a baseline, often recommending lubrication every few months or after a certain number of operating hours, your grinder itself will often show signs that it’s time for attention.
The most common indicator is unusual noise. Listen for grinding, squealing, or a harsher mechanical sound than what you typically hear during operation. These sounds suggest that the gears are no longer moving smoothly, likely due to dried-out or insufficient lubrication. Increased vibration can also be a subtle warning sign.
Another noticeable symptom is reduced efficiency or stalling. If your grinder struggles to process meat that it once handled with ease, or if the motor appears to strain more than usual, it could be a sign that the internal friction in the gear mechanism is increasing. This resistance can reduce the overall power output and, in severe cases, cause the grinder to overheat and stall.
Finally, a visual inspection during routine cleaning or disassembly might reveal dry, discolored, or hardened grease within the gear housing. Old grease loses its lubricating properties over time, becoming less effective at protecting the gears. If you see very little grease, or if it looks crusty, black, or chunky, it’s definitely time for a cleaning and re-greasing. Some manufacturers, for example, suggest oiling moving parts every three months to ensure continuous peak performance.
Choosing the Right Grease: Food-Grade is Non-Negotiable
When it comes to lubricating any equipment that comes into contact with food, including your electric meat grinder, the type of lubricant you use is paramount. You absolutely must use food-grade grease. Using standard industrial grease, automotive grease, or any lubricant not specifically designated as food-safe can lead to serious health risks through accidental food contamination.
Food-grade lubricants are specially formulated to meet stringent safety standards set by organizations like the FDA (Food and Drug Administration) and NSF (National Sanitation Foundation). Look for lubricants with an NSF H-1 rating, which means they are safe for incidental food contact. These products are typically tasteless, odorless, and non-toxic.
Several types of food-grade lubricants are suitable for your meat grinder’s gears:
- Petrol-Gel Lubricant: This is a highly recommended option for many food processing machines. It’s often paraffin-based, USDA H-1 authorized, FDA approved, tasteless, and odorless, with a high melting point. Its purity and specific formulation make it ideal for metal components in contact with food.
- Food-Grade Mineral Oil: A pure form of mineral oil, safe for internal human consumption (though not recommended as a primary lubricant for high-stress gears due to its lower viscosity compared to grease). However, it is often used for general lubrication of grinder plates and knives for storage. For gears, a heavier food-grade grease is usually preferred.
- Food-Grade Silicone Grease: Pure food-grade silicone can also be an option for certain applications. It’s known for its excellent temperature stability and water resistance. While some general “food-grade silicone” might be suggested, for internal gears, a product specifically designed for gear lubrication is best.
- Specialized Food-Grade Gear Grease: Many brands offer specific food-grade greases designed for the demanding environment of commercial and home appliance gearboxes. These are often NSF H-1 certified and provide superior film strength and resistance to breakdown under heat and pressure.
What to avoid:
- Vegetable Oils (Olive, Coconut, Avocado, etc.): While edible, these oils are not suitable for long-term gear lubrication. They can oxidize, become sticky, and turn rancid over time, leading to unpleasant odors, bacterial growth, and lubrication failure. They are sometimes used for very light coating of cutting parts for rust prevention during storage, but not for internal gears.
- Standard Industrial Greases: These contain chemicals and heavy metals that are toxic and absolutely unsafe for any potential food contact.
- Petroleum Jelly (Vaseline): While sometimes mistaken for a food-safe lubricant, standard petroleum jelly is not formulated for the mechanical demands of gears and is not typically rated for incidental food contact.
Always check the product label for relevant certifications (like NSF H-1) to ensure you are using a safe and effective lubricant for your electric meat grinder.
Step-by-Step Guide: Greasing Your Electric Meat Grinder’s Gears
Greasing the gears of your electric meat grinder is a maintenance task that can significantly extend its life and improve performance. While specific disassembly steps may vary slightly between models, the general process remains consistent. Always refer to your grinder’s owner’s manual for model-specific instructions and diagrams.
1. Safety First: Prepare Your Workspace and Tools
- Unplug the grinder: This is the most crucial safety step. Never begin any maintenance or cleaning without first disconnecting the machine from its power source to prevent accidental activation.
- Clear your workspace: Ensure you have a clean, well-lit area to work in, free from clutter. Lay down an old towel or newspaper to catch any grease.
- Gather your tools: You’ll typically need screwdrivers (Phillips and/or flathead), possibly a wrench or socket set, a clean brush (non-abrasive), clean rags or paper towels, and your chosen food-grade grease. Wearing disposable gloves is also recommended for hygiene and easier cleanup.
|
Our Picks for the Best Meat grinder in 2026
As an Amazon Associate I earn from qualifying purchases.
|
||
| Num | Product | Action |
|---|---|---|
| 1 | GANIZA Food Processors, Electric Food Chopper with Meat Grinder & Vegetable Chopper - 2 Bowls (8 Cup+8 Cup) with Powerful 450W Copper Motor - Includes 2 Sets of Bi-Level Blades for Fruits/Meat/Nuts |

|
| 2 | KitchenAid Stand Mixer Attachment, Food Grinder KSMMGA, Metal Food Grinder |
|
| 3 | CHEFFANO Electric Meat Grinder, [2000W Max] Heavy Duty Meat Mincer with 2 Blades, 3 Plates, Sausage Tube & Kubbe Kit for Home Kitchen Use |
|
| 4 | Meat Grinder Manual Mincer 2-in-1 Manual Meat Grinder Sausage Maker Table Mount Pork Mincer Sausage Stuffer Funnel Make Homemade Burger Patties Hand Operated Kitchen Tool FQ |
|
| 5 | CHEFFANO Meat Grinder, 2600W Max Stainless Steel Meat Grinder Electric, ETL Approved Heavy Duty Meat Mincer Machine with 2 Blades, 3 Plates, Sausage Stuffer Tube & Kubbe Kit for Home Kitchen Use |
|
| 6 | Oaomi 3200W Max Electric Meat Grinder & Sausage Stuffer - Mincer Machine with Tool 2 Blade And 3 Plates, 3 Tubes & Kubbe Kit Tool for Home Kitchen Use(Black) |
|
| 7 | LEM Products BigBite #8 Meat Grinder, 0.50 HP Stainless Steel Electric Meat Grinder Machine, Ideal for Regular Use |
|
| 8 | Meat Grinder, Sausage Stuffer, [2800W Max] Electric Meat Mincer with Stainless Steel Blades & 3 Grinding Plates,Sausage Maker & Kubbe Kit for Home Kitchen & Commercial Using |
|
| 9 | Meat Chopper, Hamburger Grinder, Premium Heat Resistant Smasher for Ground Beef, Burger Grinder Nylon Potato Mix Tool, Meat & Poultry Tenderizers-Black |
|
| 10 | Electric Meat Grinder, Sausage Stuffer with 3 Sausage Tubes, 2 Blades, 3 Plates, 3200W Max, Meat Grinder Heavy Duty for Home Kitchen Use, Stainless Steel (Black) |
|
2. Disassembly: Accessing the Gear Housing
- Remove external attachments: Start by removing the hopper tray, grinding head assembly (including the worm gear, blade, and plates), and any other easily detachable parts. Clean these components as you normally would after use.
- Locate and open the motor housing: This is where the internal gears are housed. For many electric meat grinders, this involves removing screws from the main body casing. Take care to keep track of all screws and small parts, perhaps by placing them in a small container.
- Expose the gearbox: Once the outer casing is removed, you should see the motor and the gear housing, which is often a sealed unit. You’ll need to carefully open this gear housing. It might be held together by screws or clips. Be gentle; avoid forcing parts, as plastic components can be fragile.
3. Cleaning Out Old Grease
- Assess the old grease: Observe the condition of the existing grease. Is it thick, crusty, discolored (dark or black), or has it completely dried out? This will give you an idea of how thorough your cleaning needs to be.
- Remove old grease: Using a clean rag, paper towels, or a non-abrasive brush, carefully wipe away all the old, degraded grease from the gears, shafts, and inside the gear housing. It’s vital to remove as much of the old lubricant as possible, as mixing old, contaminated grease with new can compromise its effectiveness.
- Avoid harsh solvents: For electric meat grinders, generally avoid industrial solvents or brake parts cleaner, which are commonly used for tools like angle grinders. These chemicals are not food-safe and could damage plastic components or leave residues. For a food-contact appliance, a thorough mechanical wipe-down is best. If any food residue has made its way into the gear housing (which shouldn’t happen with proper use, but can indicate a seal issue), a food-safe degreaser might be sparingly used, followed by meticulous rinsing and drying, though for internal gears, physical removal is usually preferred.
4. Applying New Food-Grade Grease
- Apply directly to gears: Take a generous amount of your chosen food-grade grease and apply it directly to the teeth of all exposed gears. Ensure an even coating on all surfaces that will make contact.
- Lubricate bearings and shafts: Don’t forget any visible bearings or shafts within the gear housing. A thin, even layer of grease on these rotating points will also reduce friction and wear.
- Do not overfill: While it’s important to have enough grease, avoid packing the housing completely full. Excess grease can create resistance, generate heat, and potentially leak out. A good rule of thumb is to apply enough to thoroughly coat the gear teeth and fill any small cavities around them, but not to completely submerge the components.
- Distribute evenly (optional): Once the grease is applied, you can gently rotate the gears by hand (if possible) to help distribute the new lubricant evenly before reassembly.
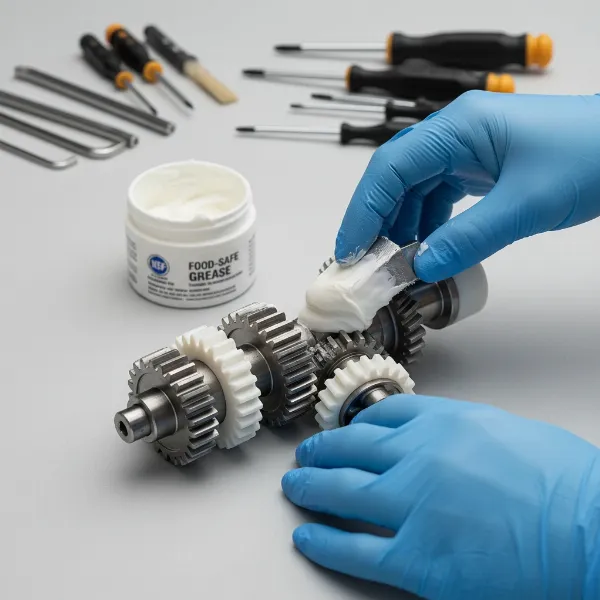 Hands applying food-grade grease to clean gears of a disassembled electric meat grinder.
5. Reassembly
- Carefully close the gear housing: Reattach the gear housing cover, ensuring all seals are properly seated. Tighten screws snugly, but avoid over-tightening, which can strip threads or crack plastic.
- Reassemble the outer casing: Put the motor housing back together, securing all screws.
- Reattach external parts: Reinstall the worm gear, blade, plates, and hopper tray. Double-check that all components are correctly aligned and securely fastened according to your manual.
6. Test Run
- Plug in and test: Once fully reassembled, plug your meat grinder back in.
- Run briefly without load: Turn the grinder on for a minute or two without any meat. Listen for smoother operation and reduced noise. This also helps further distribute the new grease.
- Perform a light grind: If everything sounds and feels normal, you can proceed with grinding as usual.
Maintenance Beyond Greasing
While greasing the gears is vital, it’s just one part of a holistic maintenance routine for your electric meat grinder. Regular, comprehensive care ensures both optimal performance and food safety.
Firstly, thorough cleaning of food contact parts after every use is non-negotiable. The FDA Food Code recommends cleaning and sanitizing meat grinders every four hours of continuous use to prevent bacterial growth. This means disassembling the grinding head (worm, blade, plates, locking ring) and washing these parts immediately with hot, soapy water, followed by a rinse and thorough drying. Ensure no moisture remains to prevent rust.
Secondly, inspect and maintain the cutting components. Regularly check the cutting blades and grinding plates for signs of dullness, nicks, or wear. A sharp blade and well-maintained plates are essential for efficient, clean cuts and prevent the grinder from struggling or jamming. Replace worn parts as needed.
Thirdly, allow for adequate cooling periods. Avoid continuous operation for excessively long durations. Many manufacturers recommend letting the machine rest for 45 minutes after about 10-15 minutes of continuous use, especially when processing large quantities of meat. This prevents the motor and internal components, including the gears, from overheating, which can degrade grease faster and shorten the machine’s lifespan.
By integrating these practices with your gear greasing schedule, you create a robust maintenance regimen that keeps your electric meat grinder operating safely, efficiently, and reliably for years to come.
Expert Tips for Optimal Performance
Maintaining your electric meat grinder goes beyond the basics; a few expert tips can ensure you get the longest life and best performance from your appliance.
“A well-lubricated gear system is the silent guardian of your meat grinder’s motor. It reduces friction, prevents premature wear, and ensures consistent power delivery, which translates directly to better grinding quality and a longer-lasting machine.” – Admin, MeatGrinderPro.com
- Don’t Overfill the Gearbox: While generous, ensure you don’t completely pack the gear housing with grease. Excess grease can create hydraulic resistance, generating heat and potentially causing seals to fail, leading to leaks. A sufficient coating on gear teeth and critical contact points is usually enough.
- Regularly Check for Leaks: After greasing and subsequent uses, occasionally inspect the exterior of the gear housing for any signs of grease leakage. A leak can indicate a compromised seal, which might allow contaminants in or lead to insufficient lubrication over time. Address leaks promptly.
- Adhere to Manufacturer’s Guidelines: Each electric meat grinder model can have unique specifications regarding maintenance, including the type of grease recommended and the frequency of lubrication. Always consult your appliance’s owner’s manual. It provides the most accurate information tailored to your specific machine.
- Store Properly: When not in use, ensure your meat grinder is stored in a clean, dry environment. Proper storage, especially after cleaning and maintenance, helps prevent rust and keeps the internal mechanisms in good condition until the next use.
Conclusion
Mastering the art of greasing your electric meat grinder’s gears is a fundamental skill for any dedicated home cook or professional. It’s a small investment of time and effort that yields significant returns in the form of extended appliance life, smoother operation, reduced noise, and consistent performance. By understanding the critical role of lubrication, choosing only NSF H-1 certified food-grade grease, and following a meticulous step-by-step process for disassembly, cleaning, and reapplication, you ensure your grinder remains a reliable and hygienic partner in the kitchen.
Regular maintenance, including internal gear care and external cleaning, not only safeguards your investment but also guarantees the quality and safety of the food you prepare. So, are you ready to give your electric meat grinder the essential care it deserves for years of flawless grinding?
Frequently Asked Questions
How often should I grease the gears of my electric meat grinder?
The frequency can vary by model and usage, but a general recommendation is every three to six months for regular home use, or more frequently for heavy commercial use. Always refer to your grinder’s owner’s manual for specific manufacturer guidelines.
Can I use any type of grease for my meat grinder’s gears?
Absolutely not. You must use NSF H-1 certified food-grade grease. Using non-food-grade lubricants can contaminate your food with toxic chemicals and is a serious health hazard. Check the product label for the H-1 rating.
What are the signs that my meat grinder’s gears need greasing?
Common signs include unusual noises like grinding, squealing, or clunking during operation, reduced grinding efficiency, or the motor struggling more than usual. A visual inspection might also reveal dry, discolored, or hardened old grease within the gear housing.
Is it difficult to disassemble an electric meat grinder to access the gears?
Disassembly varies by model, but most electric Meat Grinders are designed for maintenance. It typically involves removing the external casing and then carefully opening the gear housing. Always follow your specific model’s instruction manual to avoid damage and ensure correct reassembly.
Can I just add new grease without cleaning out the old grease?
It is strongly recommended to clean out the old grease before applying new. Old grease can degrade, collect debris, and lose its lubricating properties, compromising the effectiveness of fresh lubricant and potentially causing damage. A thorough cleaning ensures optimal performance.
How much grease should I apply to the gears?
Apply enough food-grade grease to thoroughly coat the teeth of all gears and any visible bearings or shafts within the housing. Do not overfill the housing; a generous, even coating is sufficient to ensure proper lubrication without creating excess resistance or potential leaks.
What should I do if grease leaks from my meat grinder’s gear housing?
If you notice grease leaking, it often indicates a compromised seal or that the housing was overfilled. Stop using the grinder, clean any leaked grease, and inspect the seals. You may need to replace a damaged seal or ensure you are not over-applying grease during your next maintenance.