 Ever spent hours crafting the perfect chili, only to find the texture of your meat was… well, a bit lackluster? It’s a common problem. You follow the recipe to a T, but the final result is a bit mushy, more like a meat sauce than the hearty, robust chili of your dreams. The secret often lies not in the spices, but in the grind. This brings us to a key question for any aspiring chili champion: What Is A Beaner Plate For Chili, and why is it your secret weapon? If you’ve ever felt that store-bought ground beef just doesn’t cut it, you’re about to discover why.
The Big Reveal: What Exactly is a Beaner Plate?
Let’s cut right to the chase. A “beaner plate,” sometimes called a chili plate or a chili grind plate, is simply a very coarse grinding plate for a meat grinder. It’s characterized by its large holes, typically around 10mm (3/8 inch) or even larger. The name doesn’t mean it’s for grinding beans; it’s because the resulting pieces of meat are coarse and chunky, roughly the size of a small bean.
This specific texture is the holy grail for authentic, competition-style chili. Instead of creating the fine, uniform strands you get with standard ground beef, the beaner plate produces small, distinct chunks of meat. This seemingly small difference has a massive impact on the final dish, transforming it from a simple soup into a rich, textural experience.
Why the Right Grind is a Game-Changer for Your Chili
So, why all the fuss about the size of the grind? Using a coarse grind from a beaner plate fundamentally changes your chili in a few key ways:
- Superior Texture: This is the big one. The larger meat chunks hold their shape during the long, slow simmer. They become incredibly tender without disintegrating into a grainy mush. Each spoonful offers a satisfying, meaty bite.
- Better Browning: Smaller, individual pieces of meat have more surface area, allowing them to brown beautifully. This Maillard reaction is crucial for developing deep, savory, and complex flavors that you just can’t get from steaming a block of fine ground meat.
- Enhanced Flavor Absorption: The nooks and crannies of these coarse chunks act like little sponges, soaking up all the delicious flavors of your chili seasonings, peppers, and broth.
- Fat Rendering: A home grind allows you to control the fat content perfectly. As the chili simmers, the fat from your chosen cut (like a chuck roast) renders out, infusing the entire pot with incredible richness.
Expert Tip from Chef David Wilson: “The single most important tip for a perfect grind, especially a coarse one for chili, is to keep your meat and your grinder components ice-cold. I’m talking 30 minutes in the freezer. Cold meat and fat cut cleanly instead of smearing. It makes all the difference between perfect bean-sized chunks and a frustrating, clogged-up mess.”
So, Should You Get a Meat Grinder Just for Chili?
Now you understand what is a beaner plate for chili and why it’s essential. This might lead to the next logical question: is it worth getting a whole meat grinder just for one dish? Let’s be honest, while perfect chili is a noble goal, the benefits of owning a meat grinder extend far beyond a single recipe. Once you start grinding your own meat, you’ll never look back.
Here’s why owning a meat grinder is a true kitchen upgrade:
- Unbeatable Freshness and Flavor: There is no comparison between meat you grind yourself minutes before cooking and the pre-packaged stuff that’s been sitting on a shelf. The flavor is brighter, beefier, and simply better.
- Total Control: You choose the cut of meat, you control the fat-to-lean ratio, and you decide on the texture. Want extra-lean burgers? Use sirloin. Craving juicy, flavorful meatballs? A blend of chuck and brisket is your answer.
- Improved Food Safety: When you grind meat at home, you reduce the risk of cross-contamination that can occur in large processing facilities. You know exactly what’s in your ground meat—just meat.
- Cost Savings: Grinding your own meat is often more economical. You can buy larger, cheaper cuts of meat like chuck or shoulder roasts on sale and process them yourself, saving money over buying pre-ground packages.
- Versatility: A meat grinder isn’t just for meat! As we’ll see later, it’s a versatile tool for making sausages, grinding vegetables, making breadcrumbs, and more.
|
Our Picks for the Best Meat Grinder in 2025
As an Amazon Associate, we earn from qualifying purchases.
|
||
| Num | Product | Action |
|---|---|---|
| 1 | STX International Turboforce II 4000 Electric Meat Grinder | Grinds Soft Bones | Foot Pedal | 6 Grinding Plates | Stainless Steel Blades | Sausage Tubes | Kubbe Maker | Meat Claws | Patty Press & More |

|
| 2 | MEAT! 1.5 HP Meat Grinder with 3 Stuffing Tubes, 2 Stainless Steel Grinding Plates, and a Stainless Steel Stuffing Plate for Making Ground Meat |
|
| 3 | Electric Meat Grinder, Sausage Stuffer with 3 Sausage Tubes, 2 Blades, 3 Plates, 3200W Max, Meat Grinder Heavy Duty for Home Kitchen Use, Stainless Steel (Black) |
|
| 4 | Weston Pro Series Electric Meat Grinder 7 Sausage Stuffer, Commercial Grade, 1500 Watts, 2 HP, 21lbs. Per Minute, Heavy Duty Stainless Steel (10-3201-W) |
|
| 5 | LEM Products BigBite #8 Meat Grinder, 0.50 HP Stainless Steel Electric Meat Grinder Machine, Ideal for Regular Use |
|
| 6 | VEVOR Commercial Meat Grinder, 550LB/h 1100W Electric Meat Mincer, ETL Approved Heavy Duty Industrial Meat Mincer Machine |
|
| 7 | AAOBOSI Meat Grinder Electric 3000W Max with Touch Color Screen, Auto-Reverse & Built-in Storage - 3 Speed Settings,Grinding, Sausage & Kibbe Making for Home Use, Stainless Steel |
|
| 8 | Commercial Meat Grinder #12,0.9HP Electric Meat Mincer,Heavy Duty Stainless Steel Industrial Meat Mincer w/2 Blades & Meat Pusher,Food Grinders Machine for Home Kitchen Regular Use |
|
| 9 | LEM Products BigBite #22 Meat Grinder, 1.0 HP Stainless Steel Electric Meat Grinder Machine, Ideal for Heavy Use |
|
| 10 | MEAT! 1.5 HP Meat Grinder with 3 Stuffing Tubes, 2 Stainless Steel Grinding Plates, and a Stainless Steel Stuffing Plate for Making Ground Meat |
|
Choosing Your Grinding Champion: Manual vs. Electric
When you decide to take the plunge, the first choice you’ll face is between a manual and an electric meat grinder. Neither is inherently “better”—it’s all about your needs, your kitchen space, and how often you plan to use it.
| Feature | Manual Meat Grinder | Electric Meat Grinder |
|---|---|---|
| Power Source | Your own arm strength! Clamps to a counter. | Standard electrical outlet. |
| Volume | Best for small batches (1-3 pounds). | Can handle large batches with ease. |
| Speed | Slow and steady. A good workout. | Fast and efficient. Grinds pounds in minutes. |
| Cost | Very affordable, often under $50. | Wider price range, from $100 to several hundred. |
| Best For | Beginners, small kitchens, occasional use. | Serious home cooks, hunters, bulk processors. |
| Noise Level | Quiet, just mechanical sounds. | Can be quite loud, similar to a blender. |
For someone just starting out or primarily focused on making a batch of chili or burgers once a month, a high-quality manual grinder is a fantastic and budget-friendly choice. If you envision grinding meat weekly, making your own sausage, or processing large quantities of game, investing in a powerful electric model will save you a lot of time and effort.
How to Choose the Perfect Meat Grinder for Your Kitchen
Navigating the market can be tricky. Here’s what to look for when selecting a grinder that will serve you well for years to come.
Power and Wattage (For Electric Models)
Look for a motor with at least 500-800 watts of peak power. More importantly, check the rated or running wattage, which is a better indicator of sustained performance. A strong motor will handle tougher cuts of meat and partially frozen chunks without bogging down.
Materials and Durability
- Grinding Plates and Blade: Insist on high-quality stainless steel. It’s durable, resists rust, and stays sharp. Avoid coated or mystery-metal parts that can chip or corrode.
- Body/Housing: A full metal body is the most durable, but high-impact, BPA-free plastic is also a good, lighter-weight option for many home models.
- Auger and Head: These parts do the heavy work. Stainless steel or heavy-duty cast aluminum are the best choices for longevity.
Included Accessories
A good grinder should come with a set of accessories that increases its value. Look for:
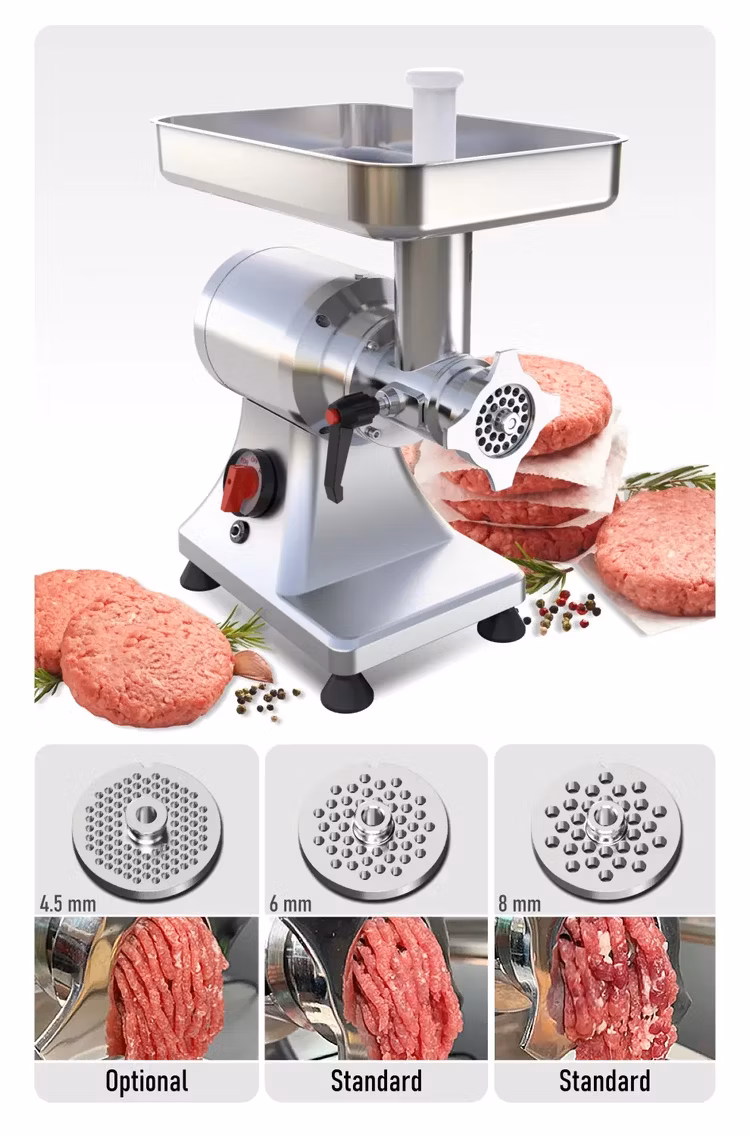
- Multiple Grinding Plates: At a minimum, you want a fine, medium, and coarse plate. For chili lovers, a very coarse “beaner plate” is a huge bonus!
- Sausage Stuffing Tubes: Even if you don’t plan to make sausage now, having the option is great.
- A Food Pusher (Stomper): This is a non-negotiable safety feature. Never use your fingers to push meat into the grinder.
Your First Grind: A Step-by-Step Guide to Using Your Meat Grinder
Ready to go? Using a meat grinder is surprisingly simple. Follow these steps for a safe and effective grind.
- Chill Everything: This is the golden rule. Place your grinder head, auger, blade, and plate in the freezer for at least 30 minutes. Cut your meat into 1-inch cubes and spread them on a baking sheet. Chill them in the freezer for about 15-20 minutes until they are firm but not frozen solid.
- Assemble Securely: Assemble the grinder according to the manufacturer’s instructions. Ensure the blade is facing the correct way (flat side out against the plate) and that the retaining ring is screwed on tightly. If it’s a manual grinder, clamp it firmly to a sturdy counter.
- Prepare Your Workspace: Place a large, chilled bowl under the grinder’s output to catch the meat. Have your meat cubes and food pusher ready to go.
- Start Grinding: Turn the machine on (or start cranking). Feed the meat cubes into the hopper a few at a time. Use only the food pusher to gently guide the meat down into the auger. Don’t force it; let the machine do the work.
- The Second Grind (Optional): For burgers or sausages, many people run the meat through the grinder a second time for a more uniform texture. For chili, one pass through the coarse beaner plate is usually perfect.
- Clean Up Immediately: Disassemble and clean your grinder as soon as you are finished. Don’t let meat particles dry on the components.
How to Clean a Meat Grinder to Keep It Lasting for Years
Proper cleaning is essential for food safety and the longevity of your machine. A clean grinder is a happy grinder.
The best way to clean a meat grinder is to first run a few slices of bread through it to push out any remaining meat and fat. Then, immediately disassemble all the parts and wash them by hand in hot, soapy water. Use a bottle brush to clean inside the head and the holes of the plates. Never put grinder parts, especially metal ones, in the dishwasher unless the manufacturer explicitly says it is safe. The harsh detergents and high heat can cause corrosion and damage. After washing, rinse thoroughly and dry every single piece completely to prevent rust before storing.
Frequently Asked Questions (FAQ)
What is the best meat grinder plate for chili?
The best plate is a coarse grinding plate, often called a “beaner plate” or “chili plate,” with holes that are 3/8 inch (about 10mm) or larger. This creates the chunky, robust texture that is ideal for authentic chili.
Can I use a food processor to grind meat for chili?
You can, but it’s not ideal. A food processor tends to chop and shred the meat rather than truly grinding it. It’s very easy to over-process the meat, resulting in a pasty, mushy texture that won’t hold up well in a long-simmering chili.
Why is my meat grinder getting clogged?
The most common reason is that the meat is too warm. Warm fat and sinew will smear and wrap around the blade and auger instead of cutting cleanly. The solution is to ensure your meat and grinder components are thoroughly chilled before you start.
What’s the best cut of beef to grind for chili?
Beef chuck is the undisputed king for chili. It has an excellent fat-to-lean ratio (around 80/20), which provides incredible flavor and tenderness. Brisket or a combination of chuck and sirloin also works wonderfully.
Can I sharpen my meat grinder blade and plates?
Yes, you can. You can have them professionally sharpened, or you can do it yourself by lapping them on a sharpening stone or fine-grit wet/dry sandpaper placed on a perfectly flat surface like a piece of glass. A sharp blade and plate are crucial for a clean cut.
Your Journey to Grinding Perfection Starts Here
Understanding what is a beaner plate for chili is more than just learning a new kitchen term; it’s the gateway to taking complete control over one of America’s most beloved dishes. It’s the first step away from mass-produced ingredients and toward a culinary craft where you dictate the freshness, quality, and texture of your food.
Owning a meat grinder empowers you to create superior burgers, perfect sausages, and of course, world-class chili. It’s an investment in flavor, quality, and a deeper connection to the food you cook. So, the next time you plan a chili night, think beyond the spice rack and consider the grind. Your taste buds will thank you.