Welcome to the heart of your kitchen’s powerhouse: the meat grinder. If you’ve ever wondered why that store-bought ground beef just doesn’t hit the spot, you’re about to discover the secret. It all starts with fresh, quality meat and a properly assembled machine. Getting the hang of How To Attach A Grinding Plate is the first, most crucial step on your journey from home cook to culinary hero. It might seem like a small detail, but this single action dictates the texture, quality, and success of your final product. Don’t worry, it’s easier than it looks, and we’re here to walk you through it, piece by piece.
First Things First: What Exactly is a Grinding Plate?
Before we get our hands dirty, let’s talk about the star of the show. Think of the grinding plate as the gatekeeper of your grinder. It’s that solid, perforated metal disc that the meat is forced through at the very end. The size of the holes in the plate determines the final texture of your grind.
- Large holes? You get a coarse, chunky grind, perfect for rustic chili or stews.
- Tiny holes? You get a fine, delicate grind, ideal for emulsified sausages like frankfurters or smooth pâtés.
Most home grinders come with at least two or three plates—typically a coarse, medium, and fine option. Understanding their role is fundamental, as choosing the right plate is just as important as knowing how to attach it correctly.
The Heart of the Matter: How to Attach a Grinding Plate
Alright, let’s get down to business. This is the moment of truth. You’ve got your grinder parts laid out, your meat is chilled and ready, but the machine is still in pieces. Follow these steps, and it’ll become second nature in no time.
- Start with the Head: Make sure the head of the grinder is securely attached to the main body (if it’s an electric model) or clamped to your counter (if it’s manual). This is your foundation.
- Insert the Auger: The auger is that long, corkscrew-shaped piece. Slide it into the grinder’s head, gear-end first. Give it a little wiggle to make sure it’s seated properly.
- Place the Blade: Now comes the cutting blade. It looks like a small, four-pronged star. This is a critical step: the flat side of the blade must face outwards, away from the motor and towards where the grinding plate will sit. It should rest snugly against the end of the auger.
- Select and Position the Grinding Plate: Pick the grinding plate with the desired hole size. Look closely at the edge of the plate; you’ll see a small notch or flat spot. This notch needs to align with the corresponding pin or indentation on the rim of the grinder’s head. This prevents the plate from spinning during operation.
- Secure the Retaining Ring: Finally, take the large ring cap and screw it onto the end of the grinder’s head, over the plate. Hand-tighten it until it’s snug. You don’t need to apply Herculean strength here—just firm and secure. Overtightening can damage the threads and make it a nightmare to remove later.
And that’s it! You’ve successfully learned how to attach a grinding plate. Your machine is now a single, cohesive unit ready to work its magic.
Meat Grinder Pro Tip: The most common mistake beginners make is putting the blade on backward. Remember this mantra: Blade, flat side out. If the curved side faces out, the machine will just smear and crush the meat instead of cutting it, leading to a mushy, unappetizing texture and potentially clogging your grinder.
Why Does Plate Orientation Matter So Much?
So, you might be thinking, “It’s just a metal disc, how important can that little notch be?” In a word: very. The notch locks the grinding plate in place, ensuring it remains stationary.
Here’s what happens if it’s not aligned: The auger turns, the blade turns, and if the plate isn’t locked, it will try to spin along with the blade. Instead of the blade shearing the meat against the sharp edges of the plate’s holes, you get a mashing and tearing action. This friction creates heat, which starts to render the fat in your meat prematurely, resulting in a greasy, pasty texture. Properly aligning the plate is the secret to a clean, professional-grade grind.
Choosing Your Weapon: Which Grinding Plate Should I Use?
Now that you know how to install any plate, which one should you choose for the job? Here’s a quick cheat sheet:
- Coarse Plate (Holes are ~1/4″ to 3/8″ or 6-10mm): This is your go-to for hearty textures. It’s perfect for the first grind of a sausage-making process, rustic chili con carne, or chunky stews where you want the meat to have a real presence.
- Medium Plate (Holes are ~3/16″ or 4.5mm): This is the workhorse for most home grinding. It produces the classic texture you expect for hamburgers, meatballs, and meatloaf. If you’re ever in doubt, the medium plate is usually a safe bet.
- Fine Plate (Holes are ~1/8″ or 3mm): This plate is for when you need a smooth, uniform texture. It’s essential for making emulsified sausages like hot dogs, bologna, or certain types of pâté. It’s also great for finely textured fillings or spreads. Many recipes call for a first pass through a medium plate, followed by a second pass through a fine plate.
Troubleshooting Common Grinding Plate Issues
Even with perfect assembly, you might run into a hiccup. Here are some common problems and how to solve them.
My Grinder is Jamming or Smearing Meat
This is the number one issue, and 99% of the time, the cause is one of three things:
- The blade is on backward. Disassemble and check. Remember: flat side out.
- Your meat and equipment are too warm. Meat grinding relies on cold temperatures to keep fat solid. Put your meat, and all the grinder parts, in the freezer for 30-45 minutes before you start.
- Your blade and plate are dull. Over time, these parts wear down. If you’ve checked the first two points and still have issues, it might be time for a replacement.
The Retaining Ring Won’t Tighten Properly
This usually means something isn’t seated correctly. Unscrew the ring and check that the grinding plate’s notch is perfectly aligned and that the plate is sitting flush against the blade and the head assembly. Don’t try to force it; you’ll risk cross-threading the ring.
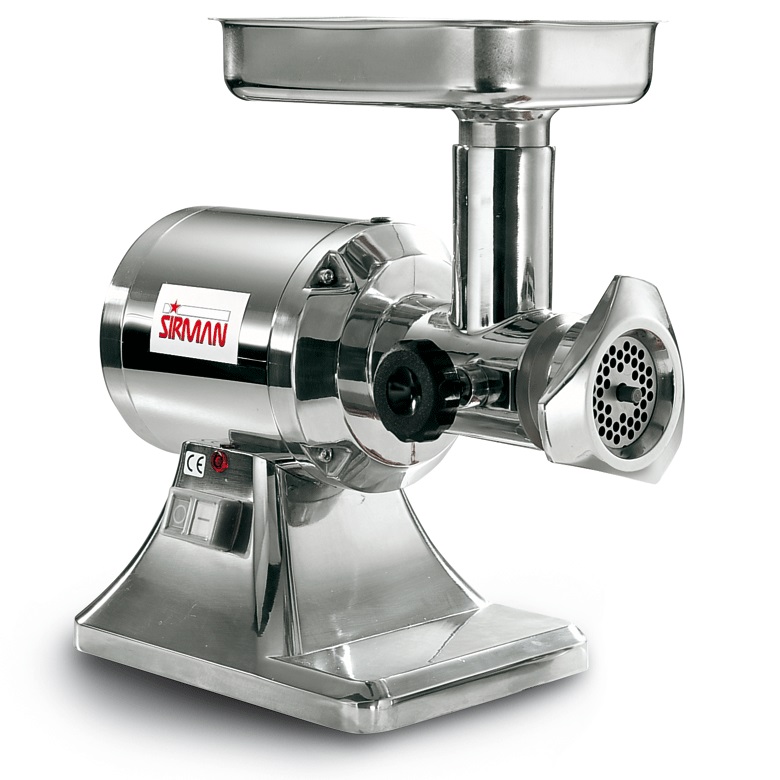
Beyond the Basics: A Quick Guide to Your Grinder’s Parts
Understanding how all the pieces fit together makes the whole process intuitive. Here’s a quick rundown:
- The Head: The main T-shaped tube that houses all the working components.
- The Hopper/Tray: The plate on top where you place the meat before pushing it into the head.
- The Auger (or Worm): The spiral screw that pulls the meat from the hopper through the head.
- The Blade: The small, X-shaped knife that does the actual cutting.
- The Grinding Plate: The perforated disc that determines the coarseness of the grind.
- The Retaining Ring: The cap that holds the blade and plate assembly tightly in place.
Keeping It Sharp: How to Care for Your Grinding Plates
Your grinding plates are precision tools. A little care goes a long way in keeping them effective and rust-free.
How do I clean my grinding plates?
Clean them immediately after use. Meat and fat residues can harden and become very difficult to remove.
- Disassemble: Carefully take apart the grinder head.
- Hand Wash: Wash the plate, blade, auger, and head in hot, soapy water. Use a bottle brush to clean inside the head and to poke out any stubborn bits of meat from the plate’s holes.
- Rinse Thoroughly: Rinse with hot water to remove all soap residue.
- Dry Immediately & Completely: This is the most important step. Carbon steel plates will rust almost instantly if left to air dry. Towel dry them thoroughly, then consider placing them in a slightly warm oven for a few minutes to evaporate any remaining moisture.
- Coat with Oil: To prevent rust, apply a light coating of food-grade mineral oil to the blade and plates before storing them.
Frequently Asked Questions (FAQ)
Q: Can I use any grinding plate with my grinder?
A: Not necessarily. Grinding plates are sized by a number system (e.g., #5, #8, #12, #22, #32) that corresponds to the size of the grinder head. You must use a plate that matches your machine’s size. Check your grinder’s manual to confirm which size you need.
Q: How tight should the retaining ring be?
A: It should be “hand-tight.” Screw it on firmly until it stops, but don’t use a wrench or excessive force. It needs to be secure enough to prevent leaks, but not so tight that it’s difficult to remove or puts stress on the components.
Q: What happens if I put the grinding plate on backward?
A: Grinding plates are designed to be used one way. While they might physically fit backward, the cutting surface won’t be flush with the blade, resulting in a poor-quality, smeared grind and potentially damaging your equipment. The flat, perforated side should always face out.
Q: Should I sharpen my grinding plate?
A: Yes, the plates and blades work as a set and should be sharpened together to maintain a perfectly flat mating surface. This is a specialized process, and it’s often more cost-effective for home users to simply replace the set when it becomes dull.
Q: How do I know which size plate I have?
A: The hole size is the primary identifier. A coarse plate will have large holes (about the diameter of a pencil), a medium plate will have smaller holes, and a fine plate will have very small holes. Some manufacturers also etch the size (e.g., 4.5mm) onto the edge of the plate.
Your Grinding Journey Starts Now
Mastering how to attach a grinding plate is your official entry into a world of incredible flavor and texture that you just can’t buy. It’s the simple mechanical step that unlocks boundless culinary potential. You’re no longer just cooking; you’re crafting. You’re controlling the fat content of your burgers, the texture of your sausage, and the freshness of every bite. Now that you have the knowledge, it’s time to put it into practice. Go on, grab your machine, and transform that beautiful cut of meat into something extraordinary.