As an experienced technician in the world of meat grinders, I understand that the key to perfectly ground meat, superior safety, and the longevity of your appliance lies in one fundamental step: proper assembly. Whether you’re a seasoned home cook or a professional in a bustling kitchen, knowing how to put your meat grinder together correctly ensures every grind is efficient and hassle-free. This comprehensive guide will walk you through each step, helping you master the art of meat grinder assembly with confidence.
Understanding Your Meat Grinder: Essential Components
Before diving into the assembly process, it’s beneficial to familiarize yourself with the core components of a typical meat grinder. While designs may vary slightly between manual and electric models, the fundamental parts remain consistent. You’ll generally find the main housing or head, which attaches to the motor unit (electric) or acts as the body (manual). Inside, the auger, a spiral-shaped component, drives the meat forward. The cutting blade, a sharp, four-pointed knife, is crucial for slicing the meat. Following the blade is the grinding plate, which comes with holes of various sizes to determine the fineness of your grind. Finally, the locking ring or collar secures all these internal parts in place at the front of the grinder head. On the exterior, you’ll have a hopper or feeding tray for the meat and a food pusher to guide it safely into the auger.
Preparation: The First Steps to a Perfect Grind
Proper preparation is paramount for both hygiene and efficiency. Neglecting this stage can lead to contaminated food or assembly issues down the line. Always start by thoroughly cleaning all parts of your meat grinder.
Before you begin assembly, it’s crucial to wash, rinse, and sanitize every component that will come into contact with food. This initial cleaning removes any manufacturing oils, dust, or residues from previous use. Allow all pieces to air dry completely to prevent rust and ensure a smooth fit. For electric meat grinders, always ensure the power cord is disconnected from the outlet before you start handling any parts. This simple safety measure prevents accidental activation during assembly. Once cleaned and dried, organize your parts on a clean surface, making them easily accessible for a streamlined assembly process.
Step-by-Step Meat Grinder Assembly Guide
Assembling your meat grinder is a straightforward process once you understand the sequence and the critical role of each part. While specific models may have minor variations, the general order remains consistent.
Assembling the Main Unit (Electric Grinders)
|
Our Picks for the Best Meat grinder in 2026
As an Amazon Associate I earn from qualifying purchases.
|
||
| Num | Product | Action |
|---|---|---|
| 1 | Meat Grinder Manual Mincer 2-in-1 Manual Meat Grinder Sausage Maker Table Mount Pork Mincer Sausage Stuffer Funnel Make Homemade Burger Patties Hand Operated Kitchen Tool FQ |

|
| 2 | LEM Products BigBite #8 Meat Grinder, 0.50 HP Stainless Steel Electric Meat Grinder Machine, Ideal for Regular Use |
|
| 3 | Meat Grinder, Sausage Stuffer, [2800W Max] Electric Meat Mincer with Stainless Steel Blades & 3 Grinding Plates,Sausage Maker & Kubbe Kit for Home Kitchen & Commercial Using |
|
| 4 | Meat Chopper, Hamburger Grinder, Premium Heat Resistant Smasher for Ground Beef, Burger Grinder Nylon Potato Mix Tool, Meat & Poultry Tenderizers-Black |
|
| 5 | KitchenAid Stand Mixer Attachment, Food Grinder KSMMGA, Metal Food Grinder |
|
| 6 | Oaomi 3200W Max Electric Meat Grinder & Sausage Stuffer - Mincer Machine with Tool 2 Blade And 3 Plates, 3 Tubes & Kubbe Kit Tool for Home Kitchen Use(Black) |
|
| 7 | GANIZA Food Processors, Electric Food Chopper with Meat Grinder & Vegetable Chopper - 2 Bowls (8 Cup+8 Cup) with Powerful 450W Copper Motor - Includes 2 Sets of Bi-Level Blades for Fruits/Meat/Nuts |
|
| 8 | CHEFFANO Electric Meat Grinder, [2000W Max] Heavy Duty Meat Mincer with 2 Blades, 3 Plates, Sausage Tube & Kubbe Kit for Home Kitchen Use |
|
| 9 | Electric Meat Grinder, Sausage Stuffer with 3 Sausage Tubes, 2 Blades, 3 Plates, 3200W Max, Meat Grinder Heavy Duty for Home Kitchen Use, Stainless Steel (Black) |
|
| 10 | CHEFFANO Meat Grinder, 2600W Max Stainless Steel Meat Grinder Electric, ETL Approved Heavy Duty Meat Mincer Machine with 2 Blades, 3 Plates, Sausage Stuffer Tube & Kubbe Kit for Home Kitchen Use |
|
For electric meat grinders, the first step often involves attaching the grinding head to the motor unit. Locate the opening on the front of your grinder’s motor housing where the grinding head will connect. Gently insert the grinding head, often with a slight twist, until it clicks into place or aligns with a locking mechanism. Many models feature a locking knob or screw on the side of the motor housing that you’ll need to tighten clockwise to secure the head firmly. Ensure it’s snug but avoid overtightening, which could damage the components. This attachment forms the robust foundation for the internal grinding parts.
Inserting the Auger (Grind Screw)
With the grinding head securely attached, or if you’re assembling a manual grinder, your next step is to insert the auger. This helical screw-like component is responsible for drawing meat from the hopper towards the cutting mechanism. Carefully slide the auger into the main housing or head, ensuring it seats properly at the back, engaging with the drive shaft of the motor (for electric models) or the crank mechanism (for manual ones). The auger should spin freely but without excessive wobbling when correctly inserted. A properly seated auger ensures consistent meat feeding and prevents blockages during operation.
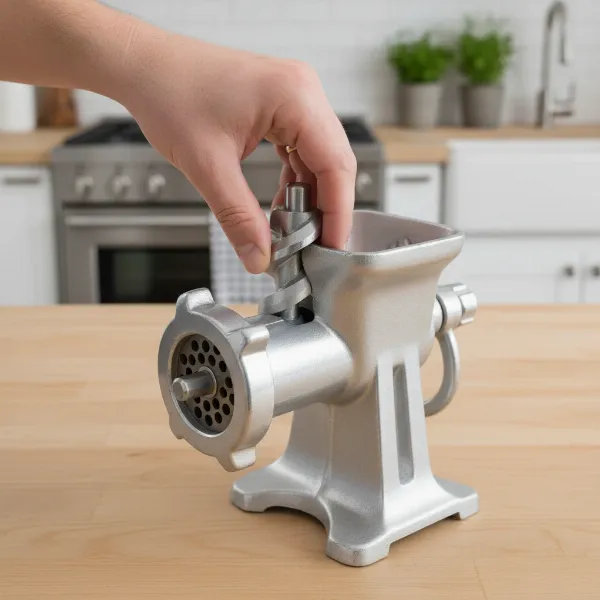 A close-up view of a hand inserting the auger (grind screw) into the main housing of a meat grinder, showing correct alignment.
The Critical Step: Installing the Cutting Blade
This is arguably the most crucial step in the entire assembly process, as an incorrectly oriented blade will result in smeared, unground meat rather than a clean cut. Take the small, four-pointed cutting blade and place it over the end of the auger’s shaft, which protrudes from the grinding head. The absolutely vital detail here is to ensure the sharp side of the blade faces outwards, towards where the grinding plate will be placed. If the blade doesn’t seem to fit perfectly or sits loosely, remove it, flip it over, and try again. The flat side of the blade should rest against the auger, allowing the sharp edges to meet the grinding plate effectively. An incorrectly installed blade is the most common reason for poor grinding performance.
> “The blade’s orientation is non-negotiable for effective grinding. Always check that the sharp edges are facing out, or you’ll end up with mush instead of ground meat.” – Chef Antoine Dubois, Culinary Equipment Specialist
Positioning the Grinding Plate
Once the cutting blade is correctly in place, select your desired grinding plate. These plates come with various hole sizes—fine, medium, or coarse—depending on your recipe needs. Carefully place the grinding plate over the cutting blade, aligning any notches or tabs on the plate with corresponding protrusions or slots on the grinder head. This alignment ensures the plate sits flush against the blade and prevents it from spinning freely during operation. A well-aligned grinding plate works in conjunction with the sharp blade to produce uniform ground meat.
Securing with the Locking Ring (Collar)
With the auger, blade, and grinding plate all nestled correctly within the head, it’s time to secure them. Take the locking ring or collar and screw it onto the threaded front of the grinding head. Turn it clockwise by hand until it is firm and snug. It’s important to tighten the locking ring enough to keep all internal components tightly compressed, preventing them from wobbling or allowing meat to bypass the grinding plate. However, avoid overtightening, as this can make disassembly difficult and potentially damage the threads or components. A hand-tightened, secure fit is generally sufficient.
Attaching the Hopper and Pusher
The final steps involve adding the external components. Place the hopper, or feeding tray, onto the top of the grinding head’s throat. This tray holds the meat before it’s fed into the grinder. The food pusher is simply a tool used to safely guide meat down into the auger without putting your hands near the moving parts. While not part of the internal grinding mechanism, these external pieces complete your meat grinder setup and ensure safe operation.
Manual Meat Grinder Specifics
For manual meat grinders, the internal assembly of the auger, blade, grinding plate, and locking ring follows the same principles as outlined above. The primary difference lies in how the unit is secured and operated. Manual grinders typically feature a clamp or suction base that needs to be firmly attached to a stable countertop or work surface. Once secured, you’ll attach the hand crank to the exposed end of the auger shaft, usually with a screw or locking pin, ensuring it’s tight and allows for smooth rotation.
Common Assembly Mistakes to Avoid
Even experienced users can occasionally make simple mistakes during meat grinder assembly that can significantly impact performance or safety. Being aware of these common pitfalls can help you avoid frustration.
The most frequent error is incorrect blade orientation. As highlighted, placing the blade with the dull side facing out will not cut the meat; it will only mash and smear it, leading to poor texture and potential clogging. Another common issue is a loose locking ring. If not tightened sufficiently, the internal components might shift, leading to inefficient grinding or even damage to the parts. Conversely, overtightening the locking ring can strip threads or make disassembly incredibly difficult. Finally, not cleaning parts beforehand, especially a new grinder, can introduce manufacturing residues into your food, while neglecting to clean after use can lead to bacterial growth and premature wear. Always take the time for proper preparation and secure, but not excessively tight, assembly.
Tips for Optimal Performance and Longevity
Correct assembly is just the beginning; a few additional practices will ensure your meat grinder performs at its best and lasts for years. Always ensure the meat you are grinding is very cold, ideally partially frozen. Cold meat grinds cleanly and efficiently, preventing smearing and reducing strain on the motor. Avoid overfilling the hopper; feed meat into the grinder at a steady, manageable pace. This prevents the motor from bogging down and ensures consistent results.
After each use, disassemble your grinder immediately and thoroughly clean all components. Meat residues can dry and become extremely difficult to remove, creating breeding grounds for bacteria. Hand washing with warm, soapy water is usually best, and always ensure parts are completely dry before storing them to prevent rust. Lubricate moving parts, particularly the auger shaft, with food-grade mineral oil periodically to ensure smooth operation and protect against corrosion.
Conclusion
Mastering the assembly of your meat grinder is an essential skill for anyone looking to produce fresh, high-quality ground meats at home or in a professional setting. By understanding each component’s role and following the straightforward steps—from thorough cleaning to the critical blade orientation—you ensure not only the longevity of your appliance but also the safety and superior texture of your culinary creations. A correctly assembled meat grinder operates efficiently, delivers consistent results, and makes the entire process of preparing your favorite dishes a true pleasure. So, take pride in your setup, and enjoy the delicious rewards of a perfectly ground meal!
What are your go-to tips for ensuring a smooth meat grinder assembly every single time?
Frequently Asked Questions
Why is my meat grinder not grinding meat effectively?
The most common reason for ineffective grinding is an incorrectly installed cutting blade. Ensure the sharp side of the blade is facing outwards, towards the grinding plate. If it’s facing backward, the meat will be smeared and crushed rather than cleanly cut.
Do all meat grinders assemble the same way?
While the fundamental principles and order of internal components (auger, blade, plate, locking ring) are largely consistent, there can be slight variations depending on the brand, model, and whether it’s a manual or electric unit. Always consult your specific model’s manual for detailed instructions.
How often should I clean my meat grinder?
You should clean your Meat Grinder immediately after every use. Meat residues can quickly dry and become a breeding ground for bacteria, and they can also be corrosive to metal parts over time. Prompt disassembly and cleaning ensure hygiene and extend the life of your appliance.
Can I put hot meat in a grinder?
No, it is strongly recommended to only grind cold, or even partially frozen, meat. Hot or room-temperature meat can smear and become mushy in the grinder, leading to poor texture and potentially clogging the machine. Cold meat grinds cleanly and efficiently.