A meat grinder is an invaluable tool for any kitchen, allowing you to create fresh, custom ground meats for everything from burgers to sausages. However, this powerful appliance comes with a critical responsibility: meticulous cleaning and sanitization. Skipping this vital step not only compromises the flavor and quality of your culinary creations but, more importantly, poses a serious risk of foodborne illness from harmful bacteria like E. coli and Salmonella. Neglecting your grinder can also lead to premature wear, rust, and ultimately, a shorter lifespan for your equipment. This comprehensive guide will walk you through every essential step to ensure your meat grinder remains spotless, hygienic, and ready for many years of safe and efficient use.
Why Proper Meat Grinder Cleaning is Crucial for Your Kitchen
|
Our Picks for the Best Meat grinder in 2026
As an Amazon Associate I earn from qualifying purchases.
|
||
| Num | Product | Action |
|---|---|---|
| 1 | CHEFFANO Meat Grinder, 2600W Max Stainless Steel Meat Grinder Electric, ETL Approved Heavy Duty Meat Mincer Machine with 2 Blades, 3 Plates, Sausage Stuffer Tube & Kubbe Kit for Home Kitchen Use |

|
| 2 | GANIZA Food Processors, Electric Food Chopper with Meat Grinder & Vegetable Chopper - 2 Bowls (8 Cup+8 Cup) with Powerful 450W Copper Motor - Includes 2 Sets of Bi-Level Blades for Fruits/Meat/Nuts |
|
| 3 | Electric Meat Grinder, Sausage Stuffer with 3 Sausage Tubes, 2 Blades, 3 Plates, 3200W Max, Meat Grinder Heavy Duty for Home Kitchen Use, Stainless Steel (Black) |
|
| 4 | CHEFFANO Electric Meat Grinder, [2000W Max] Heavy Duty Meat Mincer with 2 Blades, 3 Plates, Sausage Tube & Kubbe Kit for Home Kitchen Use |
|
| 5 | LEM Products BigBite #8 Meat Grinder, 0.50 HP Stainless Steel Electric Meat Grinder Machine, Ideal for Regular Use |
|
| 6 | Meat Chopper, Hamburger Grinder, Premium Heat Resistant Smasher for Ground Beef, Burger Grinder Nylon Potato Mix Tool, Meat & Poultry Tenderizers-Black |
|
| 7 | Meat Grinder Manual Mincer 2-in-1 Manual Meat Grinder Sausage Maker Table Mount Pork Mincer Sausage Stuffer Funnel Make Homemade Burger Patties Hand Operated Kitchen Tool FQ |
|
| 8 | KitchenAid Stand Mixer Attachment, Food Grinder KSMMGA, Metal Food Grinder |
|
| 9 | Meat Grinder, Sausage Stuffer, [2800W Max] Electric Meat Mincer with Stainless Steel Blades & 3 Grinding Plates,Sausage Maker & Kubbe Kit for Home Kitchen & Commercial Using |
|
| 10 | Oaomi 3200W Max Electric Meat Grinder & Sausage Stuffer - Mincer Machine with Tool 2 Blade And 3 Plates, 3 Tubes & Kubbe Kit Tool for Home Kitchen Use(Black) |
|
Maintaining impeccable hygiene when handling raw meat is paramount. A meat grinder, with its intricate parts and exposure to raw animal protein, can quickly become a breeding ground for bacteria if not cleaned thoroughly after each use. These microorganisms can contaminate subsequent batches of meat, leading to food poisoning. Beyond health concerns, leftover meat residue and moisture can cause corrosion on metal components, leading to rust and damaging the grinder’s functionality. Regular, proper cleaning and sanitization protect your family’s health, preserve the taste and quality of your food, and extend the life of your valuable kitchen appliance.
Step-by-Step Guide: Cleaning Your Meat Grinder
Achieving a truly clean and sanitized meat grinder involves more than just a quick rinse. Follow these detailed steps to ensure every nook and cranny is free from residue and harmful pathogens.
1. Safety First: Unplug and Prepare
Before you begin any cleaning, safety must be your top priority. Always ensure your meat grinder is unplugged from the electrical outlet. This prevents accidental activation and potential injury from the motor or sharp blades. Gather all your cleaning supplies: a stiff-bristled brush, a smaller brush (like a toothbrush or a specialized grinder brush), dish soap, a sanitizing solution, clean towels, and a basin or sink for soaking.
2. Pre-Cleaning: Clearing Out Residue
This often- overlooked step can make a significant difference in how easily you clean your grinder. After grinding meat, run a few slices of plain bread, or even starchy vegetables like potatoes, through the machine. The bread or vegetables will act as a natural scrub, pushing out remaining meat particles and absorbing excess grease, making the subsequent disassembly and washing much simpler. Discard this “pre-cleaning” material immediately.
3. Disassembly: Taking Your Grinder Apart
Carefully begin to disassemble your meat grinder. While designs vary, most grinders consist of a feeder tube, a pusher, a locking ring, a grinding head, an auger (worm gear), a blade, and a grinding plate. Refer to your manufacturer’s instructions for the specific order of disassembly for your model. Exercise extreme caution when handling the blade; it is designed to cut meat efficiently and can easily cause injury to fingers and hands. Place all detachable parts in a designated area.
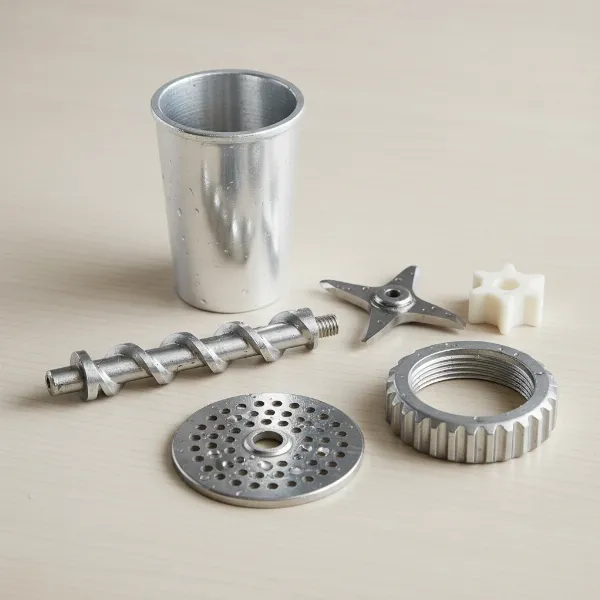 Close-up of various disassembled meat grinder parts laid out on a clean surface.
4. Washing: Soaking and Scrubbing
Once disassembled, it’s time to wash.
- Initial Rinse: Rinse all individual parts under warm running water to remove any loose meat fragments.
- Soak: Fill a large basin or sink with hot water and a generous amount of dish soap or a mild detergent. Submerge all the disassembled parts in the soapy water and let them soak for at least 15 to 20 minutes. This soaking period is crucial for loosening stubborn meat residue and grease that can cling to surfaces.
- Scrub Thoroughly: After soaking, use your stiff-bristled brush to meticulously scrub each part. Pay particular attention to the grinding plate and blade, as these areas come into direct contact with the meat and can harbor bacteria. For hard-to-reach crevices, holes in the grinding plate, or the inner curves of the auger, employ a smaller brush, like a toothbrush or a specialized grinder head cleaning brush. Avoid using abrasive cleaners or scouring pads, as these can scratch the surfaces of your grinder parts, potentially creating tiny areas where bacteria can hide or leading to rust.
- Re-soak if Needed: If any residue remains after the initial scrub, don’t hesitate to re-soak the parts and scrub them again until they are visibly clean.
5. Sanitizing: Eliminating Harmful Bacteria
While washing removes visible dirt and grease, sanitization is the critical step that kills lingering bacteria and ensures food safety.
- Choose Your Sanitizer: You can use a commercial food-safe sanitizer designed for kitchen equipment, or a simple homemade bleach solution. For a bleach solution, mix one tablespoon of unscented liquid chlorine bleach per gallon of water.
- Application: Submerge the cleaned parts in the sanitizing solution or spray them thoroughly, ensuring complete coverage of all surfaces.
- Contact Time: Allow the sanitizer to remain in contact with the parts for the recommended time (check the product label for commercial sanitizers; for a bleach solution, usually a minute or two is sufficient).
- Rinse After Sanitizing: This step is crucial, especially with bleach. Rinse all parts thoroughly under clean, running water to remove any sanitizer residue. Incomplete rinsing can leave chemical traces that are unsafe for food contact.
6. Drying: Preventing Rust and Bacterial Growth
Thorough drying is just as important as washing and sanitizing. Moisture is the enemy, as it can lead to rust on metal components and create an environment for bacteria to regrow.
- Methods: You can dry the parts with a clean, lint-free towel, but air-drying is often preferred to ensure complete moisture evaporation. Place the parts on a clean drying rack or a towel, ensuring good air circulation.
- Complete Dryness: Allow all components to air dry completely before attempting to reassemble or store the grinder. Even a tiny amount of moisture can initiate rust formation.
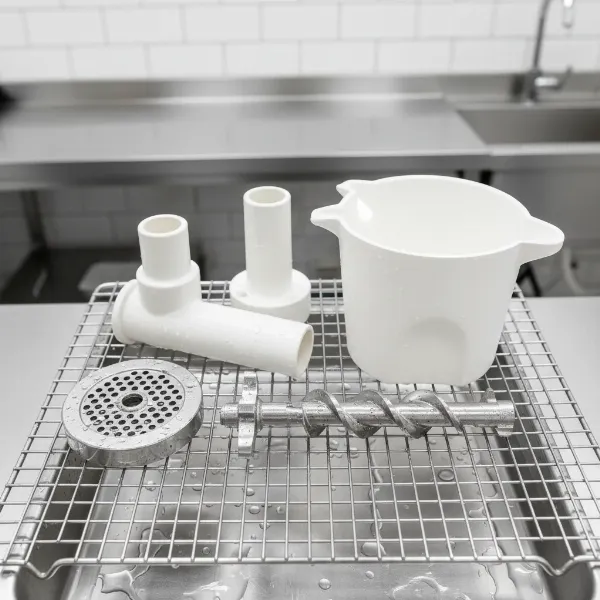 Clean meat grinder components air-drying on a rack to prevent rust and bacterial growth.
7. Cleaning the Exterior and Motor Unit
While the internal parts soak and dry, don’t forget the main motor unit.
- Wipe Down: Use a damp cloth, possibly with a little soap or sanitizer, to wipe down the exterior of the motor housing.
- Important: Never submerge the motor unit in water or spray it directly with water, as this can damage the electrical components and render your grinder unusable. Stick to wiping only the exterior surfaces.
Essential Tips for Meat Grinder Maintenance and Longevity
Beyond the regular cleaning routine, a few extra practices can significantly prolong the life and performance of your meat grinder.
- Clean Immediately After Use: The sooner you clean your grinder after use, the easier it will be. Dried meat and grease are much harder to remove.
- Lubricate Metal Parts: Before storing metal components like the blade and grinding plate, apply a thin layer of food-grade mineral oil. This creates a protective barrier that prevents oxidation and rust formation during storage.
- Proper Storage: Store all dry, reassembled parts in a clean, dry place. If possible, store parts separately to ensure good air circulation.
- Regular Inspection: Periodically inspect your grinder’s parts for any signs of wear, damage, or dullness on the blade. Replacing worn components promptly can prevent further damage to the machine and maintain optimal grinding performance.
“A well-maintained meat grinder isn’t just about prolonging its life; it’s about guaranteeing the safety and quality of every meal you prepare. Neglecting hygiene can turn a kitchen asset into a health risk.”
Frequently Asked Questions
How often should I clean my meat grinder?
You should clean and sanitize your meat grinder immediately after every use to prevent bacterial growth and make the cleaning process easier.
Can I put meat grinder parts in the dishwasher?
While some modern meat grinder parts might be labeled “dishwasher safe,” it’s generally recommended to hand wash them. High heat and harsh detergents in dishwashers can potentially damage or discolor parts, especially those made of aluminum. Always check your manufacturer’s manual.
What kind of brush is best for cleaning a meat grinder?
A stiff-bristled brush is excellent for general scrubbing, and a smaller brush (like a specialized grinder brush or a clean toothbrush) is ideal for reaching into the small holes of the grinding plate and tight crevices of the auger and head.
How can I prevent rust on my meat grinder parts?
To prevent rust, ensure all metal parts are completely dry after cleaning and sanitizing. Applying a thin coat of food-grade mineral oil before storage also provides a protective barrier against moisture and air.
Conclusion
Mastering the art of cleaning and sanitizing your meat grinder is a fundamental skill for any home cook or professional. By consistently following these detailed steps—from initial pre-cleaning and thorough washing to vital sanitization and meticulous drying—you safeguard against harmful bacteria, prevent rust, and ensure your appliance operates at its best for years to come. Making this routine a consistent part of your kitchen practice not only guarantees food safety but also preserves the quality and flavor of your freshly ground meats. How often do you make cleaning your Meat Grinder a priority in your kitchen?