There’s a unique satisfaction in sinking your teeth into a perfectly crafted smash burger – that impossibly crispy, caramelized crust yielding to a juicy, tender interior. While many factors contribute to this culinary magic, the journey begins long before the hot griddle: it starts with the beef itself. For truly transcendent smash burgers, grinding your own beef at home isn’t just a step, it’s a game-changer. It offers unparalleled control over texture, flavor, and fat content, allowing you to tailor your burger experience to perfection. Forget limp, pre-packaged patties; let’s unlock the secrets to a smash burger that sings with beefy flavor, starting from the grind.
Why Grinding Your Own Beef is a Smash Burger Game-Changer
When it comes to elevating your smash burger game, the decision to grind your own beef at home is perhaps the most impactful choice you can make. It moves beyond the limitations of pre-ground options, offering you complete mastery over every aspect of your patty.
Firstly, grinding your own beef grants you absolute control over the fat content. This is paramount for a smash burger, where the fat renders quickly on a scorching hot surface, basting the patty in its own flavorful juices and contributing to that signature crispy edge. Store-bought ground beef often comes in limited fat percentages, and you can’t be sure of the exact blend of cuts. With homemade grinding, you dictate the ratio, ensuring the ideal balance for optimal juiciness and flavor without excess grease.
Secondly, you gain the power to select specific meat blends. Instead of a generic “ground beef,” you can combine different cuts, each contributing unique nuances to the final taste and texture. This allows for experimentation and personalization, leading to a burger that truly reflects your culinary vision. You’re not just making a burger; you’re crafting a beef experience.
Finally, there’s the undeniable advantage of freshness. Beef ground moments before cooking retains more of its natural juices and vibrant flavor. The texture, too, is superior – a loose, airy grind that compacts beautifully under the smash, rather than a dense, overworked patty. This fresh texture is crucial for achieving that delicate balance between a crisp exterior and a succulent interior, making every bite an unforgettable delight.
Selecting the Perfect Beef Cuts for Unrivaled Flavor
The foundation of any exceptional smash burger lies in the quality and type of beef you choose. Not all cuts are created equal when it comes to the intense heat and swift cooking method of a smash burger.
The reigning champion, consistently lauded by chefs and burger enthusiasts alike, is chuck steak. This cut from the shoulder of the cow is a powerhouse of beefy flavor, thanks to its rich marbling and robust connective tissue. When ground, chuck provides a fantastic balance of lean meat and fat, which is essential for juicy, flavorful patties that hold up beautifully under the smash. It’s readily available, relatively inexpensive, and delivers consistently excellent results.
However, the world of beef offers more avenues for exploration if you’re looking to elevate your blend. Brisket, sourced from the cow’s lower chest, is another excellent contender. Known for its intense flavor and significant fat content, adding brisket to your grind can introduce a deeper, richer taste profile. Similarly, short rib, with its exquisite marbling and tenderness, can contribute a luxurious, buttery texture and profound beefiness.
For those aiming to craft truly bespoke smash burgers, consider creating custom blends. A common and highly recommended approach is a combination of chuck with either brisket or short rib. A 50/50 blend of chuck and brisket, for example, offers a complex flavor while maintaining an ideal fat ratio. Experimentation is encouraged – perhaps a touch of sirloin for a leaner, beefier punch or a small amount of oxtail for an even deeper, gelatinous richness. The key is to start with high-quality cuts and ensure your overall fat percentage remains within the optimal range. Visiting a local butcher can be invaluable here, as they can often provide specific cuts or even grind a custom blend for you on the spot.
The Gold Standard: Ideal Fat-to-Lean Ratio for Juiciness
Achieving the perfect smash burger isn’t just about the cut of beef; it’s crucially about the fat-to-lean ratio. This proportion dictates how juicy, flavorful, and ultimately how successful your burger will be on the griddle.
The widely accepted “gold standard” for smash burgers, and indeed most burgers, is an 80/20 ratio – 80% lean meat to 20% fat. This ratio strikes a near-perfect balance. The 20% fat content is sufficient to render down during the high-heat cooking process, creating a luscious, self-basting environment for the patty. This fat distribution is what contributes significantly to the Maillard reaction, producing that irresistible crispy, caramelized crust, while simultaneously keeping the interior incredibly juicy and tender. It prevents the burger from drying out and infuses it with rich, beefy flavor.
While 80/20 is the benchmark, some enthusiasts venture slightly higher or lower. A 70/30 ratio (70% lean, 30% fat) can result in an incredibly juicy burger, but it runs the risk of being excessively greasy. The extra fat might cause more flare-ups on a grill and could shrink the patty more significantly, overwhelming the beef flavor with richness. Conversely, going too lean, such as a 90/10 ratio (90% lean, 10% fat), is generally discouraged for smash burgers. With less fat to render, these patties tend to be drier and less flavorful, struggling to achieve that characteristic crispy crust. The unique cooking method of a smash burger relies heavily on fat to create its magic, and a lean patty simply won’t deliver the same experience.
The role of fat in a smash burger cannot be overstated. Beyond contributing flavor and juiciness, fat helps the patty hold its shape without being overly compressed. As the fat renders and coats the individual meat strands, it creates a bond that allows the burger to withstand the intense smashing pressure without crumbling, yet still maintain a delicate, loose texture when cooked. It’s the essential ingredient that transforms simple ground beef into a smash burger masterpiece.
Essential Equipment for Home Grinding Success
Embarking on the journey of grinding your own beef for smash burgers requires the right tools. While the process itself is straightforward, having the proper equipment can significantly impact the quality of your grind and your overall experience.
The most dedicated tool for the job is a stand-alone meat grinder. These come in various sizes and power levels, from compact manual models perfect for occasional use to robust electric versions capable of processing larger batches with ease. Electric grinders are generally preferred for their efficiency and consistent output, especially when dealing with fattier cuts that require swift processing to prevent smearing. Look for models with sturdy construction, easy-to-clean components, and a selection of grinding plates.
For many home cooks, a more versatile option is a stand mixer attachment. Brands like KitchenAid offer meat grinding attachments that easily connect to the power hub of their popular stand mixers. These attachments are a convenient and space-saving solution, allowing you to leverage an appliance you likely already own. They perform admirably for home-scale grinding and are a great entry point for those new to the practice.
While not ideal, a food processor can be used as an alternative for grinding beef, especially if you lack a dedicated grinder. However, it comes with significant caveats. A food processor “chops” rather than “grinds,” which can lead to a less uniform texture and a tendency to “smear” the fat, resulting in a denser, less desirable burger. If using a food processor, ensure your beef is very cold and cut into small pieces, and pulse it in short bursts to avoid over-processing. The consistency will be a bit uneven, impacting the final product, but it can work in a pinch.
When selecting a grinder, pay attention to the grinder plate sizes. These perforated discs determine the coarseness of your grind. For smash burgers, a double grind is often recommended: starting with a coarser plate (e.g., 6mm or 1/4 inch) for the first pass, followed by a finer plate (e.g., 3mm or 1/8 inch) for the second. The initial coarse grind breaks down the meat, while the second fine grind creates a more uniform, loosely packed texture that is perfect for developing that incredible crust when smashed. Using a finer plate in the second pass also helps expose more myosin, a protein that aids in patty cohesion and crust formation.
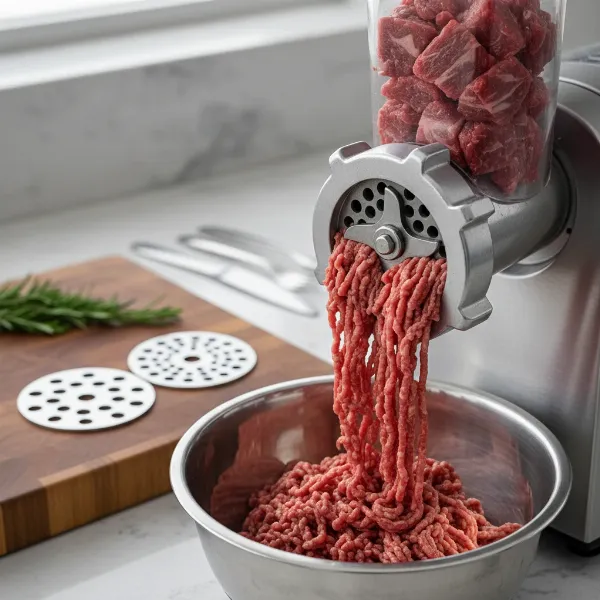 Electric meat grinder processing chilled beef cubes for smash burgers, showing coarse and fine grind plates.
Preparing Your Beef for Grinding: The Cold Truth
The secret to a clean, efficient grind that yields perfectly textured beef for smash burgers lies in one critical factor: cold. Keeping everything thoroughly chilled is not just a recommendation; it’s a fundamental rule that prevents smearing, ensures optimal texture, and even contributes to food safety.
Begin by preparing your beef. Cut your chosen cuts of beef into 1- to 2-inch cubes. This size is manageable for the grinder and ensures even chilling. Trim off any excessively large pieces of silver skin or connective tissue, as these can wrap around the grinder blade and cause blockages. Once cubed, spread the meat in a single layer on a baking sheet or large plate. Now, it’s time for a critical step: chill the meat in the freezer for about 15-30 minutes. The goal is for the beef to be firm and very cold to the touch, almost icy on the exterior, but not frozen solid. This firm texture allows the grinder to cut through the meat cleanly, rather than squishing or smearing the fat.
Equally important is chilling your grinder components. Disassemble your meat grinder attachment or stand-alone unit, paying particular attention to the auger (the spiral feed screw), the blade, and the grinding plates. Place these metal components in the freezer alongside your beef for at least 15-30 minutes, or even longer if space permits. A cold grinder ensures that as the meat passes through, the friction generated doesn’t warm the fat prematurely. If the fat warms, it becomes soft and sticky, leading to a “smeared” grind where the fat emulsifies with the lean meat, resulting in a dense, paste-like texture that renders out less effectively during cooking.
The science behind keeping it cold is simple: fat has a lower melting point than lean muscle. By keeping the meat and equipment icy cold, you maintain the fat’s solid structure, allowing it to be cleanly cut and distributed throughout the lean meat. This creates distinct pockets of fat that will render beautifully on the hot griddle, contributing to juiciness and flavor. A cold grind ensures a pebbly, airy texture, which is exactly what you want for a smash burger that develops an incredible crust without becoming tough or rubbery.
Step-by-Step: The Precision Grinding Process
With your beef perfectly chilled and your grinder components frosty, you’re ready to embark on the actual grinding process. Precision here ensures the ideal texture for your smash burgers.
First, assemble your chilled meat grinder, attaching the coarser grinding plate (typically 6mm or 1/4 inch). Place a large bowl underneath the grinder spout, preferably a metal bowl that has also been chilled. This helps maintain the meat’s cold temperature as it exits the grinder. Begin feeding the cold beef cubes into the grinder chute, using the stomper or plunger to gently guide them through. Avoid forcing the meat, allowing the auger to do its work. You’ll observe the meat emerging in distinct, coarse strands. This first grind breaks down the larger pieces and begins the mixing process of fat and lean.
Once all the beef has passed through the coarse plate, it’s time for the second grind, which is often recommended for smash burgers. For this, switch to a finer grinding plate (typically 3mm or 1/8 inch). It’s crucial to keep everything cold at this stage too. If your equipment or meat has warmed, a quick 10-15 minute return to the freezer can be beneficial. Feed the coarsely ground beef back through the grinder with the finer plate. This second pass further refines the texture, creating a more uniform, yet still loose and airy, grind. This finer consistency is excellent for smash burgers as it promotes greater surface area contact with the griddle and aids in forming that desirable crispy crust.
When grinding, be mindful of avoiding common mistakes:
- Smearing the fat: This happens if the meat or grinder is too warm, turning the fat into a paste. The result is a dense, sticky texture that will produce a greasy, rather than juicy, burger. Always prioritize cold temperatures and work swiftly.
- Overworking the meat: Once the meat is ground, resist the urge to knead, mix, or compress it excessively. Overworking develops myosin, a protein that can make the final burger tough and rubbery. The goal is a loose, tender texture, not a dense meatball.
- Adding salt too early: Never add salt to the beef before or during the grinding process. Salt is a desiccant, meaning it draws out moisture, which can prematurely dry out your beef and alter its texture, making it tougher. Seasoning should always happen just before the patties hit the hot griddle.
By following these steps, you’ll achieve a perfectly ground beef that is ready to be transformed into the ultimate smash burger.
Crafting the Perfect Patty: Post-Grind Techniques
Once your beef is expertly ground, the next stage involves transforming it into the ideal form for smashing. This process is about gentle handling and strategic preparation to preserve the delicate texture achieved through grinding.
The most crucial principle here is gentle handling: the key to tender burgers. After grinding, the beef should be loosely collected in a bowl. Avoid any vigorous kneading, pressing, or compacting. The goal is to keep the individual strands of ground beef as separate and airy as possible. Overworking the meat will develop muscle proteins, leading to a tough, dense patty – the opposite of what you want for a juicy smash burger.
Next, you’ll want to form the ground beef into loose balls. For most smash burgers, a portion size of 3 to 4 ounces (approximately 85 to 115 grams) per ball is ideal. This allows for a thin patty once smashed, maximizing the surface area for crust development. To form these balls, gently scoop the desired amount of meat and lightly roll it between your palms just enough to create a sphere. Do not compact it tightly; the balls should feel delicate and somewhat crumbly, not dense. A good trick is to imagine you’re forming a snowball, not a clay ball. The looser the ball, the easier it will smash and the more tender the final burger.
After forming, consider placing the beef balls back in the refrigerator for another 10-15 minutes, or even longer, especially if your kitchen is warm. Chilling your formed beef balls ensures they retain their shape and, more importantly, keeps the fat firm until they hit the griddle. A cold ball will smash more cleanly and efficiently, and the fat will render more effectively for that perfect crust.
Finally, a word on when to season your beef (and why it matters). As mentioned, never season your beef with salt before or during grinding. The best time to season your smash burger patties is just moments before they hit the hot griddle. Once the loose beef balls are formed and ready, liberally season the exterior with coarse sea salt and freshly cracked black pepper. Some also add garlic powder or onion powder for extra flavor. Seasoning at this late stage allows the salt to remain on the surface, where it will enhance the Maillard reaction and contribute to that irresistible savory crust, without drawing out moisture from the interior of the patty. This ensures maximum juiciness and flavor.
Mastering the Smash: From Ball to Bliss
The act of “smashing” is the signature technique that defines this burger style, transforming a simple ball of ground beef into a thin, crispy, and incredibly flavorful patty. Executing the smash correctly is key to achieving that coveted Maillard reaction.
First and foremost, high heat is non-negotiable. Your cooking surface, whether a cast-iron skillet, a flat-top griddle, or a griddle plate on your grill, needs to be screaming hot. Preheat it to a very high temperature for at least 5-10 minutes. A visual cue is often a slight shimmer or even light smoke emanating from the surface. This intense heat is what instantly sears the beef, kickstarting the Maillard reaction and forming that irresistible crust. You can add a very thin layer of high-smoke-point oil (like canola or grapeseed) or clarified butter, but often the fat from an 80/20 beef is sufficient.
Once your griddle is blazing hot, place your loosely formed, chilled beef balls directly onto the surface, leaving ample space between them. Immediately after placing them, it’s time for the smash technique. This is where a sturdy burger press or a wide, flat metal spatula comes into play. For an even cleaner smash, place a square of parchment paper over each beef ball before pressing. This prevents the beef from sticking to your press or spatula and ensures an easy release.
With conviction, firmly press straight down on each beef ball. The goal is to flatten it into a very thin patty, ideally about 1/4 inch thick, with irregular, lacy edges that will become incredibly crispy. Apply firm, even pressure for about 5-10 seconds, then release. Avoid pressing and wiggling or pushing the beef around, as this can squeeze out precious juices. Once smashed, peel back and discard the parchment paper. Immediately season the exposed side of the patty generously with salt and pepper.
The magic of the Maillard reaction truly unleashes during this stage. The extreme heat and pressure create maximum contact between the beef and the hot surface. This triggers a complex chemical reaction between amino acids and reducing sugars, leading to the formation of hundreds of new flavor compounds and the desired browning and crust. You’ll typically cook the first side for about 2-3 minutes, or until the edges are deeply browned and crispy, and you start to see juices bubbling up through the top. Then, with a sturdy spatula, scrape underneath the patty at a 45-degree angle to lift it cleanly, preserving that beautiful crust, and flip it. You can add cheese immediately after flipping to allow it to melt while the second side cooks, usually for just another 1-2 minutes.
By mastering this aggressive yet precise smash, you transform simple ground beef into a smash burger that delivers on its promise of unparalleled flavor and texture.
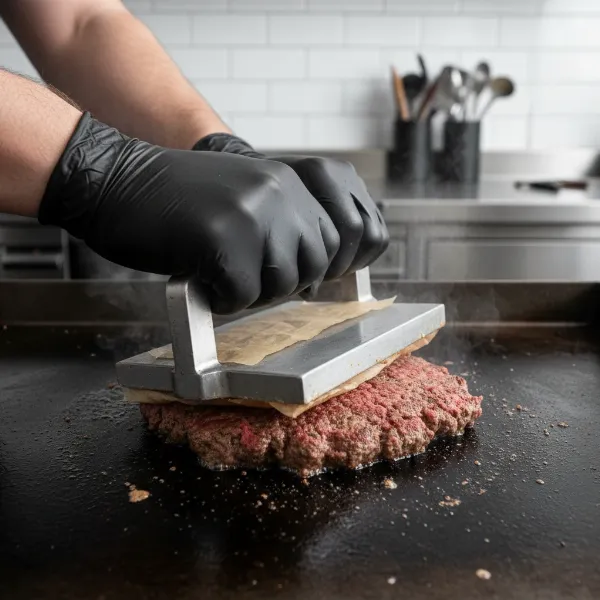 A burger press smashing a beef ball on a hot cast-iron griddle with parchment paper.
Troubleshooting Common Smash Burger Challenges
Even seasoned home cooks can encounter a few bumps on the road to smash burger perfection. Understanding common issues and their solutions can turn a potential disappointment into a learning opportunity.
One frequent challenge is burgers falling apart on the griddle. This often stems from an insufficient fat content in the beef (too lean), or the meat being overworked and too dense before smashing. Ensure you’re using an 80/20 fat-to-lean ratio and handle the ground beef gently, forming loose balls. A double grind can also help create a better structure. If you’re still experiencing crumbling, ensure your griddle is hot enough to create an immediate sear, which helps bind the patty.
Another common complaint is burgers being too greasy or too dry. A burger that is too greasy usually indicates a fat-to-lean ratio that is too high (e.g., 70/30 or higher) for personal preference, or the griddle wasn’t hot enough, allowing the fat to render slowly rather than quickly searing. Conversely, a dry burger points to a beef blend that is too lean (90/10 or higher), or the patties were pressed too thin and overcooked. The 80/20 blend cooked on a scorching hot surface for a short duration is the sweet spot for juiciness.
Uneven cooking can also be frustrating. This might happen if your griddle has hot spots, or if your patties are not uniformly thin after smashing. Ensure your griddle is evenly heated across its surface. When smashing, apply even pressure across the entire patty to create a consistent thickness. If using multiple patties, rotate them on the griddle to account for any temperature variations. Overcrowding the griddle can also drop the temperature and lead to steaming rather than searing, so cook in batches if necessary.
Sometimes, the crust isn’t as crispy as desired. This is almost always a sign that your griddle wasn’t hot enough. Don’t be afraid of high heat; that’s where the magic happens. Also, avoid flipping the burger too early; give it enough time on the first side to develop that deep, dark crust before turning. Patience for the sear is a virtue.
Lastly, some might find their homemade ground beef results in a dense, chewy texture. This is typically due to overworking the meat. Remember, once the beef is ground, handle it as little as possible. Form loose balls with a light touch, and resist the urge to knead or compact the meat. The beauty of a smash burger is its delicate, airy interior contrasting with the crispy exterior, which only comes from gently handled, freshly ground beef.
Addressing these common pitfalls will bring you closer to consistently making the perfect smash burger every time.
Conclusion
The journey to the perfect smash burger is an incredibly rewarding culinary adventure, and at its heart lies the art of grinding your own beef. By meticulously selecting the right cuts like chuck, achieving that golden 80/20 fat-to-lean ratio, and committing to the “cold is key” philosophy throughout the grinding and preparation phases, you gain unparalleled control over the flavor and texture of your patties. This hands-on approach ensures a superior, fresher product that simply can’t be replicated by store-bought ground beef.
Mastering the precise technique of the smash on a screaming hot griddle transforms these carefully prepared beef balls into thin, crispy discs of pure, beefy bliss. The resulting Maillard reaction creates an irresistible crust, while the perfectly rendered fat keeps the interior incredibly juicy. From the initial cuts to the final flip, every step contributes to a burger experience that is truly exceptional.
So, are you ready to elevate your home burger game and taste the difference that freshly ground beef can make?
Frequently Asked Questions
What’s the minimum fat content for a good smash burger?
|
Our Picks for the Best Meat grinder in 2026
As an Amazon Associate I earn from qualifying purchases.
|
||
| Num | Product | Action |
|---|---|---|
| 1 | CHEFFANO Meat Grinder, 2600W Max Stainless Steel Meat Grinder Electric, ETL Approved Heavy Duty Meat Mincer Machine with 2 Blades, 3 Plates, Sausage Stuffer Tube & Kubbe Kit for Home Kitchen Use |

|
| 2 | Oaomi 3200W Max Electric Meat Grinder & Sausage Stuffer - Mincer Machine with Tool 2 Blade And 3 Plates, 3 Tubes & Kubbe Kit Tool for Home Kitchen Use(Black) |
|
| 3 | LEM Products BigBite #8 Meat Grinder, 0.50 HP Stainless Steel Electric Meat Grinder Machine, Ideal for Regular Use |
|
| 4 | KitchenAid Stand Mixer Attachment, Food Grinder KSMMGA, Metal Food Grinder |
|
| 5 | CHEFFANO Electric Meat Grinder, [2000W Max] Heavy Duty Meat Mincer with 2 Blades, 3 Plates, Sausage Tube & Kubbe Kit for Home Kitchen Use |
|
| 6 | Meat Grinder Manual Mincer 2-in-1 Manual Meat Grinder Sausage Maker Table Mount Pork Mincer Sausage Stuffer Funnel Make Homemade Burger Patties Hand Operated Kitchen Tool FQ |
|
| 7 | GANIZA Food Processors, Electric Food Chopper with Meat Grinder & Vegetable Chopper - 2 Bowls (8 Cup+8 Cup) with Powerful 450W Copper Motor - Includes 2 Sets of Bi-Level Blades for Fruits/Meat/Nuts |
|
| 8 | Meat Chopper, Hamburger Grinder, Premium Heat Resistant Smasher for Ground Beef, Burger Grinder Nylon Potato Mix Tool, Meat & Poultry Tenderizers-Black |
|
| 9 | Meat Grinder, Sausage Stuffer, [2800W Max] Electric Meat Mincer with Stainless Steel Blades & 3 Grinding Plates,Sausage Maker & Kubbe Kit for Home Kitchen & Commercial Using |
|
| 10 | Electric Meat Grinder, Sausage Stuffer with 3 Sausage Tubes, 2 Blades, 3 Plates, 3200W Max, Meat Grinder Heavy Duty for Home Kitchen Use, Stainless Steel (Black) |
|
While 80/20 is ideal, a minimum of 15% fat is generally recommended for a smash burger to ensure enough juiciness and a good crust. Anything leaner, like 90/10, tends to produce a drier patty that struggles to achieve the signature crispy edges.
Can I use pre-ground beef for smash burgers?
Yes, you can use pre-ground beef for smash burgers, but selecting 80/20 chuck is crucial. However, grinding your own offers superior control over cuts, freshness, and prevents the dense texture often found in store-bought options, leading to a significantly better result.
How do I prevent my smash burgers from becoming dense?
Preventing density comes down to two main factors: proper grinding and minimal handling. Keep your meat and grinder very cold to prevent smearing, which creates a paste-like texture. After grinding, handle the beef as little as possible, forming loose, airy balls without compacting them.
What’s the best way to clean a meat grinder after grinding beef?
To clean a Meat Grinder, disassemble all parts immediately after use. Wash components with hot, soapy water, using a brush to remove any lingering meat particles. For stubborn bits, feed a slice of bread through the grinder before disassembling. Ensure all parts are thoroughly dried to prevent rust, especially metal plates and blades.
Is a double grind always necessary for smash burgers?
A double grind (first coarse, then fine) is highly recommended for smash burgers as it creates a more uniform, loosely packed texture that promotes better crust development and patty cohesion. While a single grind can work, a double grind generally yields a superior, more tender final product.