There’s a unique satisfaction that comes from creating something delicious with your own hands, especially when it involves fresh, flavorful homemade sausage. Stepping into the world of sausage making might seem daunting at first, but with a reliable meat grinder and this comprehensive guide, you’ll unlock a realm of culinary possibilities. Forget store-bought options filled with unknowns; imagine custom-blended meats, perfectly seasoned and tailored to your taste. This journey will demystify the process, from selecting the right cuts to stuffing your very own savory links, transforming your kitchen into a haven for artisanal charcuterie.
The Art of Homemade Sausage: Why Embark on This Flavorful Journey?
Why bother making sausage from scratch when countless varieties line grocery store shelves? The answer lies in the unparalleled control and quality you gain.
- Unrivaled Taste and Quality Control: When you make sausage at home, you dictate every ingredient. You choose fresh, high-quality meats, select your preferred fat content, and craft unique seasoning blends. This level of control results in a superior flavor and texture that mass-produced sausages simply cannot match. You avoid unwanted preservatives, fillers, and artificial flavors, ensuring a wholesome product.
- Customization and Creativity: Homemade sausage is a canvas for your culinary imagination. Whether you crave a classic Italian link, a spicy chorizo, a savory breakfast patty, or an exotic blend with unique spices and herbs, the possibilities are endless. Experiment with different meat combinations, spice ratios, and even add vegetables or cheeses to create truly bespoke sausages.
- Cost-Effectiveness: While initial equipment investment is required, making sausage in larger batches can be significantly more economical than continually purchasing specialty sausages from the store. You can take advantage of bulk meat sales and create a freezer full of delicious, ready-to-cook options.
Essential Equipment for Your Sausage Making Adventure
To successfully make homemade sausage, you’ll need a few key pieces of equipment. The right tools make the process smoother, more efficient, and ultimately more enjoyable.
The Mighty Meat Grinder
The cornerstone of homemade sausage is, undoubtedly, the meat grinder. This appliance breaks down larger cuts of meat into a consistent texture, essential for sausage making.
- Electric Meat Grinders: For most home cooks, an electric meat grinder offers the best balance of power and convenience. Look for models with sturdy construction, a powerful motor (at least 500 watts is a good starting point), and multiple grinding plates (coarse, medium, fine). A reverse function is also incredibly useful for clearing clogs. Consider grinders with a wide feed tube to minimize pre-cutting.
 A powerful electric meat grinder with various attachments for making homemade sausage.
- Stand Mixer Attachments: Many popular stand mixers offer meat grinder attachments. These can be suitable for smaller batches (around 5-10 pounds) and occasional use. However, they typically have less power and can heat up more quickly than dedicated grinders, making them less ideal for larger quantities. If using an attachment, ensure your mixer has sufficient power and always keep meat and parts well-chilled.
- Manual Meat Grinders: For the truly traditional or those making very small batches, manual grinders are an option. They require significant effort but offer precise control over the grinding speed.
|
Our Picks for the Best Meat grinder in 2026
As an Amazon Associate I earn from qualifying purchases.
|
||
| Num | Product | Action |
|---|---|---|
| 1 | Electric Meat Grinder, Sausage Stuffer with 3 Sausage Tubes, 2 Blades, 3 Plates, 3200W Max, Meat Grinder Heavy Duty for Home Kitchen Use, Stainless Steel (Black) |

|
| 2 | Oaomi 3200W Max Electric Meat Grinder & Sausage Stuffer - Mincer Machine with Tool 2 Blade And 3 Plates, 3 Tubes & Kubbe Kit Tool for Home Kitchen Use(Black) |
|
| 3 | CHEFFANO Electric Meat Grinder, [2000W Max] Heavy Duty Meat Mincer with 2 Blades, 3 Plates, Sausage Tube & Kubbe Kit for Home Kitchen Use |
|
| 4 | Meat Grinder Manual Mincer 2-in-1 Manual Meat Grinder Sausage Maker Table Mount Pork Mincer Sausage Stuffer Funnel Make Homemade Burger Patties Hand Operated Kitchen Tool FQ |
|
| 5 | CHEFFANO Meat Grinder, 2600W Max Stainless Steel Meat Grinder Electric, ETL Approved Heavy Duty Meat Mincer Machine with 2 Blades, 3 Plates, Sausage Stuffer Tube & Kubbe Kit for Home Kitchen Use |
|
| 6 | GANIZA Food Processors, Electric Food Chopper with Meat Grinder & Vegetable Chopper - 2 Bowls (8 Cup+8 Cup) with Powerful 450W Copper Motor - Includes 2 Sets of Bi-Level Blades for Fruits/Meat/Nuts |
|
| 7 | LEM Products BigBite #8 Meat Grinder, 0.50 HP Stainless Steel Electric Meat Grinder Machine, Ideal for Regular Use |
|
| 8 | Meat Grinder, Sausage Stuffer, [2800W Max] Electric Meat Mincer with Stainless Steel Blades & 3 Grinding Plates,Sausage Maker & Kubbe Kit for Home Kitchen & Commercial Using |
|
| 9 | KitchenAid Stand Mixer Attachment, Food Grinder KSMMGA, Metal Food Grinder |
|
| 10 | Meat Chopper, Hamburger Grinder, Premium Heat Resistant Smasher for Ground Beef, Burger Grinder Nylon Potato Mix Tool, Meat & Poultry Tenderizers-Black |
|
The Indispensable Sausage Stuffer
While many meat grinders come with sausage stuffing attachments (often just a horn or funnel), a dedicated sausage stuffer is a game-changer for consistently filled links without frustration.
- Dedicated Sausage Stuffers: These are typically vertical or horizontal cylinders with a hand-cranked plunger that pushes meat evenly into casings. They prevent the meat from getting overworked and warm, which can happen when using a grinder’s stuffing attachment. Look for models with multiple stuffing tube sizes to accommodate various casing diameters.
- Stuffer Attachments (from grinders): If you’re just starting, the funnel that comes with your meat grinder can work for small quantities. Be mindful of meat temperature, as forcing meat through a grinder’s auger for stuffing can generate heat.
Choosing the Right Casings
Casings hold your ground meat mixture together, giving sausage its characteristic shape and “snap.”
- Natural Casings: Derived from the intestines of pigs, sheep, or cattle, natural casings offer a traditional “snap” and are permeable, allowing smoke and flavors to penetrate. Hog casings are excellent for Italian sausage and bratwurst, while sheep casings are ideal for thinner breakfast links. They come packed in salt and require rinsing and soaking before use.
- Collagen Casings: Made from beef or pork collagen, these are uniform in size and easy to use, often requiring no pre-soaking. They are a good choice for beginners or those seeking consistent product size. However, they lack the characteristic “snap” of natural casings.
Other Essential Tools
- Large Mixing Bowls: For chilling and seasoning your meat.
- Sharp Knives: For prepping your meat into appropriate sizes for grinding.
- Kitchen Scale: Crucial for accurately measuring ingredients, especially salt and spices, for consistent flavor.
- Meat Thermometer: To monitor meat temperature throughout the process.
- Sausage Pricker (or Needle): For removing air pockets from stuffed sausages.
Crafting Your Flavor Profile: Ingredients for Perfect Homemade Sausage
The quality of your ingredients directly impacts the final taste of your homemade sausage. Careful selection of meat, seasonings, and liquids is paramount.
Selecting Your Meat: The Fat-to-Lean Ratio
The ideal sausage blend typically includes a balance of lean meat and fat. Fat is crucial for moisture, flavor, and preventing a dry, crumbly texture.
- Pork: Pork shoulder (also known as pork butt or Boston butt) is the go-to choice for many homemade sausages. It has an excellent meat-to-fat ratio, usually around 70-80% lean to 20-30% fat, which is perfect for juicy sausages. If your cut is too lean, you can add additional pork fatback.
- Beef: Cuts like beef chuck offer good flavor and fat content. For leaner beef, consider adding beef fat or pork fat.
- Poultry & Game: Chicken, turkey, venison, or other game meats can be used, but they are often much leaner. To achieve a good texture and moisture, you’ll almost always need to add extra pork fat (around 25-30% of the total meat weight) when using these leaner options. A common recommendation for a juicy, flavorful sausage is approximately 75% lean meat to 25% fat.
The Heart of Flavor: Seasoning and Spices
This is where your creativity truly shines! Basic sausage often includes salt, black pepper, and garlic, but countless variations exist.
- Salt: Essential for flavor and preservation. Measure accurately by weight. A general rule of thumb is 1.5-2% salt by weight of the total meat mixture.
- Herbs & Spices: Common additions include fennel seed (for Italian sausage), sage (for breakfast sausage), paprika, red pepper flakes, coriander, thyme, nutmeg, and cayenne. Fresh herbs can also add vibrant flavor.
- Aromatics: Fresh minced garlic and onion are frequent additions.
- Sugar: A touch of sugar (like brown sugar) can balance flavors, especially in breakfast sausages.
The Role of Liquids
A small amount of liquid helps bind the meat mixture, keeps it moist, and can infuse additional flavor.
- Ice Water: The most common liquid, keeping the meat cold during mixing.
- Wine or Beer: Adds depth and complexity to certain sausage styles.
- Broth: Can be used to enhance flavor.
Step-by-Step: Making Homemade Sausage with Your Meat Grinder
Now for the hands-on part! Follow these steps for delicious homemade sausage.
1. Preparation: Chill Everything Down
Temperature control is perhaps the most critical factor in successful sausage making. Cold meat grinds cleanly, preventing fat from smearing and creating an unappetizing, pasty texture.
- Chill Your Meat: Cut your chosen meat and fat into 1-inch to 2-inch cubes or strips that will fit easily into your grinder’s feed tube. Place the cut meat on a sheet tray and put it in the freezer for 30-60 minutes, or until it is very cold and slightly firm but not frozen solid (around 30-32°F / -1°C to 0°C).
- Chill Your Equipment: Disassemble your meat grinder head (auger, blade, grinding plate, and collar). Place these parts, along with your mixing bowls, in the freezer for at least 30 minutes, or even longer for a powerful electric grinder. The colder your equipment, the better your grind.
2. Grinding the Meat
Assemble your chilled meat grinder, ensuring the blade is facing correctly against the grinding plate. Place a large, chilled bowl underneath to catch the ground meat.
- First Grind (Coarse): Start with a coarse grinding plate (e.g., 6mm or 1/4 inch). Feed the cold meat through the grinder, using the stomper only as needed to gently push the meat down. Avoid forcing it. The goal is a clean, distinct grind with visible pieces of fat. Work in small batches, returning any ground meat or unground meat to the freezer if it starts to warm up.
- Second Grind (Optional, Finer Texture): For a finer textured sausage, re-chill the coarsely ground meat and the grinder parts, then pass the meat through a smaller grinding plate (e.g., 4.5mm or 3/16 inch). This is common for breakfast sausage or hot dogs. For a rustic sausage like Italian, a single coarse grind might be preferred.
3. Mixing and Seasoning: Developing the Bind
This step is crucial for flavor distribution and creating the proper “bind” – where the proteins develop a sticky texture that holds the sausage together and prevents crumbling.
- Add Seasonings: Transfer the ground meat to a large, chilled mixing bowl. Add all your pre-measured seasonings, spices, and any liquids (like ice water, wine, or beer).
- Mix Thoroughly: Using clean, cold hands or a stand mixer with a paddle attachment on low speed, mix the meat vigorously. The key is to mix until the proteins become tacky and sticky. You’ll notice the meat transforming from loose crumbles to a cohesive mass that clings to your hand when you lift it. This typically takes 3-5 minutes by hand or 2-3 minutes in a mixer. Avoid overmixing, which can lead to a tough texture.
- Test the Flavor: Before stuffing, take a small patty of the seasoned meat mixture (about 1 tablespoon), fry it in a skillet until cooked through, and taste. Adjust seasonings as needed. This is your last chance to tweak the flavor!
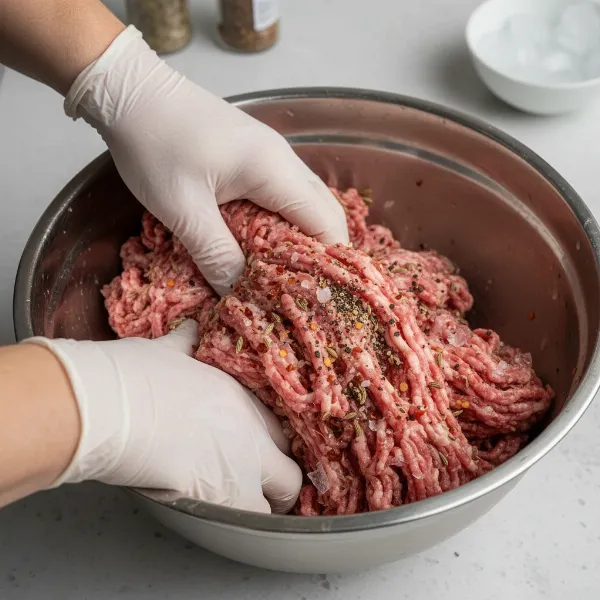 Hands mixing ground meat with spices in a cold bowl, creating homemade sausage mixture.
4. Preparing and Stuffing the Casings
Re-chill your mixed meat, and gather your prepared casings and stuffer.
- Prepare Casings: If using natural casings, rinse them thoroughly to remove excess salt, then soak them in cool water for at least 30 minutes (or overnight in the refrigerator for best results). You can add a teaspoon of baking soda to the soaking water to help lubricate them. If using collagen casings, follow package instructions (often no soaking is required).
- Assemble Stuffer: Attach the appropriate size stuffing horn to your meat grinder’s stuffer attachment or your dedicated sausage stuffer.
- Load Casings: Carefully gather a length of casing onto the stuffing horn, leaving about 4-6 inches dangling off the end.
- Stuffing: Feed the chilled, mixed meat into the stuffer. As the meat pushes through the horn, gently guide the casing, allowing it to fill evenly. The goal is to fill the casing firmly but not overly tight – it should feel plump but still have a little give. Overstuffed casings can burst during linking or cooking. Work slowly and steadily.
- Remove Air Pockets: If you notice any air pockets forming in the stuffed sausage, use a sausage pricker or a sterilized needle to gently prick the casing and release the trapped air. This prevents unsightly gaps and ensures even cooking.
- Linking: Once the casing is filled, tie off the open end. Now, you can twist the long sausage into individual links of your desired length. Pinch and twist the sausage every 4-6 inches, alternating the direction of your twists to create stable links.
5. Resting, Storage, and Cooking
After all your hard work, a little patience goes a long way.
- Resting: Place the finished sausage links on a tray in the refrigerator, uncovered, for at least 12-24 hours. This allows the flavors to meld and deepen, and the casings to dry slightly, resulting in a better texture when cooked.
- Storage: Fresh sausages can be stored in the refrigerator for 2-3 days. For longer storage, freeze them. You can freeze individual links on a sheet pan until solid, then transfer them to freezer bags, or vacuum seal them for best quality.
- Cooking: Cook your homemade sausages slowly over medium heat until cooked through and nicely browned. Avoid cooking on high heat, which can cause the casings to burst and the fat to render out too quickly, leading to dry sausage.
Troubleshooting and Tips for Sausage Making Success
Even experienced sausage makers encounter occasional challenges. Here are some tips to help you achieve perfect results every time.
- Always Work Cold: This cannot be stressed enough. Keeping your meat and equipment as cold as possible (ideally near freezing) is the most crucial factor in preventing fat smear, ensuring a clean grind, and maintaining the proper texture. “Heat is the enemy to making sausage,” as many experts attest.
- Sanitation is Key: Ground meat has a larger surface area than whole cuts, making it more susceptible to bacterial growth. Keep all your work surfaces, hands, and equipment meticulously clean and sanitized. Wash everything immediately after use.
- Test Your Seasoning: The “fry-and-taste” method is indispensable. It allows you to adjust your salt and spice levels before committing to an entire batch, saving you from bland or over-seasoned sausage.
- Avoid Overstuffing: A sausage that’s too tight is prone to bursting. Aim for a plump but yielding texture. If you accidentally overstuff, you can cook it as a coil rather than individual links to reduce pressure.
- Don’t Overmix: Mixing until tacky is good; overmixing can break down the meat too much, resulting in a rubbery texture.
- Invest in a Dedicated Stuffer: While a grinder attachment can work, a dedicated stuffer offers far better control, reduces heat transfer to the meat, and makes the stuffing process much easier and more consistent.
- Proper Grinder Care: After each use, thoroughly disassemble, clean, and dry all meat grinder parts. Many parts are not dishwasher safe and should be hand-washed. Keeping your blades sharp and plates clean ensures efficient grinding and prevents rust.
“The secret to great homemade sausage isn’t just a perfect recipe; it’s understanding the science of cold and bind. Master those, and you’ll master the craft.”
Conclusion
Making homemade sausage with a meat grinder is a rewarding culinary endeavor that brings unparalleled freshness, flavor, and customization to your table. From selecting your ingredients to the final twist of the casing, each step allows you to craft a product perfectly suited to your palate. By prioritizing cold temperatures, proper seasoning, and careful technique, you’ll overcome initial hurdles and soon be churning out delicious, bespoke sausages that will impress family and friends alike. So, gather your gear, chill your meat, and get ready to transform simple ingredients into extraordinary meals. What delicious sausage creation will you embark on first?
Frequently Asked Questions
What is the ideal meat-to-fat ratio for homemade sausage?
For most juicy and flavorful sausages, aim for a ratio of approximately 75% lean meat to 25% fat. This balance ensures moisture, richness, and a pleasing texture, preventing the sausage from becoming dry or crumbly.
Why is it important to keep meat and grinder parts cold?
Keeping meat and grinder components chilled (ideally near freezing) is crucial to prevent fat from smearing. Warm fat will melt and smear, resulting in a pasty texture and making the grinder less efficient. Cold ingredients ensure a clean, distinct grind and proper texture.
Can I use a stand mixer attachment for making sausage?
Yes, a stand mixer with a grinder attachment can be used, especially for smaller batches (under 10 pounds). However, dedicated Meat Grinders or stuffers are generally more efficient, powerful, and better at maintaining cold temperatures for larger volumes or frequent use.
How do I know when my sausage mixture is mixed enough?
The meat mixture is properly mixed when it becomes tacky and sticky. You should be able to grab a small handful and turn your hand upside down; if the meat sticks, it has achieved the necessary protein bind to hold its shape.
What are the best types of casings for beginners?
Collagen casings are often recommended for beginners due to their uniformity and ease of use, as they typically don’t require pre-soaking. However, for a traditional “snap,” natural hog casings are excellent once you get the hang of preparing them.
What should I do if I get air pockets in my stuffed sausage?
If you notice air pockets after stuffing, use a sausage pricker or a thin, sterilized needle to gently prick the casing at the air pocket’s location. This releases the trapped air, ensuring the meat adheres properly to the casing and prevents gaps.
How long should homemade sausage rest before cooking or freezing?
It’s recommended to let homemade sausage rest in the refrigerator, uncovered, for at least 12-24 hours. This allows the flavors to fully develop and the casings to dry slightly, improving the texture when cooked.