Stepping into the world of homemade charcuterie is a deeply rewarding experience, and among the finest culinary achievements is crafting your own salami. Imagine a perfectly marbled, deeply flavored sausage, cured to perfection – it’s a true testament to patience and skill. However, the journey to a flawless homemade salami begins long before curing, with a crucial step often underestimated: the grinding of your meat. As someone who has spent over a decade immersed in meat grinding technology, I can tell you that understanding your meat grinder and mastering grinding techniques are the bedrock of exceptional salami. This comprehensive guide will walk you through every aspect, from selecting the right equipment to advanced grinding tips, ensuring your homemade salami is nothing short of spectacular.
Understanding the Art of Salami Making
|
Our Picks for the Best Meat grinder in 2026
As an Amazon Associate I earn from qualifying purchases.
|
||
| Num | Product | Action |
|---|---|---|
| 1 | Meat Grinder, Sausage Stuffer, [2800W Max] Electric Meat Mincer with Stainless Steel Blades & 3 Grinding Plates,Sausage Maker & Kubbe Kit for Home Kitchen & Commercial Using |
![Check Meat Grinder, Sausage Stuffer, [2800W Max] Electric Meat Mincer with Stainless Steel Blades & 3 Grinding Plates,Sausage Maker & Kubbe Kit for Home Kitchen & Commercial Using on Amazon](https://meatgrinderpro.com/wp-content/plugins/amazon-tables/assets/images/buy.png)
|
| 2 | KitchenAid Stand Mixer Attachment, Food Grinder KSMMGA, Metal Food Grinder |
|
| 3 | GANIZA Food Processors, Electric Food Chopper with Meat Grinder & Vegetable Chopper - 2 Bowls (8 Cup+8 Cup) with Powerful 450W Copper Motor - Includes 2 Sets of Bi-Level Blades for Fruits/Meat/Nuts |
|
| 4 | LEM Products BigBite #8 Meat Grinder, 0.50 HP Stainless Steel Electric Meat Grinder Machine, Ideal for Regular Use |
|
| 5 | Meat Chopper, Hamburger Grinder, Premium Heat Resistant Smasher for Ground Beef, Burger Grinder Nylon Potato Mix Tool, Meat & Poultry Tenderizers-Black |
|
| 6 | Electric Meat Grinder, Sausage Stuffer with 3 Sausage Tubes, 2 Blades, 3 Plates, 3200W Max, Meat Grinder Heavy Duty for Home Kitchen Use, Stainless Steel (Black) |
|
| 7 | Meat Grinder Manual Mincer 2-in-1 Manual Meat Grinder Sausage Maker Table Mount Pork Mincer Sausage Stuffer Funnel Make Homemade Burger Patties Hand Operated Kitchen Tool FQ |
|
| 8 | CHEFFANO Meat Grinder, 2600W Max Stainless Steel Meat Grinder Electric, ETL Approved Heavy Duty Meat Mincer Machine with 2 Blades, 3 Plates, Sausage Stuffer Tube & Kubbe Kit for Home Kitchen Use |
|
| 9 | Oaomi 3200W Max Electric Meat Grinder & Sausage Stuffer - Mincer Machine with Tool 2 Blade And 3 Plates, 3 Tubes & Kubbe Kit Tool for Home Kitchen Use(Black) |
|
| 10 | CHEFFANO Electric Meat Grinder, [2000W Max] Heavy Duty Meat Mincer with 2 Blades, 3 Plates, Sausage Tube & Kubbe Kit for Home Kitchen Use |
|
Salami is more than just ground meat in a casing; it’s a dry-cured sausage that undergoes a complex transformation involving fermentation and drying. This process relies on a delicate balance of high-quality meat, appropriate fat content, carefully selected spices, and beneficial starter cultures. The result is a product with a unique texture, aroma, and flavor profile. Precision at each stage, especially during the initial grinding, is paramount to achieving that characteristic salami bite and appearance. Any misstep here can compromise the final texture, binding, and even the safety of your cured masterpiece.
Essential Equipment for Homemade Salami
To embark on your salami-making adventure, having the right tools is non-negotiable. While some home cooks might attempt shortcuts, investing in quality equipment tailored for the task will significantly elevate your results and ensure food safety.
Meat Grinders
The heart of your salami operation is undoubtedly the meat grinder. It’s responsible for transforming chunks of meat and fat into the desired consistency.
- Manual Meat Grinders: These hand-cranked devices are affordable and perfect for very small batches or occasional use. They require significant effort but offer precise control over speed. However, for larger salami batches, they can be slow and labor-intensive.
- Electric Meat Grinders (Domestic): Ideal for most home enthusiasts, these grinders offer varying levels of power (typically 500-1200 watts). They process meat much faster than manual models and often come with multiple grinding plates. Brands like Sunmile and Cuisinart offer reliable options for regular home use.
- Electric Meat Grinders (Heavy-Duty/Commercial-Grade): For serious hobbyists or those processing large quantities (e.g., 10-15 lbs or more per batch), a heavy-duty electric grinder (1 horsepower or higher) is a wise investment. These robust machines from brands like STX International and LEM are designed for speed, efficiency, and durability, preventing overheating and ensuring a consistent grind even with tougher cuts.
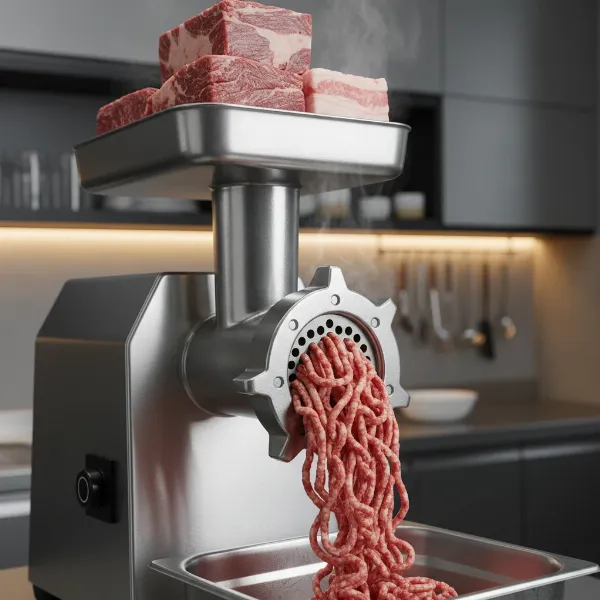 A powerful stainless steel heavy-duty electric meat grinder processing raw meat for salami.
 - Stand Mixer Attachments: While convenient for very small amounts of meat (under 5 lbs), attachments for stand mixers like KitchenAid have limitations. They typically have less power and smaller throats, which can lead to slower processing and potential smearing of fat if the meat isn’t extremely cold. Many experienced charcuterie makers recommend against using them for stuffing due to fat smearing.
Sausage Stuffers
This is where many home salami makers make a critical mistake. While many meat grinders come with stuffing attachments, they are generally not recommended for stuffing salami.
- Dedicated Sausage Stuffers: A standalone sausage stuffer is a must-have for salami. Unlike grinder attachments, stuffers push meat through without further grinding, preventing fat smearing and ensuring an even, air-pocket-free fill in your casings. This is vital for proper fermentation and drying, ultimately impacting texture and safety. Brands like LEM are well-regarded for their dedicated stuffers.
Other Essential Tools
- Curing Chamber or Controlled Environment: Salami requires specific temperature and humidity conditions for fermentation and drying. This can be a dedicated chamber or a carefully controlled basement or refrigerator.
- Digital Scale: Precision in measuring ingredients (meat, salt, cure, spices) is critical for flavor and safety.
- pH Meter: Essential for monitoring the fermentation process to ensure proper acidity levels.
- Salami Casings: Natural or collagen casings, chosen based on preference and salami type.
- Pricking Tool: To remove air pockets from stuffed salami, preventing spoilage.
The Critical Role of Grinding in Salami Production
The grinding process is foundational to the texture and success of your homemade salami. Getting it right ensures proper binding, even fat distribution, and a pleasing mouthfeel.
Temperature Control: Your Salami’s Best Friend
The single most important rule for grinding meat for salami is keep everything cold – exceptionally cold. This means your meat, your fat, and even your grinder components (the auger, grinding plates, and blade) should be chilled, ideally to near-freezing temperatures, before grinding.
- Why it Matters: Cold meat and fat pass cleanly through the grinder. If the meat warms up, especially the fat, it will “smear.” Fat smearing results in a greasy, mushy texture, prevents proper binding, and can lead to an unappetizing appearance. It also creates a less hospitable environment for beneficial bacteria and can hinder the drying process, potentially affecting safety. Many experts recommend placing meat and grinder parts in the freezer for 1-2 hours before grinding.
Grind Size: Coarse is King
Unlike some sausages that call for a fine grind, salami typically demands a coarse texture. This gives salami its distinctive appearance and firm, chewy bite.
- Recommended Plates: For most traditional salami, an 8mm to 10mm grinding plate is ideal. Some recipes might even call for a coarser 12mm or 14mm plate. A few sources mention using a 4.5mm or 6mm plate, suggesting a slightly finer texture might be desired for certain salami types, but generally, a coarse grind is preferred. Experimentation with different plate sizes can help you discover your preferred texture.
Meat and Fat Preparation
Before it even touches the grinder, your meat needs careful preparation.
- Trimming and Cubing: Cut your meat into strips or cubes that are small enough to feed easily into your grinder’s throat without forcing. For smaller domestic grinders, this means smaller pieces. Remove any gristle or undesirable connective tissue.
- Ideal Meat-to-Fat Ratio: Salami relies heavily on fat for flavor, moisture, and texture. A common ratio is around 70-80% lean meat to 20-30% fat, though some recipes can go as high as 40% fat. Pork shoulder is a popular choice for its balanced meat-to-fat ratio. Pork backfat is often added for additional richness and texture. Ensure the fat is well-distributed throughout the meat before grinding.
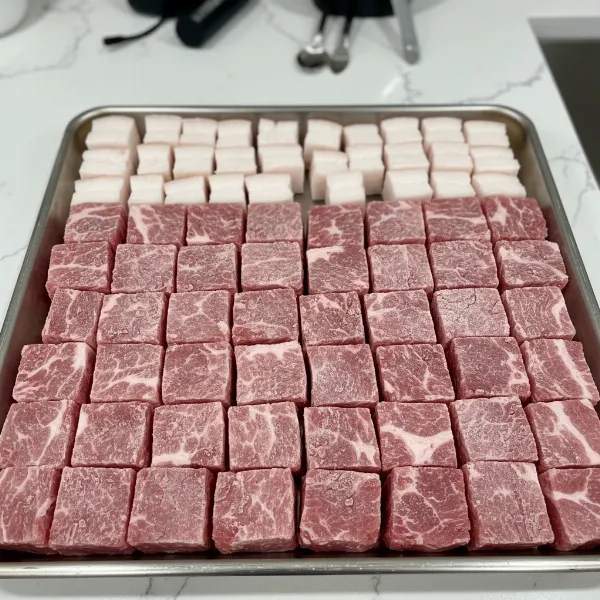 Chilled pork shoulder and backfat cut into precise cubes, ready for coarse grinding for salami.
Step-by-Step Guide: Making Your Salami
Once you’ve mastered the grinding principles, the rest of the salami-making process builds on this solid foundation.
- Preparation is Key: Start by cutting your chosen lean meat (often pork or beef) and pork backfat into manageable cubes or strips. Place these, along with your grinder head, auger, blade, and desired grinding plate, in the freezer for 1-2 hours until they are very cold but not completely frozen solid.
- First Grind: Assemble your chilled meat grinder with a coarse plate (typically 8mm-10mm). Pass the meat and fat through the grinder. Work quickly to keep temperatures low.
- Mixing and Seasoning: Transfer the coarsely ground meat and fat to a large, cold mixing bowl. Now, it’s time to add your meticulously weighed ingredients: curing salts (like Instacure #2, essential for safety and color), salt, a starter culture (which initiates fermentation and inhibits spoilage), and your chosen blend of spices (e.g., black pepper, garlic, fennel). If your recipe calls for liquids like wine, add them now. Mix the mixture thoroughly and vigorously for 2-3 minutes. This critical step, often called “kneading,” helps break down meat proteins, creating a sticky texture that ensures a proper “bind” and prevents crumbly salami.
- Stuffing the Casings: Attach your chosen casing (natural or collagen) to your dedicated sausage stuffer. Carefully stuff the meat mixture into the casings, ensuring a tight, even fill without any air pockets. Air pockets can lead to spoilage.
- Pricking and Shaping: Use a sterile pricking tool or a clean needle to remove any trapped air bubbles from the stuffed salami links. Tie off the salami into desired lengths.
- Fermentation: Hang your salami in a controlled environment (a curing chamber or a space with consistent temperature and high humidity, usually around 70-85°F and 80-90% humidity) for 12-72 hours. This phase allows the starter culture to thrive, producing lactic acid that lowers the pH, developing flavor, and further protecting against harmful bacteria.
- Drying and Curing: Once fermentation is complete (often indicated by a target pH level), move your salami to a cooler, less humid environment (typically 50-60°F and 70-80% humidity) for the slow drying and curing process. This can take weeks or even months, depending on the size of the salami. Monitor weight loss and ensure slow drying to prevent “case hardening,” where the exterior dries too quickly, trapping moisture inside.
- Enjoy and Store: Once your salami has reached its desired weight loss and firmness, it’s ready to be enjoyed. Store finished salami properly to maintain its quality.
Choosing the Right Meat Grinder for Your Salami Ambitions
Selecting the perfect meat grinder depends on your specific needs and how often you plan to make salami.
Determining Your Needs
- Batch Size: For occasional small batches (under 5 lbs), a KitchenAid attachment might suffice, though a dedicated grinder is always better. For regular home use (5-15 lbs), a powerful electric domestic grinder (#8 or #12 size) is recommended. If you’re processing large quantities (15+ lbs), a heavy-duty electric grinder (#22 or #32 size) will save you time and effort.
- Frequency: If you plan on making salami or other ground meat products frequently, invest in a more durable and powerful machine.
Key Features to Look For
- Power and Durability: Look for a robust motor that won’t strain or overheat, especially when grinding chilled meat and fat. Higher horsepower (HP) indicates greater capability.
- Material: Stainless steel components for the grinding head, auger, and plates are preferred for hygiene, durability, and ease of cleaning.
- Plate Sizes: Ensure the grinder comes with, or has readily available, coarse grinding plates (8mm-14mm) suitable for salami.
- Ease of Cleaning: Grinders should be easy to disassemble and clean thoroughly to prevent bacterial growth.
| Type of Grinder | Ideal For | Power/Capacity (Approx.) | Pros | Cons |
|---|---|---|---|---|
| Manual | Very small batches (1-3 lbs) | Low | Affordable, portable, quiet | Labor-intensive, slow, less efficient for cold meat |
| Electric (Domestic) | Regular home use (3-10 lbs) | 500-1200W | Faster than manual, versatile plates, reasonably priced | Can struggle with very cold or large batches, potential for fat smearing if not used carefully |
| Electric (Heavy-Duty) | Large batches (10-50+ lbs) | 0.5 HP – 2 HP+ | Fast, powerful, durable, handles cold meat effortlessly | More expensive, larger footprint, can be noisy |
| Stand Mixer Attachment | Extremely small batches (<5 lbs) | Dependent on mixer’s power | Space-saving, leverages existing appliance | Limited power, slower, not recommended for stuffing, risk of mixer damage if misused |
Tips for Using and Maintaining Your Meat Grinder
A well-maintained meat grinder is a joy to use and a cornerstone of safe food preparation.
- Always Pre-chill: I cannot emphasize this enough – always chill your meat, fat, and grinder components. This ensures a clean cut, prevents smearing, and extends the life of your grinder by reducing strain.
- Clean Immediately: Disassemble and wash all grinder parts (blade, plate, auger, grinding head) by hand with hot, soapy water immediately after use. This prevents meat residue from drying and becoming difficult to remove, and it’s crucial for hygiene.
- Thorough Drying: Ensure all metal parts are completely dry before storage to prevent rust.
- Lubrication: Lightly coat metal parts (like plates and blades) with food-grade mineral oil before storage. This protects against rust and keeps them ready for your next grinding session.
- Safety First: Always follow the manufacturer’s instructions. Use the provided pusher to feed meat; never use your fingers.
“Making salami at home is a journey that begins with precision. The care you put into preparing and grinding your meat will define the texture and success of your final product. Don’t rush, keep it cold, and trust your equipment.” – The Meat Grinder Pro Admin
Conclusion
Crafting homemade salami is a deeply rewarding culinary endeavor that brings authentic flavors and a sense of accomplishment to your kitchen. The quality of your salami hinges significantly on the initial grinding process – ensuring your meat is properly prepared, chilled, and processed with the right equipment and technique. By selecting a suitable Meat Grinder, maintaining optimal temperatures, and using coarse plates, you lay the essential groundwork for a perfectly textured, safely cured salami. Embrace the process, from the methodical preparation to the anticipation of the final cure, and you’ll discover a whole new dimension of culinary satisfaction. So, are you ready to elevate your charcuterie game and savor the unparalleled taste of your very own artisanal salami?
Frequently Asked Questions
What is the ideal fat content for salami?
The ideal fat content for salami typically ranges from 20% to 40%. A higher fat percentage, commonly around 30-35%, contributes significantly to the salami’s flavor, moisture, and desirable texture. Cuts like pork shoulder, which naturally have a good fat-to-lean ratio, or added pork backfat, are excellent choices.
Why is keeping the meat cold during grinding so important for salami?
Keeping the meat and grinder components extremely cold (near freezing) during grinding is crucial to prevent fat smearing. If the fat warms up, it will smear and create a greasy, pasty texture, which negatively impacts the salami’s binding, appearance, and overall mouthfeel, potentially compromising the drying process and safety.
Can I use a food processor instead of a meat grinder for salami?
While a food processor can chop meat, it is generally not recommended for making salami. A food processor tends to “smash” or “puree” the meat rather than cutting it cleanly, resulting in a different, often undesirable, texture (more like a paste than distinct ground particles), and it can easily smear fat.
Do I really need a dedicated sausage stuffer for salami?
Yes, a dedicated sausage stuffer is highly recommended for making salami. Using a grinder’s stuffing attachment can cause fat smearing and create air pockets, which are detrimental to salami’s texture, binding, and safety. A stuffer ensures a dense, even fill without re-grinding the meat, which is vital for proper curing.
What grind plate size is best for salami?
For most traditional salami, a coarse grind is preferred to achieve its characteristic texture. Recommended grind plate sizes typically range from 8mm to 10mm. Some recipes may call for slightly finer (6mm) or coarser (12-14mm) plates depending on the specific salami type and desired mouthfeel.