Few things are as frustrating for a home cook or a professional butcher as pulling out a cherished meat grinder only to find its plates and knives marred by rust. This insidious enemy not only compromises the hygiene of your equipment but also drastically impacts its performance and longevity. If you’ve ever faced dull blades, uneven grinds, or even worse, flecks of rust in your meat, you know the urgency of addressing this issue. But don’t worry, restoring your meat grinder to its pristine, food-safe condition is often simpler than you think. This guide will walk you through effective rust removal techniques and, more importantly, equip you with the knowledge to prevent rust from ever taking hold again, ensuring your meat grinder remains a reliable workhorse in your kitchen.
Understanding Rust and Its Impact on Your Meat Grinder
Rust, scientifically known as iron oxide, is the reddish-brown flaky coating that appears on iron and its alloys, like steel, when they are exposed to moisture and oxygen. Many high-quality meat grinder plates and knives are made from carbon steel, prized for its ability to hold a sharp edge, but inherently more susceptible to rust than stainless steel.
The presence of rust on your grinder parts is more than just an aesthetic concern. It poses several significant problems:
- Hygiene Risks: Rust can harbor bacteria and other contaminants, making it unsafe for food contact. Flakes of rust can also mix with your ground meat, presenting health hazards.
- Performance Degradation: Rust creates an uneven, rough surface on grinder plates and knives. This dulls the cutting edge, leading to poor grinding performance, smeared meat, and increased strain on your grinder’s motor.
- Reduced Lifespan: Left unchecked, rust can deeply pit and corrode metal, weakening the parts and eventually rendering them unusable. Replacing grinder components can be costly and inconvenient.
Therefore, understanding how to effectively remove and prevent rust is not just about aesthetics; it’s about ensuring food safety, optimal performance, and extending the life of your valuable equipment.
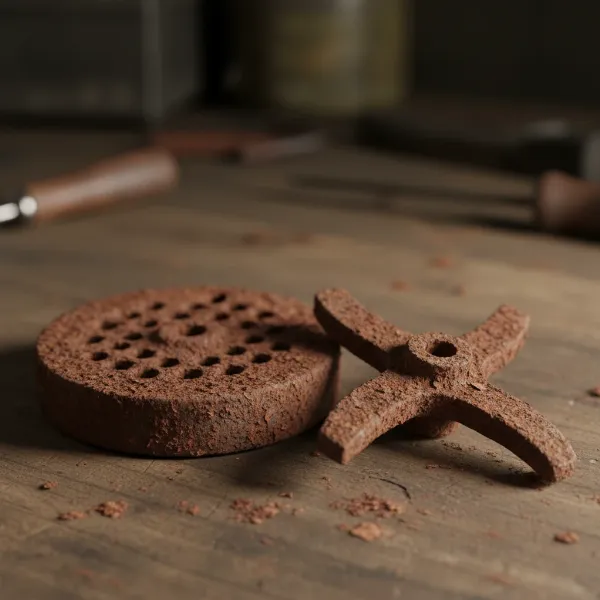 Close-up of rusty meat grinder plate and knife, showing reddish-brown corrosion.
Essential Tools and Materials for Rust Removal
Before you begin the rust removal process, gather the following common household items and specialized supplies. Having everything at hand will make the task more efficient and effective:
- White Vinegar: A household staple, its acetic acid is excellent for dissolving rust.
- Baking Soda: A mild abrasive and alkaline solution, useful for light rust and neutralizing acids.
- Lemon Juice and Salt: The acidity of lemon juice combined with the abrasive nature of salt provides a natural rust-fighting duo.
- Stiff Brushes: Nylon, brass, or stainless steel brushes are essential for scrubbing away rust, particularly in intricate areas. An old toothbrush can also be very helpful.
- Steel Wool/Scouring Pads: Various grades of steel wool, Scotch-Brite pads, or bronze wool are effective for scrubbing rust from metal surfaces without causing excessive damage.
- Fine-Grit Sandpaper (Optional): For more stubborn or embedded rust spots.
- Clean Towels/Cloth: For thorough drying and applying oil.
- Food-Grade Mineral Oil: Crucial for lubricating and protecting cleaned metal parts from future rust. Avoid vegetable oils, which can become rancid.
- Protective Gloves: To protect your hands from rust and cleaning agents.
- Large Bowl or Container: For soaking grinder parts.
Step-by-Step Guide: Removing Rust from Grinder Plates and Knives
With your tools ready, let’s tackle that rust. Always disassemble your meat grinder completely before cleaning, separating all plates, knives, and other metal components.
Method 1: The Vinegar Soak (for Light to Moderate Rust)
|
Our Picks for the Best Meat grinder in 2026
As an Amazon Associate I earn from qualifying purchases.
|
||
| Num | Product | Action |
|---|---|---|
| 1 | Meat Grinder, Sausage Stuffer, [2800W Max] Electric Meat Mincer with Stainless Steel Blades & 3 Grinding Plates,Sausage Maker & Kubbe Kit for Home Kitchen & Commercial Using |
![Check Meat Grinder, Sausage Stuffer, [2800W Max] Electric Meat Mincer with Stainless Steel Blades & 3 Grinding Plates,Sausage Maker & Kubbe Kit for Home Kitchen & Commercial Using on Amazon](https://meatgrinderpro.com/wp-content/plugins/amazon-tables/assets/images/buy.png)
|
| 2 | LEM Products BigBite #8 Meat Grinder, 0.50 HP Stainless Steel Electric Meat Grinder Machine, Ideal for Regular Use |
|
| 3 | Oaomi 3200W Max Electric Meat Grinder & Sausage Stuffer - Mincer Machine with Tool 2 Blade And 3 Plates, 3 Tubes & Kubbe Kit Tool for Home Kitchen Use(Black) |
|
| 4 | Electric Meat Grinder, Sausage Stuffer with 3 Sausage Tubes, 2 Blades, 3 Plates, 3200W Max, Meat Grinder Heavy Duty for Home Kitchen Use, Stainless Steel (Black) |
|
| 5 | Meat Grinder Manual Mincer 2-in-1 Manual Meat Grinder Sausage Maker Table Mount Pork Mincer Sausage Stuffer Funnel Make Homemade Burger Patties Hand Operated Kitchen Tool FQ |
|
| 6 | GANIZA Food Processors, Electric Food Chopper with Meat Grinder & Vegetable Chopper - 2 Bowls (8 Cup+8 Cup) with Powerful 450W Copper Motor - Includes 2 Sets of Bi-Level Blades for Fruits/Meat/Nuts |
|
| 7 | KitchenAid Stand Mixer Attachment, Food Grinder KSMMGA, Metal Food Grinder |
|
| 8 | CHEFFANO Electric Meat Grinder, [2000W Max] Heavy Duty Meat Mincer with 2 Blades, 3 Plates, Sausage Tube & Kubbe Kit for Home Kitchen Use |
|
| 9 | Meat Chopper, Hamburger Grinder, Premium Heat Resistant Smasher for Ground Beef, Burger Grinder Nylon Potato Mix Tool, Meat & Poultry Tenderizers-Black |
|
| 10 | CHEFFANO Meat Grinder, 2600W Max Stainless Steel Meat Grinder Electric, ETL Approved Heavy Duty Meat Mincer Machine with 2 Blades, 3 Plates, Sausage Stuffer Tube & Kubbe Kit for Home Kitchen Use |
|
This is one of the most popular and effective methods for addressing rust on meat grinder parts.
- Preparation: First, thoroughly wash your grinder parts with hot, soapy water to remove any grease or meat residue. This ensures the vinegar can directly access the rust.
- Soaking: Submerge the rusty plates and knives completely in undiluted white vinegar. For optimal results, let them soak overnight, or for at least 8-12 hours. The acidic nature of the vinegar will work to break down the rust.
- Scrubbing: After soaking, remove the parts from the vinegar. Most of the rust should have softened or dissolved. Use a stiff brush, steel wool, or a scouring pad to scrub away any remaining rust. For intricate holes on the grinder plate, a small brush or even a pipe cleaner can be effective.
- Rinsing and Drying: Rinse the parts thoroughly under clean, running water. It’s crucial to remove all vinegar residue. Immediately proceed to drying to prevent new rust from forming.
Method 2: Baking Soda Paste (for Light Rust or Spot Treatment)
Baking soda is a gentler abrasive, ideal for lighter rust stains or for spot-treating specific areas.
- Make the Paste: Mix baking soda with a small amount of water to create a thick paste. The consistency should be spreadable but not too runny.
- Apply and Wait: Apply the paste generously over the rusted areas of your grinder plates and knives. Let it sit for at least an hour, allowing the baking soda to react with the rust.
- Scrub: Use a stiff brush, an old toothbrush, or a scouring pad to scrub the affected areas. The baking soda acts as a mild abrasive to lift the rust.
- Rinse and Dry: Rinse thoroughly with water to remove all baking soda and rust residue. Dry immediately and completely.
Method 3: Lemon Juice and Salt (Natural Alternative)
Similar to baking soda, this method uses natural acids and abrasives to combat rust.
- Apply Mixture: Sprinkle a layer of salt over the rusted areas. Then, squeeze lemon juice over the salt, creating a paste-like consistency.
- Soak: Allow the lemon and salt mixture to sit on the rusty parts for approximately two hours. The citric acid in the lemon juice will begin to loosen the rust.
- Scrub: Use the squeezed lemon rind itself, or a stiff brush or steel wool, to scrub away the rust. The salt provides the necessary abrasive action.
- Rinse and Dry: Rinse the parts thoroughly to remove all traces of salt and lemon juice, then dry immediately and completely.
Method 4: Commercial Rust Removers (for Heavy Rust with Caution)
For severely rusted parts, commercial rust removers may be necessary. However, extreme caution is advised, especially since these parts come into contact with food.
- Choose Food-Safe: If possible, look for commercial rust removers explicitly labeled as “food-safe” or non-toxic. Phosphoric acid-based solutions are sometimes used and can be effective, but require careful handling and neutralization.
- Safety First: Always wear protective gloves and eye protection. Work in a well-ventilated area.
- Follow Instructions: Adhere strictly to the manufacturer’s instructions for application and contact time.
- Thorough Rinsing and Neutralization: After using a chemical rust remover, rinse the parts exceptionally well. For acidic removers, a follow-up soak in a baking soda solution (2:1 hot water to baking soda) can help neutralize any residual acid before a final rinse and dry.
The Importance of Thorough Drying
After rust removal, the single most critical step to prevent immediate re-rusting is thorough drying. Any residual moisture, even a microscopic film, will quickly lead to flash rust.
- Towel Dry: Immediately after rinsing, vigorously dry all parts with a clean, lint-free towel.
- Air Dry: Allow the parts to air dry completely.
- Oven Drying (Recommended): For carbon steel parts, placing them in a low-temperature oven (150-200°F or around 300°F) for 15-30 minutes can evaporate any hidden moisture in crevices and pores. This is an excellent way to ensure complete dryness. Let them cool before handling.
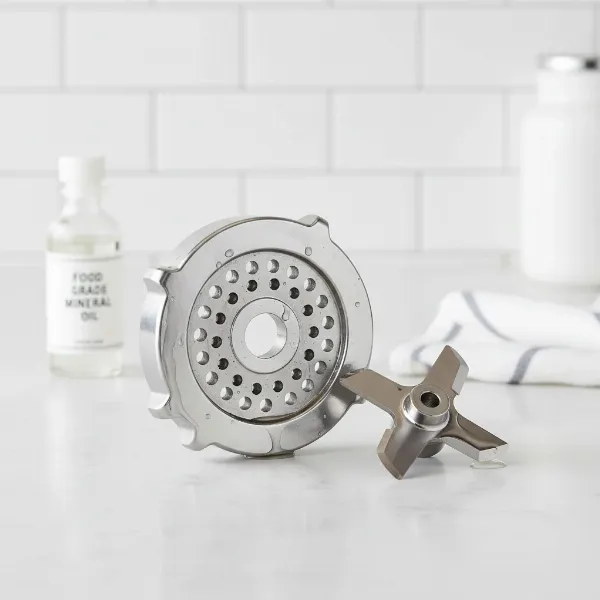 Shiny, clean, and lightly oiled meat grinder plate and knife, ready for storage.
Preventing Future Rust: Best Practices for Grinder Maintenance
Preventing rust is far easier than removing it. By adopting a consistent maintenance routine, you can keep your meat grinder parts in excellent condition for years to come.
- Clean Immediately After Use: Do not let meat residue or moisture sit on the parts. Disassemble and clean your grinder as soon as you’re finished using it.
- Hand Wash Only: Never put meat grinder plates and knives in a dishwasher. The harsh detergents, high heat, and prolonged exposure to moisture in a dishwasher are detrimental, especially to carbon steel, and will almost guarantee rust and dulling. Wash all components by hand in hot, soapy water.
- Thorough Drying is Key: As emphasized above, dry all parts meticulously after washing. Use a towel and consider oven drying for optimal results.
- Apply Food-Grade Mineral Oil: Once the parts are completely dry, apply a light, even coating of food-grade mineral oil to all metal surfaces, especially on carbon steel plates and knives. This creates a protective barrier against moisture and oxygen. Avoid using vegetable oils like olive or canola oil, as they can turn rancid and sticky over time.
- Proper Storage Environment: Store your oiled grinder parts in a dry, low-humidity environment. An airtight container is ideal. Some users even place a handful of uncooked rice or desiccant packets in the container to absorb any lingering moisture.
- Seasoning New Parts (for Cast Iron/Carbon Steel): Similar to cast iron cookware, some cast iron or carbon steel grinder parts can benefit from “seasoning.” This involves applying a thin layer of mineral oil and baking it at a higher temperature (e.g., 300-350°F) for an hour, allowing the oil to polymerize and create a more durable, rust-resistant coating. Repeat this process a few times for best results.
- Consider Stainless Steel: While often less sharp, if rust prevention is your absolute top priority and you want minimal maintenance, opting for stainless steel plates and knives (if available for your model) can be a good choice.
“A well-maintained meat grinder isn’t just a matter of cleanliness; it’s a testament to your commitment to quality and safety in the kitchen.” – Admin, MeatGrinderPro.com
Conclusion
Rust on your meat grinder plates and knives is a common nuisance, but one that is entirely manageable with the right approach. By understanding the causes of rust and employing effective removal techniques such as vinegar soaks, baking soda pastes, or lemon and salt, you can restore your equipment to a safe and efficient condition. More importantly, establishing a rigorous maintenance routine, centered on immediate hand washing, meticulous drying—perhaps with the aid of a low-heat oven—and the consistent application of food-grade mineral oil, will safeguard your meat grinder against future corrosion. Investing a little time in care will ensure your grinder delivers perfectly ground meat every time and remains a trusted appliance in your culinary arsenal for many years.
What are your go-to methods for keeping your meat grinder rust-free?
Frequently Asked Questions
Is it safe to use a meat grinder that has rust on its plates and knives?
No, it is generally not safe to use a rusty meat grinder. Rust can harbor bacteria and other contaminants, and rust flakes can break off and mix with your food, posing potential health risks. It’s crucial to remove all rust and thoroughly clean the parts before use.
Can I put my meat grinder parts in the dishwasher to clean them?
You should absolutely not put most meat grinder plates and knives in the dishwasher. The high temperatures, harsh detergents, and prolonged exposure to moisture are highly conducive to rust formation, especially for carbon steel parts, and can also damage other components. Always hand wash them.
What kind of oil should I use to prevent rust on my meat grinder?
You should use food-grade mineral oil to prevent rust on your meat grinder parts. It creates a protective barrier and will not go rancid or gummy over time, unlike common vegetable oils.
How often should I oil my meat grinder plates and knives?
You should oil your Meat Grinder plates and knives every time you clean and dry them after use, especially if they are made of carbon steel. This habit ensures a continuous protective layer against moisture and oxygen during storage.
Can old, pitted rust be completely removed from a meat grinder?
While surface rust can often be removed completely, deep pitting caused by severe rust may not be entirely reversible. In such cases, the functionality of the part might be compromised, and replacement may be necessary for optimal performance and safety.