Let’s be honest, the first time you look at a meat grinder, it can seem a little intimidating. There are tubes, a menacing-looking screw, and a bunch of metal plates. But right on top, there’s a simple, wide-mouthed pan. Ever wonder about its official name or why it’s even there? If you’re asking yourself, What Is A Hopper Or Tray, you’re asking the right question. This unassuming component is the starting point for every delicious burger, sausage, or meatball you’ll ever make, and understanding it is the first step to mastering your machine. It’s far more than just a place to dump your meat; it’s the control center for your entire grinding operation.
The Heart of the Machine: A Deeper Look at the Hopper
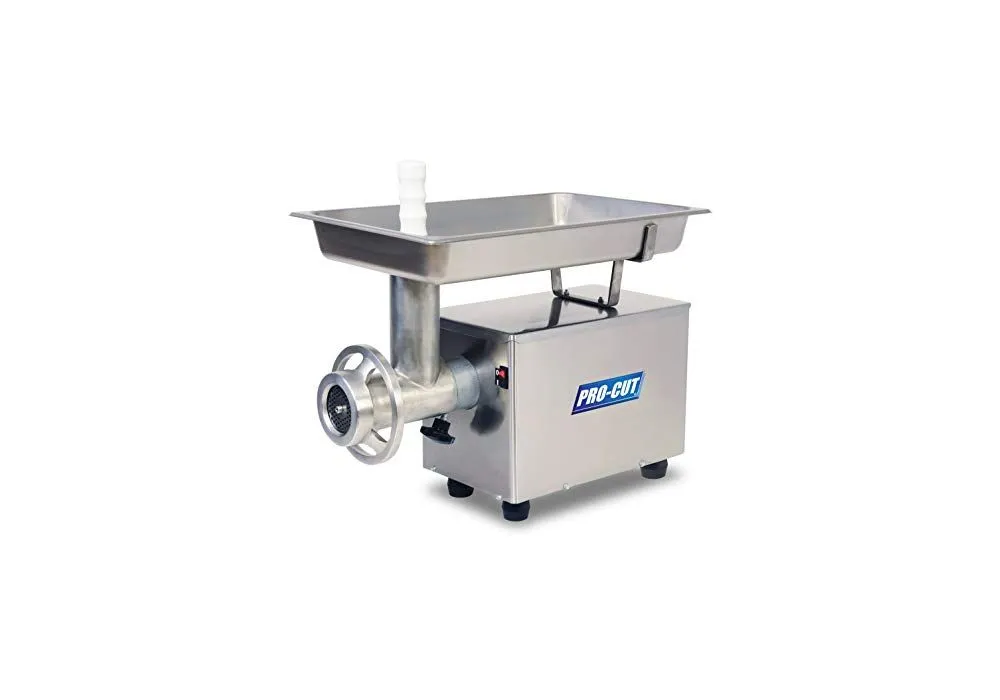
So, what is a hopper or tray in the context of a meat grinder? Simply put, the hopper (often called a tray) is the large, usually funnel-shaped or rectangular pan that sits on top of the grinder’s feeding tube. Its primary job is to hold the cubes of meat before they are fed down into the grinding mechanism.
Think of it as the prep station or the on-deck circle for your meat. It’s where everything begins. You place your carefully cubed and chilled meat onto this tray, allowing you to stage the process and feed the meat into the grinder’s throat at a consistent, manageable pace. Without it, you’d be awkwardly trying to push one piece of meat at a time into a narrow tube, which is not only inefficient but also incredibly unsafe.
Why Its Design Is a Bigger Deal Than You Think
Not all hoppers are created equal. The design, material, and size can dramatically impact your grinding experience.
- Material: Most high-quality grinders feature a stainless steel hopper. This is the gold standard for a reason. It’s durable, non-porous (so it won’t absorb odors or bacteria), and, most importantly, it’s excellent at staying cold. Keeping your meat and equipment cold is the number one rule for a perfect grind. Some budget models might use plastic, which is lighter but can be harder to clean and may retain smells over time.
- Size: The capacity of the hopper determines how much meat you can stage at once. A large tray is a lifesaver if you’re processing a whole deer or grinding a 10-pound brisket for burgers. For smaller weekly batches, a more compact hopper is perfectly fine.
- Safety: The hopper also provides a crucial safety barrier. Its wide surface keeps your hands and fingers far away from the auger (the corkscrew part) turning inside the grinder’s neck. This is why you should always use the provided food pusher or “stomper” to push the meat from the tray into the tube.
Expert Tip from Chef David Wilson: “Before you even start, pop your grinder’s hopper and head assembly in the freezer for 15-20 minutes. A chilled surface prevents the meat’s fat from smearing as you grind, giving you a much better texture in the final product. It’s a small step that makes a world of difference.”
|
Our Picks for the Best Meat Grinder in 2026
As an Amazon Associate, we earn from qualifying purchases.
|
||
| Num | Product | Action |
|---|---|---|
| 1 | AAOBOSI Meat Grinder Electric 3000W Max with Touch Color Screen, Auto-Reverse & Built-in Storage - 3 Speed Settings,Grinding, Sausage & Kibbe Making for Home Use, Stainless Steel |

|
| 2 | LEM Products BigBite #8 Meat Grinder, 0.50 HP Stainless Steel Electric Meat Grinder Machine, Ideal for Regular Use |
|
| 3 | MEAT! 1.5 HP Meat Grinder with 3 Stuffing Tubes, 2 Stainless Steel Grinding Plates, and a Stainless Steel Stuffing Plate for Making Ground Meat |
|
| 4 | STX International Turboforce II 4000 Electric Meat Grinder | Grinds Soft Bones | Foot Pedal | 6 Grinding Plates | Stainless Steel Blades | Sausage Tubes | Kubbe Maker | Meat Claws | Patty Press & More |
|
| 5 | Weston Pro Series Electric Meat Grinder 7 Sausage Stuffer, Commercial Grade, 1500 Watts, 2 HP, 21lbs. Per Minute, Heavy Duty Stainless Steel (10-3201-W) |
|
| 6 | LEM Products BigBite #22 Meat Grinder, 1.0 HP Stainless Steel Electric Meat Grinder Machine, Ideal for Heavy Use |
|
| 7 | VEVOR Commercial Meat Grinder, 550LB/h 1100W Electric Meat Mincer, ETL Approved Heavy Duty Industrial Meat Mincer Machine |
|
| 8 | Electric Meat Grinder, Sausage Stuffer with 3 Sausage Tubes, 2 Blades, 3 Plates, 3200W Max, Meat Grinder Heavy Duty for Home Kitchen Use, Stainless Steel (Black) |
|
| 9 | Commercial Meat Grinder #12,0.9HP Electric Meat Mincer,Heavy Duty Stainless Steel Industrial Meat Mincer w/2 Blades & Meat Pusher,Food Grinders Machine for Home Kitchen Regular Use |
|
| 10 | MEAT! 1.5 HP Meat Grinder with 3 Stuffing Tubes, 2 Stainless Steel Grinding Plates, and a Stainless Steel Stuffing Plate for Making Ground Meat |
|
The Hopper in Action: A Step-by-Step Grinding Guide
Understanding the hopper’s role makes the whole process much clearer. Here’s how it fits into your workflow.
- Preparation is Key: Cut your meat into 1-inch cubes. The goal is to have pieces that can easily fall down the grinder’s throat without needing to be forced. Make sure the meat is very cold, almost partially frozen.
- Load the Hopper: Place a manageable amount of your chilled meat cubes onto the hopper or tray. Don’t overcrowd it! You want space to work. This is your staging area.
- Turn on the Machine: Switch your electric grinder on, or get ready to crank if you’re using a manual one.
- Feed the Beast: Gently push the meat from the hopper into the feed tube using the stomper. Find a steady rhythm. The machine will pull the meat in with the auger. Your job is simply to keep the tube supplied from the convenient pile on your hopper.
- Watch the Magic Happen: As you feed the meat from the hopper, you’ll see perfectly ground meat begin to emerge from the grinding plate. It’s that simple.
How to Properly Clean Your Meat Grinder Hopper
A clean machine is a safe machine. Because the hopper is in direct contact with raw meat, cleaning it properly is non-negotiable to prevent cross-contamination and bacterial growth.
The best way to clean a hopper or tray is to disassemble it from the grinder head and wash it thoroughly with hot, soapy water immediately after use. For stainless steel trays, they are often dishwasher safe, but always check your manufacturer’s instructions. Never leave it to sit, as dried meat particles can be very difficult to remove.
Quick Cleaning Checklist:
- [ ] Disconnect the grinder from power.
- [ ] Detach the hopper from the grinder head.
- [ ] Scrape off any large pieces of meat or fat.
- [ ] Wash with a sponge or brush in hot, soapy water.
- [ ] Rinse thoroughly with hot water.
- [ ] Dry completely with a clean towel to prevent water spots or rust.
- [ ] Sanitize if desired, following food safety guidelines.
Choosing the Right Hopper Size for Your Needs
When you’re shopping for a meat grinder, the size of the unit (often denoted by #5, #8, #12, etc.) directly correlates with the size of the hopper. So, how do you know what you need?
| Grinder Size | Typical Hopper Size | Best For… |
|---|---|---|
| #5, #8 | Small to Medium | The home cook making weekly batches of ground beef, chicken, or sausage. |
| #12, #22 | Medium to Large | Serious home chefs, hunters processing small game, or frequent large-batch grinders. |
| #32+ | Extra Large | Commercial use, hunters processing large game like deer or elk, homesteaders. |
A larger hopper simply means less time spent refilling it during a big grinding session. If you know you’ll be processing 20 pounds of venison, a large tray is your best friend. If you’re just grinding a pound of chuck for Tuesday night’s dinner, a smaller one is more than adequate.
Frequently Asked Questions (FAQ)
Q: Can I use my meat grinder without the hopper or tray?
A: You should never use a meat grinder without its designated hopper or tray. It is a critical safety component that keeps your hands away from the moving parts and provides a stable platform for feeding the meat into the machine.
Q: What is the best material for a meat grinder hopper?
A: Stainless steel is widely considered the best material. It’s food-safe, incredibly durable, easy to sanitize, and won’t stain or absorb odors. Plus, its ability to hold a cold temperature is a huge advantage for achieving a quality grind.
Q: Is a bigger hopper always better?
A: Not necessarily. A bigger hopper is only better if you regularly grind large quantities of meat. For smaller, everyday tasks, a large hopper can be bulky to handle and clean. It’s best to match the hopper and grinder size to your specific needs.
Q: My hopper is plastic. Is that okay?
A: Plastic hoppers are common on more entry-level models and are perfectly functional. Just be extra diligent with cleaning, as plastic can be more prone to scratching and potentially harboring bacteria in those scratches over time. Avoid abrasive scrubbers.
Q: Can I put frozen meat directly on the hopper?
A: You should put partially frozen, chilled meat on the hopper. Solidly frozen blocks of meat can damage the grinder’s motor and auger. The ideal state is firm to the touch but not rock solid, which you can achieve by placing cubed meat in the freezer for about 15-30 minutes before grinding.
Your First Step to Grinding Perfection
So, when you next look at a grinder and ask, what is a hopper or tray, you’ll know the answer. It’s not just an accessory; it’s the command post for your entire operation. It’s where safety and efficiency meet, allowing you to turn simple cuts of meat into culinary creations. By understanding and respecting this fundamental component, you’re well on your way to moving beyond store-bought ground meat and embracing the superior flavor and quality you can only get at home. Now, what will you be grinding first?