Ever found yourself staring at a new kitchen appliance, a collection of shiny metal parts scattered on your counter, and thinking, “Where on earth does this piece go?” We’ve all been there. And when it comes to your meat grinder, one of the most crucial yet misunderstood components is that circular, often-threaded piece at the very end. So, let’s dive in and answer the big question: What Is A Locking Knob and why is it the unsung hero of your culinary adventures?
Simply put, the locking knob—often called a retaining ring or locking cap—is the component that holds the entire grinding assembly (the blade and the grinding plate) securely in place against the grinder’s head. Think of it like the lug nuts on a car’s wheel. Without them, the wheel would be wobbly, unsafe, and completely useless. The locking knob performs that same vital function for your meat grinder, ensuring everything works together smoothly, safely, and efficiently. It’s the final piece of the puzzle that turns a collection of parts into a powerful food-processing machine.
The Anatomy of a Meat Grinder: Where the Locking Knob Fits In
To truly appreciate the locking knob, you need to understand its neighborhood. A meat grinder’s head assembly is a team of parts working in perfect harmony, and the locking knob is the team captain that keeps everyone in line.
Here’s a quick rundown of the key players, from the inside out:
- The Auger (or Worm): This is the large, corkscrew-shaped piece that pushes the meat from the hopper down the barrel of the grinder head.
- The Grinding Blade: A small, star-shaped blade that sits on the end of the auger. This is what does the actual cutting. It’s crucial that the flat side of the blade faces outward.
- The Grinding Plate: A perforated disk with holes of various sizes (coarse, medium, or fine). The blade spins against this plate, cutting the meat as it’s forced through the holes.
- The Locking Knob (Retaining Ring): This is the final piece. It screws onto the end of the grinder head, pressing the grinding plate firmly against the blade, and holding the entire assembly together.
Without a properly secured what is a locking knob, the pressure from the auger would simply push the blade and plate right out. The result? No ground meat, a potential safety hazard, and a very frustrating afternoon.
Why This Small Part is a Big Deal: Safety and Performance
It’s easy to overlook such a simple-looking component, but the locking knob is directly responsible for both the quality of your grind and the safety of your operation. I’ll never forget the first time I used a cheap grinder where the knob kept loosening—the grind was inconsistent, and the machine made a terrible noise. It taught me a valuable lesson.
Here’s why you should always pay attention to your locking knob:
- Ensures a Consistent Grind: A tightly secured knob keeps the cutting blade flush against the grinding plate. This close contact is essential for a clean, efficient cut. If it’s loose, meat can get mashed and mangled between the two parts instead of being cut, leading to a pasty, unappetizing texture.
- Prevents Machine Damage: A wobbly grinding assembly puts unnecessary strain on the motor and gears of your grinder. The locking knob ensures all parts are stable, allowing the machine to operate as designed and extending its lifespan.
- It’s a Critical Safety Feature: Imagine the internal pressure building up as meat is forced through the grinder. A loose or faulty locking knob could, in a worst-case scenario, lead to parts being ejected from the machine. Always ensure it’s secure before turning the power on.
Expert Tip from Chef David Wilson: “A common mistake I see is over-tightening the locking knob. You want it ‘hand-tight’—snug and secure, but not so tight that you need a wrench to get it off. Over-tightening can cause the motor to strain and can make disassembly for cleaning a real nightmare.”
|
Our Picks for the Best Meat Grinder in 2025
As an Amazon Associate, we earn from qualifying purchases.
|
||
| Num | Product | Action |
|---|---|---|
| 1 | STX International Turboforce II 4000 Electric Meat Grinder | Grinds Soft Bones | Foot Pedal | 6 Grinding Plates | Stainless Steel Blades | Sausage Tubes | Kubbe Maker | Meat Claws | Patty Press & More |

|
| 2 | Weston Pro Series Electric Meat Grinder 7 Sausage Stuffer, Commercial Grade, 1500 Watts, 2 HP, 21lbs. Per Minute, Heavy Duty Stainless Steel (10-3201-W) |
|
| 3 | AAOBOSI Meat Grinder Electric 3000W Max with Touch Color Screen, Auto-Reverse & Built-in Storage - 3 Speed Settings,Grinding, Sausage & Kibbe Making for Home Use, Stainless Steel |
|
| 4 | LEM Products BigBite #8 Meat Grinder, 0.50 HP Stainless Steel Electric Meat Grinder Machine, Ideal for Regular Use |
|
| 5 | LEM Products BigBite #22 Meat Grinder, 1.0 HP Stainless Steel Electric Meat Grinder Machine, Ideal for Heavy Use |
|
| 6 | MEAT! 1.5 HP Meat Grinder with 3 Stuffing Tubes, 2 Stainless Steel Grinding Plates, and a Stainless Steel Stuffing Plate for Making Ground Meat |
|
| 7 | Electric Meat Grinder, Sausage Stuffer with 3 Sausage Tubes, 2 Blades, 3 Plates, 3200W Max, Meat Grinder Heavy Duty for Home Kitchen Use, Stainless Steel (Black) |
|
| 8 | MEAT! 1.5 HP Meat Grinder with 3 Stuffing Tubes, 2 Stainless Steel Grinding Plates, and a Stainless Steel Stuffing Plate for Making Ground Meat |
|
| 9 | Commercial Meat Grinder #12,0.9HP Electric Meat Mincer,Heavy Duty Stainless Steel Industrial Meat Mincer w/2 Blades & Meat Pusher,Food Grinders Machine for Home Kitchen Regular Use |
|
| 10 | VEVOR Commercial Meat Grinder, 550LB/h 1100W Electric Meat Mincer, ETL Approved Heavy Duty Industrial Meat Mincer Machine |
|
How to Properly Use and Tighten Your Grinder’s Locking Knob
Getting this right is simple, but it’s the foundation of a great grinding experience. Follow these steps every time you assemble your machine.
- Assemble in Order: After placing the auger inside the grinder head, put the blade on the end of the auger pin, ensuring the flat cutting edges are facing out.
- Select Your Plate: Choose the grinding plate for your desired texture (coarse, medium, or fine) and place it over the blade, fitting the notch on the plate into the corresponding pin on the grinder head to prevent it from spinning.
- Thread with Care: Take your locking knob and carefully begin to screw it onto the threads of the grinder head. Do not force it. If you feel resistance, back it off and try again to avoid cross-threading, which can permanently damage your machine.
- Hand-Tighten Securely: Screw the knob on until it is snug. It should be tight enough that it won’t vibrate loose during operation, but not so tight that you’ll struggle to remove it later. This is what “hand-tight” means.
- Post-Grind Check: After you’ve finished grinding, you might notice the knob is a bit tighter than when you started. This is normal. Just be sure to disassemble and clean all parts promptly.
Common Problems and Troubleshooting Your Locking Knob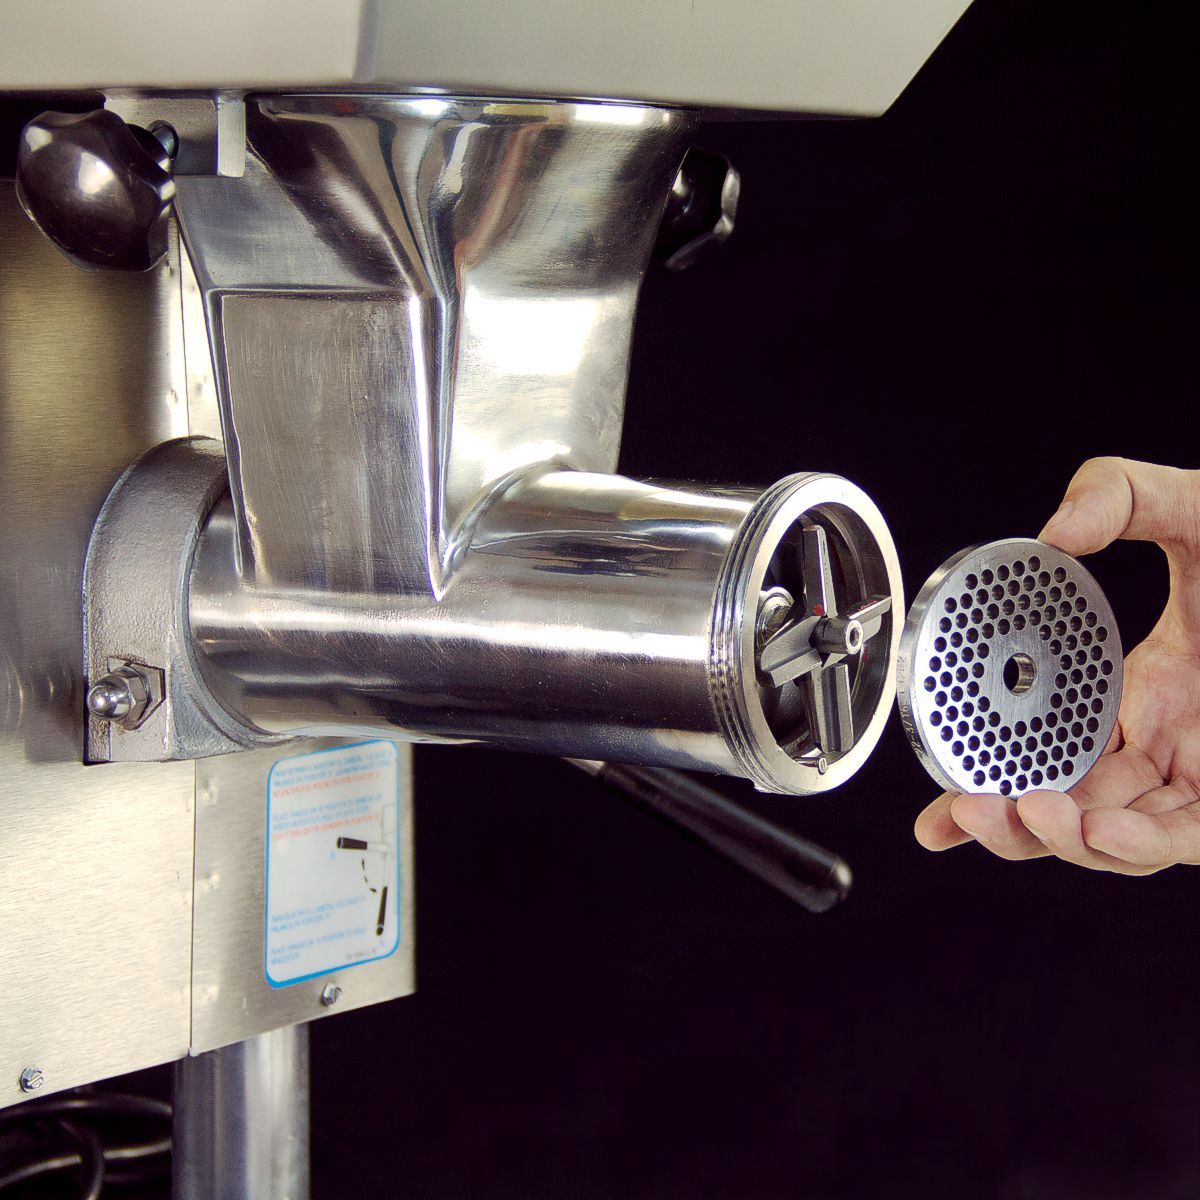
Even the best equipment can have its moments. Here are a few common issues you might face with your locking knob and how to solve them.
Help, My Locking Knob is Stuck!
This usually happens due to over-tightening or dried food particles acting like glue.
- The Fix: First, try tapping the rim of the knob gently with the handle of a wooden spoon or a rubber mallet to break the seal. If that doesn’t work, soak the end of the grinder head in hot, soapy water for 10-15 minutes (if it’s stainless steel) to loosen any grime. For extra grip, use a rubber jar opener.
The Knob Won’t Tighten Properly
This could mean the threads are stripped or something is misaligned.
- The Fix: Disassemble everything. Check the threads on both the grinder head and the locking knob for any damage. Ensure the grinding plate is seated correctly on its alignment pin. Sometimes the plate being just slightly off-kilter is enough to prevent the knob from seating properly.
Is My Locking Knob Supposed to be Plastic or Metal?
Both are common, and each has its pros and cons.
- Metal (Stainless Steel or Coated Aluminum): More durable and heavy-duty, preferred for high-volume use. The main drawback is that aluminum parts should never go in the dishwasher, as they will oxidize and turn black.
- Plastic/Nylon: Often found on more budget-friendly or lighter-duty models. They are less prone to “galling” or seizing up but can crack or strip over time if handled roughly.
Cleaning and Maintenance Checklist
Keeping your locking knob and the entire assembly clean is non-negotiable for food safety and machine longevity.
- [ ] Disassemble Immediately: Never let meat dry inside the grinder. Take it apart as soon as you’re done.
- [ ] Wash by Hand: Use hot, soapy water and a bottle brush to clean inside the grinder head and the threads of the locking knob.
- [ ] Check Dishwasher Safety: Crucially, verify if your parts are dishwasher safe. Most commercial-grade stainless steel parts are, but almost all cast aluminum parts are not. When in doubt, wash by hand.
- [ ] Dry Thoroughly: Lay all parts out on a towel to air dry completely before storing to prevent rust (especially with carbon steel plates and blades) and mold.
- [ ] Store Assembled or Disassembled?: Many people store their grinders fully assembled. However, storing parts separately ensures they are 100% dry and can prevent the locking knob from seizing.
Frequently Asked Questions (FAQ)
Q: What is the locking knob on a meat grinder actually called?
A: While we call it a locking knob for clarity, its technical names are often “retaining ring,” “locking ring,” or “faceplate ring.” The function is the same regardless of the name.
Q: Why is my meat grinder’s locking knob getting stuck?
A: The most common reasons are over-tightening, dried food particles in the threads, or a slight reaction between two different types of metal. Always clean promptly and tighten to a “snug” fit, not a “strained” one.
Q: Can I use my meat grinder without the locking knob?
A: Absolutely not. It is a critical safety component. Operating the grinder without it would cause the internal parts (blade and plate) to be pushed out by the auger, creating a dangerous situation and failing to grind any meat.
Q: How tight should the locking knob be?
A: The golden rule is “hand-tight.” It should be firm and secure so it doesn’t wobble, but you shouldn’t need excessive force or tools to tighten or loosen it.
Q: Are all meat grinder locking knobs universal?
A: No, they are not. Locking knobs are specific to the brand, model, and size of the meat grinder (e.g., #5, #8, #12). When ordering a replacement, you must match it to your specific machine.
The Final Turn
So, what is a locking knob? It’s far more than just a threaded ring. It’s the gatekeeper of quality, the linchpin of performance, and a crucial element of safe operation for your meat grinder. Understanding its function and how to properly use and care for it is a simple step that separates frustrating grinding sessions from flawless, delicious results. Now that you’re an expert, go forth and grind with confidence! We’d love to hear about your creations—share your favorite ground meat recipes or any grinder tips in the comments below.