Ever bitten into a homemade burger and thought, “Wow, this is a game-changer”? That’s the magic of grinding your own meat. It’s a simple step that elevates your cooking from good to absolutely unforgettable. But after the glory of crafting the perfect patty or sausage comes the less glamorous, but critically important, part: the cleanup. If you’re standing over your trusty machine wondering What Is The Best Way To Clean The Hopper and all its accompanying parts, you’ve come to the right place. It’s a question we get all the time, and mastering the cleanup is just as important as mastering the grind itself. This guide will walk you through everything, ensuring your meat grinder remains a pristine, reliable workhorse in your kitchen for years to come.
What Even Is a Meat Grinder? A Quick Trip Back in Time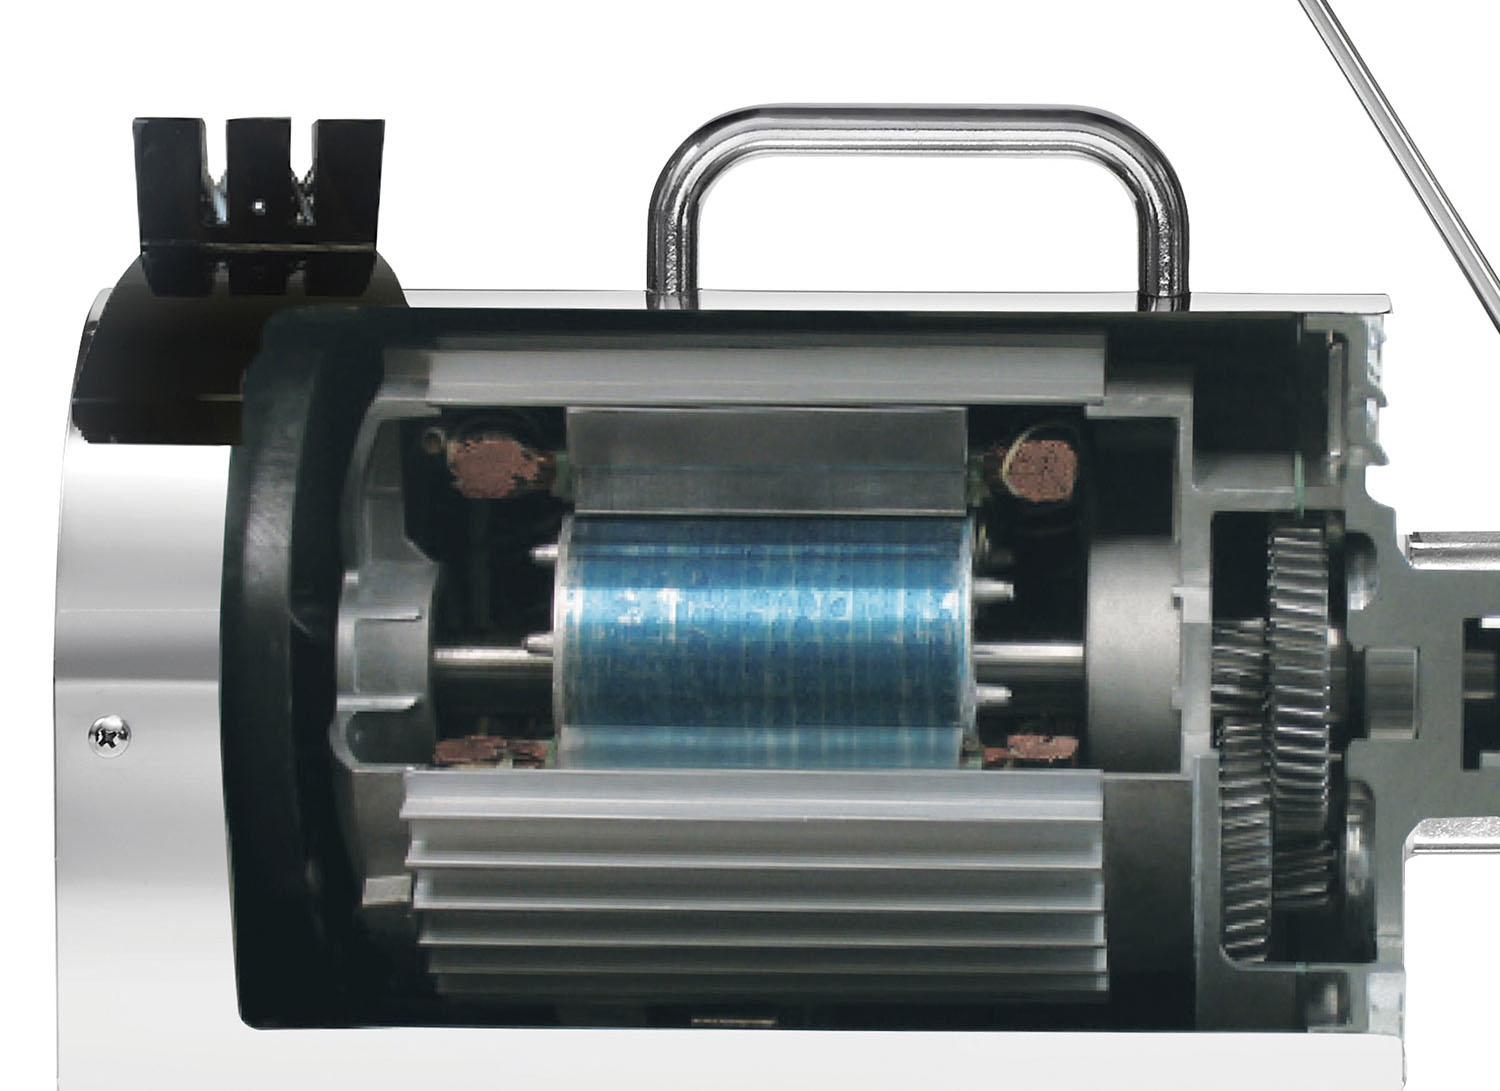
Before we get into the nitty-gritty of cleaning, let’s take a moment to appreciate this incredible tool. At its core, a meat grinder (or a meat mincer, as our friends across the pond might say) is a kitchen appliance that transforms cuts of meat into ground meat. The concept is beautifully simple: meat is fed into a funnel-like hopper, pushed along by a screw conveyor (the auger), and then forced out through a perforated plate.
Believe it or not, this kitchen staple was invented way back in the 19th century by a German inventor named Karl Drais. His brilliant, hand-cranked device revolutionized butchery and home cooking, allowing for the consistent production of ground meat for sausages, pies, and more. While today’s electric models are certainly a far cry from the original, the fundamental principle remains the same.
Why Bother With a Grinder? The Juicy Benefits of DIY
You might be thinking, “I can just buy ground beef at the store. Why bother?” I get it. But let me tell you, once you start grinding your own, you’ll never look back. The difference is night and day.
- Unbeatable Flavor and Texture: You control the cut of meat and the fat-to-lean ratio. Want a succulent burger? Grind up some chuck with a bit of brisket. The freshness is on a whole other level.
- Superior Food Safety: When you grind it yourself, you know exactly what’s in your meat. There’s no mystery meat, no fillers, and you have complete control over the cleanliness of the process, reducing the risk of cross-contamination.
- Cost-Effective: Often, buying whole cuts of meat and grinding them yourself is cheaper than buying pre-packaged ground meat. You can buy in bulk when there’s a sale and grind as needed.
- Incredible Versatility: This isn’t just a “burger machine.” As you’ll see later, a good meat grinder is a multi-talented kitchen assistant.
|
Our Picks for the Best Meat Grinder in 2026
As an Amazon Associate, we earn from qualifying purchases.
|
||
| Num | Product | Action |
|---|---|---|
| 1 | STX International Turboforce II 4000 Electric Meat Grinder | Grinds Soft Bones | Foot Pedal | 6 Grinding Plates | Stainless Steel Blades | Sausage Tubes | Kubbe Maker | Meat Claws | Patty Press & More |

|
| 2 | MEAT! 1.5 HP Meat Grinder with 3 Stuffing Tubes, 2 Stainless Steel Grinding Plates, and a Stainless Steel Stuffing Plate for Making Ground Meat |
|
| 3 | MEAT! 1.5 HP Meat Grinder with 3 Stuffing Tubes, 2 Stainless Steel Grinding Plates, and a Stainless Steel Stuffing Plate for Making Ground Meat |
|
| 4 | AAOBOSI Meat Grinder Electric 3000W Max with Touch Color Screen, Auto-Reverse & Built-in Storage - 3 Speed Settings,Grinding, Sausage & Kibbe Making for Home Use, Stainless Steel |
|
| 5 | Weston Pro Series Electric Meat Grinder 7 Sausage Stuffer, Commercial Grade, 1500 Watts, 2 HP, 21lbs. Per Minute, Heavy Duty Stainless Steel (10-3201-W) |
|
| 6 | Electric Meat Grinder, Sausage Stuffer with 3 Sausage Tubes, 2 Blades, 3 Plates, 3200W Max, Meat Grinder Heavy Duty for Home Kitchen Use, Stainless Steel (Black) |
|
| 7 | Commercial Meat Grinder #12,0.9HP Electric Meat Mincer,Heavy Duty Stainless Steel Industrial Meat Mincer w/2 Blades & Meat Pusher,Food Grinders Machine for Home Kitchen Regular Use |
|
| 8 | LEM Products BigBite #22 Meat Grinder, 1.0 HP Stainless Steel Electric Meat Grinder Machine, Ideal for Heavy Use |
|
| 9 | LEM Products BigBite #8 Meat Grinder, 0.50 HP Stainless Steel Electric Meat Grinder Machine, Ideal for Regular Use |
|
| 10 | VEVOR Commercial Meat Grinder, 550LB/h 1100W Electric Meat Mincer, ETL Approved Heavy Duty Industrial Meat Mincer Machine |
|
The Great Grinder Showdown: Manual vs. Electric
The first fork in the road for any aspiring home-grinder is choosing between a manual and an electric model. There’s no single “best” answer—it all comes down to your needs, volume, and kitchen style. I’ve used both extensively, and each has its charm.
| Feature | Manual Meat Grinder | Electric Meat Grinder |
|---|---|---|
| Power Source | Your own elbow grease! | Standard electrical outlet |
| Grinding Volume | Best for small batches (1-5 lbs) | Ideal for small to very large batches |
| Portability | Excellent. Clamps onto any counter. | Less portable, requires a power source. |
| Cost | Very affordable, often under $50. | Wider price range, from $60 to several hundred. |
| Noise Level | Quiet, just the sound of cranking. | Can be quite loud during operation. |
| Best For | Beginners, small kitchens, occasional use. | Serious home cooks, hunters, bulk processing. |
Picking Your Perfect Partner: A Buyer’s Guide
Ready to take the plunge? Here are the key things to look for when choosing your meat grinder.
Power and Wattage
For electric models, wattage is a key indicator of power. A grinder with 500-800 watts is great for general home use. If you plan on grinding tougher cuts or small bones for pet food, look for something in the 1000+ watt range. Don’t forget to look for a “reverse” function—it’s a lifesaver for clearing jams.
Materials Matter: Stainless Steel vs. Plastic
The components that touch your food—the hopper, auger, plates, and blade—should ideally be made of food-grade stainless steel or cast aluminum. They’re durable, easy to sanitize, and won’t react with the meat. While some models have plastic housings to save weight, the internal working parts are what really count.
Don’t Forget the Attachments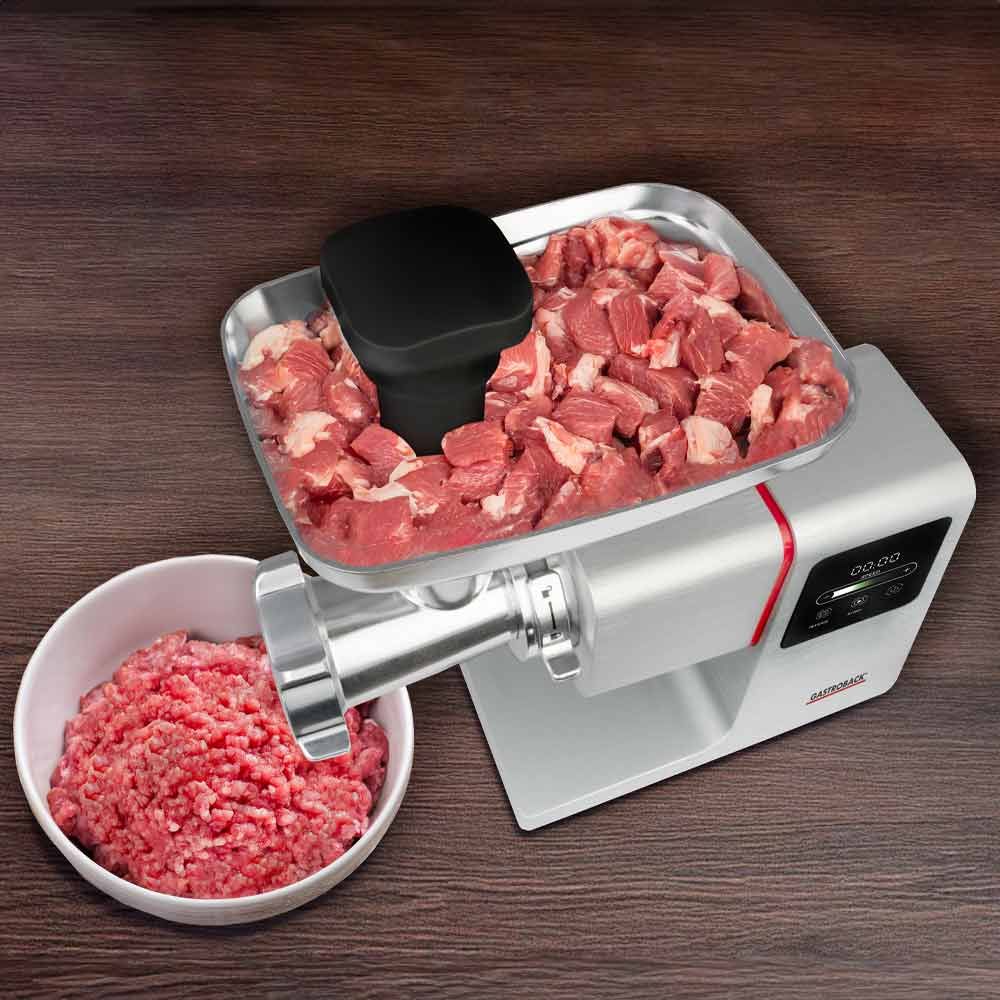
Many grinders come with a suite of useful attachments. Look for:
- Multiple Grinding Plates: Fine, medium, and coarse plates give you control over your final texture.
- Sausage Stuffing Tubes: A must-have for anyone interested in making their own links.
- Kubbe/Kibbeh Attachment: For making traditional Middle Eastern stuffed meatballs.
Your First Grind: A Step-by-Step Guide to Success
You’ve got your grinder, you’ve got your meat. Let’s make some magic.
- Chill Everything: This is the golden rule. Put your grinder’s metal parts (hopper, auger, plate, blade) and your cubed meat in the freezer for about 30-45 minutes. Cold meat and equipment prevent the fat from smearing, which leads to a clean grind instead of a mushy paste.
- Cube Your Meat: Cut your semi-frozen meat into small cubes or strips that will easily fit down the hopper.
- Assemble Securely: Put your grinder together according to the manufacturer’s instructions. Make sure the blade is seated correctly against the grinding plate (flat side out) and the retaining ring is tight.
- The First Pass: Turn the machine on (or start cranking!) and begin feeding the meat into the hopper. Use the food pusher, never your fingers, to guide the meat down. Don’t force it; let the auger do the work.
- The Second Pass (Optional): For a finer, more uniform texture, especially for sausages, chill the meat again and run it through the grinder a second time.
The Main Event: What Is the Best Way to Clean the Hopper?
You’ve done it! You have a beautiful bowl of freshly ground meat. Now, for the crucial part. Answering the question what is the best way to clean the hopper and the entire machine is key to food safety and the longevity of your appliance.
The best way to clean the hopper and all grinder parts is to first run a few slices of bread through the machine to absorb grease and push out residual meat. Immediately after, disassemble all components, soak them in hot, soapy water, scrub with a bottle brush, rinse thoroughly, and dry them completely by hand to prevent rust.
Here is a more detailed, foolproof method:
- The Bread Trick: Before you even think about unplugging it, grab 2-3 slices of stale bread. Run them through the grinder just like you did with the meat. The bread will absorb a surprising amount of leftover grease and push out the last stubborn bits of meat from the auger and plate. It makes the next steps so much easier.
- Unplug and Disassemble: Safety first! Unplug the machine from the wall. Carefully disassemble all the parts: the hopper, food pusher, retaining ring, grinding plate, blade, and auger. Lay them out on a towel next to your sink.
- The Hot, Soapy Soak: Fill your sink or a basin with hot water and a good squirt of dish soap. Place all the disassembled metal and plastic parts into the water to soak for about 15-20 minutes. This will loosen any remaining fat and protein.
- Scrub-a-Dub-Dub: Use a bottle brush or a dedicated cleaning brush to scrub every nook and cranny. Pay special attention to the inside of the feed tube, the holes in the grinding plate, and the crevices of the auger.
- Rinse and Dry Immediately: Rinse every part thoroughly under hot running water. Then, and this is the most important step, dry every single piece completely with a clean towel. Do not let them air dry. Any moisture left on cast iron or carbon steel parts will lead to rust almost instantly.
A Pro’s Tip from Chef David Wilson: “The biggest mistake people make is letting their grinder parts air dry or, even worse, putting them in the dishwasher. Most are not dishwasher safe and the harsh detergents and high heat can ruin the finish and cause oxidation. A thorough hand-dry is non-negotiable for keeping your equipment in top shape.”
Beyond Burgers: Unleash Your Grinder’s Creative Side
Don’t let your grinder be a one-trick pony. This machine is more versatile than you think!
- Make fresh breadcrumbs from stale bread.
- Grind vegetables like onions, peppers, and celery for a fine base for sauces or relish.
- Create custom veggie burger patties by grinding chickpeas, black beans, and spices.
- Process fruits for homemade jams and preserves.
- Grind hard cheeses like Parmesan.
Frequently Asked Questions (FAQ)
Q: Can I put my meat grinder parts in the dishwasher?
A: Almost always, the answer is no. Unless your manual specifically states that the parts are dishwasher-safe, you should never do it. The high heat and harsh detergents can cause discoloration, pitting, and rust, especially on aluminum or cast iron parts.
Q: How do I get rust off my grinder plates?
A: If you get a bit of surface rust, you can often remove it by scrubbing the part with a paste of baking soda and water or by using a fine-grade steel wool. After removing the rust, wash, dry completely, and apply a light coat of food-grade mineral oil to protect it.
Q: What is the best way to clean the hopper if it’s not removable?
A: For grinders with an integrated hopper, use a sponge or cloth with hot, soapy water to thoroughly wipe the inside. Use a bottle brush to get down into the feed tube. Rinse carefully by wiping with a cloth dipped in clean water, and then dry completely with a clean towel.
Q: How should I store my meat grinder?
A: After cleaning and drying, it’s a good practice to lightly coat the metal parts (plate, blade, auger) with a food-grade mineral oil. This prevents rust during storage. Store the parts inside a sealed bag or container to keep them clean and dust-free.
Q: My meat is coming out mushy. What am I doing wrong?
A: This is almost always a temperature issue. Your meat, fat, and grinder parts are not cold enough. The fat is melting and “smearing” instead of being cleanly cut. Put everything back in the freezer for 30 minutes and try again.
Your Grinding Journey Starts Now
Owning a meat grinder is about more than just making burgers; it’s about taking control of your food, exploring new culinary techniques, and creating meals with unparalleled flavor and quality. It’s a journey that puts you in the driver’s seat. And now that you know that mastering the cleanup, including understanding what is the best way to clean the hopper, is the simple secret to keeping your machine happy and your food safe, there’s nothing holding you back. So go ahead, get grinding, and taste the difference for yourself.