Grinding your own meat at home is a game-changer for anyone passionate about cooking, offering unparalleled control over ingredients, fat content, and freshness. Yet, achieving that ideal texture – distinct, tender, and juicy – hinges on one crucial, often overlooked step: properly chilling your meat before it meets the grinder. Without adequate cooling, you risk a smeared, unappetizing result that falls far short of your culinary aspirations. This comprehensive guide will walk you through why and how to chill your meat for the best possible grinding experience, ensuring your homemade sausages, burgers, and meatloaves are consistently exceptional.
Why Chilling Your Meat Before Grinding is Essential
The temperature of your meat before grinding profoundly impacts the final product. Understanding the science behind this is key to mastering the craft.
Improved Texture and Consistency
|
Our Picks for the Best Meat grinder in 2026
As an Amazon Associate I earn from qualifying purchases.
|
||
| Num | Product | Action |
|---|---|---|
| 1 | Electric Meat Grinder, Sausage Stuffer with 3 Sausage Tubes, 2 Blades, 3 Plates, 3200W Max, Meat Grinder Heavy Duty for Home Kitchen Use, Stainless Steel (Black) |

|
| 2 | Meat Chopper, Hamburger Grinder, Premium Heat Resistant Smasher for Ground Beef, Burger Grinder Nylon Potato Mix Tool, Meat & Poultry Tenderizers-Black |
|
| 3 | CHEFFANO Electric Meat Grinder, [2000W Max] Heavy Duty Meat Mincer with 2 Blades, 3 Plates, Sausage Tube & Kubbe Kit for Home Kitchen Use |
|
| 4 | KitchenAid Stand Mixer Attachment, Food Grinder KSMMGA, Metal Food Grinder |
|
| 5 | Oaomi 3200W Max Electric Meat Grinder & Sausage Stuffer - Mincer Machine with Tool 2 Blade And 3 Plates, 3 Tubes & Kubbe Kit Tool for Home Kitchen Use(Black) |
|
| 6 | Meat Grinder Manual Mincer 2-in-1 Manual Meat Grinder Sausage Maker Table Mount Pork Mincer Sausage Stuffer Funnel Make Homemade Burger Patties Hand Operated Kitchen Tool FQ |
|
| 7 | LEM Products BigBite #8 Meat Grinder, 0.50 HP Stainless Steel Electric Meat Grinder Machine, Ideal for Regular Use |
|
| 8 | Meat Grinder, Sausage Stuffer, [2800W Max] Electric Meat Mincer with Stainless Steel Blades & 3 Grinding Plates,Sausage Maker & Kubbe Kit for Home Kitchen & Commercial Using |
|
| 9 | CHEFFANO Meat Grinder, 2600W Max Stainless Steel Meat Grinder Electric, ETL Approved Heavy Duty Meat Mincer Machine with 2 Blades, 3 Plates, Sausage Stuffer Tube & Kubbe Kit for Home Kitchen Use |
|
| 10 | GANIZA Food Processors, Electric Food Chopper with Meat Grinder & Vegetable Chopper - 2 Bowls (8 Cup+8 Cup) with Powerful 450W Copper Motor - Includes 2 Sets of Bi-Level Blades for Fruits/Meat/Nuts |
|
When meat is warm, its fat is soft and pliable. Pushing soft fat through a grinder causes it to smear and emulsify with the lean muscle, creating a pasty, unappetizing texture. Cold meat, however, ensures that the fat remains firm, allowing the grinder’s blade to cut through it cleanly. This results in distinct, well-separated particles of lean meat and fat, which is the hallmark of high-quality ground meat. This proper separation prevents the meat from becoming mushy and yields a far more desirable, crumbly texture.
 Comparison of perfectly ground cold meat with crumbly texture versus smeared ground warm meat
Enhanced Food Safety
Temperature control is paramount in food safety. Raw meat contains bacteria on its surface, and grinding distributes these bacteria throughout the entire batch. If the meat’s temperature rises above 40°F (4°C) during processing, it enters the “danger zone” (between 41°F and 140°F or 5°C and 60°C), where bacteria can multiply rapidly. Keeping your meat, and even your equipment, as cold as possible significantly slows bacterial growth, minimizing the risk of foodborne illness.
Easier Grinding Process and Equipment Protection
Cold, firm meat is not only safer and better for texture, but it also makes the grinding process itself much smoother and more efficient. Warm, soft meat can clog the grinder, forcing the motor to work harder and potentially damaging your equipment. The firm consistency of chilled meat allows it to pass through the grinder more easily, resulting in a cleaner cut and less strain on your machine. This also means less mess and easier cleanup.
“The colder the meat, the cleaner the cut. It’s a fundamental principle for both quality and safety when grinding.” – Chef Austin Stull, Executive Chef at The Grillroom Chophouse & Wine Bar
Optimal Temperature for Meat Grinding: What to Aim For
The goal is to get your meat very cold, almost partially frozen, but not entirely solid.
Understanding the Ideal Range
Most experts agree that the ideal temperature for meat before grinding is between 28°F and 32°F (-2°C and 0°C). At this temperature, the meat will be firm to the touch, and the fat will be hard, but the muscle tissue won’t be completely frozen solid. Some professionals even suggest an optimal range around 26-27°F (-3°C) for tempered frozen product. While you don’t need to be overly precise with a thermometer for home grinding, aiming for meat that is very firm, yet still workable, is perfect. The most critical rule is that your meat and equipment should never exceed 40°F (4°C) during the entire grinding process.
The Science Behind Cold Grinding
Meat, particularly the fat within it, heats up during grinding due to friction. The colder you start, the more “buffer” you have before the meat reaches temperatures where fat begins to smear or bacteria proliferate rapidly. If the fat begins to melt and seep into the lean meat, it impacts not just the texture but also the flavor, leading to a greasy mouthfeel that even subsequent cooling cannot fully remedy.
Step-by-Step Guide to Chilling Your Meat Properly
Follow these steps to ensure your meat is perfectly prepared for grinding.
Preparation: Cutting Meat into Manageable Pieces
Before chilling, prepare your meat by cutting it into cubes that are approximately 1 to 2 inches (2.5 to 5 cm) in size. This ensures that the pieces will fit easily into your grinder’s feeding tube and allows for more even and rapid chilling. Trim any excessively large pieces of gristle or silver skin, but leave the fat in for flavor and moisture, as long as it’s the desired fat-to-lean ratio.
Chilling Methods:
Choose the method that best suits your timeline and equipment.
-
Refrigerator Cooling: The Standard Approach
For a gentler chill, cut meat can be placed in a single layer on a baking sheet, ideally lined with parchment paper, and refrigerated for a few hours. This method works well if you have plenty of time and are grinding smaller batches. However, for truly optimal results, you’ll want to combine this with a brief stint in the freezer. -
Freezer Flash Chilling: For Quicker Results
This is the most common and effective method for home grinding. After cutting your meat into 1-2 inch chunks, spread them in a single layer on a baking sheet lined with parchment paper or foil. Place the sheet pan in your freezer for about 15 to 30 minutes. The exact time will depend on the thickness of your meat pieces and the temperature of your freezer. You want the meat to be very firm around the edges, and perhaps slightly frozen on the exterior, but still pliable in the center. It should not be rock solid.
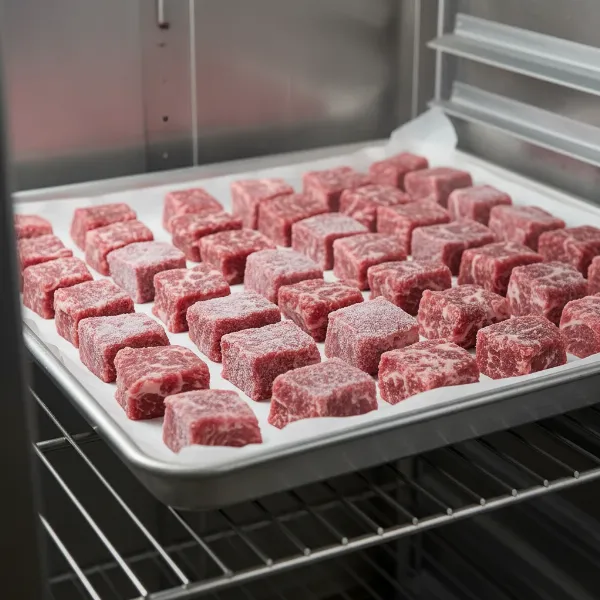 Raw meat chunks on a baking sheet flash chilling in a freezer for grinding
- Ice Bath Techniques: Advanced Cooling (Less common for raw meat before grinding)
While more often used for cooked items or chilling sausage emulsions, an ice bath can rapidly cool meat. However, for raw meat that will be ground, direct contact with water can be undesirable, potentially affecting the meat’s surface texture. Flash chilling in the freezer is generally preferred for pre-grinding.
Tools and Equipment: What You’ll Need
Beyond the meat itself, ensuring your grinding equipment is cold is equally vital.
- Meat Thermometer: While not strictly necessary for home grinding if you follow the “firm but not frozen” rule, a thermometer can provide precision, especially for larger batches.
- Baking Sheets: Essential for spreading out meat chunks for even chilling.
- Parchment Paper or Foil: Prevents meat from sticking to the baking sheet and makes cleanup easier.
- Meat Grinder (and its parts): Crucially, place the metal parts of your grinder – the auger (feed screw), blade, and grinding plate – in the freezer for at least 30 minutes, or ideally 1 to 2 hours, before you start grinding. Cold equipment helps maintain the meat’s temperature as it passes through.
Common Mistakes to Avoid When Cooling Meat
Steering clear of these pitfalls will help you achieve consistently great results.
- Grinding Warm Meat: As discussed, this is the primary culprit behind smeared, greasy, and texturally inferior ground meat. It also significantly increases food safety risks.
- Over-Freezing Your Meat: While cold is good, completely frozen solid meat can be too hard for home grinders. It can strain the motor, potentially damage the blades, and result in an uneven grind or even shards of ice in your final product. Aim for firm, not rock-hard.
- Insufficient Chilling Time: Rushing the chilling process means the meat won’t be uniformly cold, leading to inconsistent grinding results. Give it the recommended time for proper firmness.
- Cross-Contamination Risks: Always keep raw meat and its juices separate from other foods. Use dedicated cutting boards, utensils, and containers for raw meat, and thoroughly wash everything (including your hands) before and after handling raw meat.
Maintaining Cold Temperatures During the Grinding Process
Keeping your meat cold isn’t just about pre-grinding; it’s a continuous effort.
Chilling Your Grinder Parts
As mentioned, pre-chilling your grinder’s metal components in the freezer is non-negotiable. This prevents the warmth of the equipment from raising the meat’s temperature as it’s processed. For professional-grade results, some even keep their grinder parts stored in the freezer between uses.
Working in a Cold Environment
If possible, work in a cool kitchen. The ambient temperature can affect how quickly your meat warms up. If you’re working on a particularly hot day, consider placing the bowl collecting the ground meat into a larger bowl of ice to keep it chilled as you work.
Grinding in Batches
For larger quantities of meat, don’t try to grind it all at once. Grind in smaller batches, keeping the unused meat in the freezer until you’re ready for the next run. If you notice your meat or equipment becoming too warm, return them to the freezer for 10-15 minutes to re-chill before continuing. This intermittent chilling ensures consistent quality throughout.
Tips for the Best Ground Meat Ever
Beyond chilling, a few extra tips can elevate your homemade ground meat.
- Use High-Quality Meat: The better the starting product, the better the end result. Choose fresh, well-marbled cuts from a reputable butcher.
- Keep Everything Cold: This cannot be stressed enough. From your hands to your cutting board, bowls, and grinder, maintaining a low temperature throughout the process is the single most important factor.
- Clean Your Grinder Thoroughly: Disassemble and clean all grinder parts immediately after use. This prevents food residue from hardening and harbors bacteria.
Conclusion
Mastering the art of grinding your own meat begins with understanding and implementing proper chilling techniques. By ensuring your meat is firm, cold, and your equipment is pre-chilled, you will consistently produce ground meat with superior texture, enhanced flavor, and uncompromising food safety. This diligent approach not only yields delicious results for your culinary creations but also extends the life of your Meat Grinder and bolsters your confidence in the kitchen. So, the next time you plan to grind, remember: a little cold goes a long way. What are your favorite dishes to prepare with freshly ground meat?