A meat grinder is an indispensable tool for any home cook or butcher, transforming cuts of meat into delicious ground blends for sausages, burgers, or pâtés. But like any cutting tool, its effectiveness hinges on the sharpness of its blades. Over time, constant use dulls even the toughest steel, leading to a frustrating experience in the kitchen. If your meat grinder is struggling, mashing rather than cleanly cutting, it’s a clear signal: your blades need attention.
This comprehensive guide will walk you through the simple yet vital process of sharpening your meat grinder blades and plates at home. You’ll learn why sharp blades are crucial, what tools you’ll need, and a step-by-step method to restore your grinder to its peak performance, ensuring consistent, high-quality results every time.
The Unseen Power of Sharp Blades: Why They Matter
|
Our Picks for the Best Meat grinder in 2026
As an Amazon Associate I earn from qualifying purchases.
|
||
| Num | Product | Action |
|---|---|---|
| 1 | Meat Chopper, Hamburger Grinder, Premium Heat Resistant Smasher for Ground Beef, Burger Grinder Nylon Potato Mix Tool, Meat & Poultry Tenderizers-Black |

|
| 2 | GANIZA Food Processors, Electric Food Chopper with Meat Grinder & Vegetable Chopper - 2 Bowls (8 Cup+8 Cup) with Powerful 450W Copper Motor - Includes 2 Sets of Bi-Level Blades for Fruits/Meat/Nuts |
|
| 3 | CHEFFANO Electric Meat Grinder, [2000W Max] Heavy Duty Meat Mincer with 2 Blades, 3 Plates, Sausage Tube & Kubbe Kit for Home Kitchen Use |
|
| 4 | CHEFFANO Meat Grinder, 2600W Max Stainless Steel Meat Grinder Electric, ETL Approved Heavy Duty Meat Mincer Machine with 2 Blades, 3 Plates, Sausage Stuffer Tube & Kubbe Kit for Home Kitchen Use |
|
| 5 | Electric Meat Grinder, Sausage Stuffer with 3 Sausage Tubes, 2 Blades, 3 Plates, 3200W Max, Meat Grinder Heavy Duty for Home Kitchen Use, Stainless Steel (Black) |
|
| 6 | Meat Grinder, Sausage Stuffer, [2800W Max] Electric Meat Mincer with Stainless Steel Blades & 3 Grinding Plates,Sausage Maker & Kubbe Kit for Home Kitchen & Commercial Using |
|
| 7 | LEM Products BigBite #8 Meat Grinder, 0.50 HP Stainless Steel Electric Meat Grinder Machine, Ideal for Regular Use |
|
| 8 | Oaomi 3200W Max Electric Meat Grinder & Sausage Stuffer - Mincer Machine with Tool 2 Blade And 3 Plates, 3 Tubes & Kubbe Kit Tool for Home Kitchen Use(Black) |
|
| 9 | Meat Grinder Manual Mincer 2-in-1 Manual Meat Grinder Sausage Maker Table Mount Pork Mincer Sausage Stuffer Funnel Make Homemade Burger Patties Hand Operated Kitchen Tool FQ |
|
| 10 | KitchenAid Stand Mixer Attachment, Food Grinder KSMMGA, Metal Food Grinder |
|
Sharp blades are the heart of an efficient meat grinder, and their importance extends beyond mere cutting ability. When your grinder’s blades are perfectly honed, they slice through meat with precision, preserving its texture and preventing it from becoming a mushy mess. This not only enhances the quality of your ground product but also significantly reduces the strain on your grinder’s motor, extending the life of your appliance.
Conversely, dull blades force the motor to work harder, leading to slower grinding speeds, inconsistent textures, and even potentially overheating the unit. You might notice unusual grinding sounds, an increased effort required to push meat into the feeder, or meat emerging in irregular chunks. Recognizing these signs early and addressing them with proper sharpening ensures your grinder operates smoothly, quietly, and effectively.
Understanding Your Grinder: Blade and Plate Anatomy
Before diving into sharpening, it’s helpful to understand the key components of your meat grinder that contribute to its cutting action: the blade and the grinding plate.
Most home meat grinders feature cross-blades, also known as four-wing or star blades. These are typically made of stainless steel, offering durability and rust resistance, and feature four sharp edges designed to chop and mince meat as they rotate against the grinding plate. Less common are flat blades, often made of carbon steel, which have a single flat surface with sharp edges that slice meat as it passes through.
The true magic happens in the partnership between the blade and the grinding plate (or die plate). The blade rotates directly against this plate, which has an array of holes that determine the fineness of your grind. For optimal performance, both the blade and the plate must have perfectly flat, smooth, and sharp mating surfaces. A dull blade can only perform as well as the plate it works against; if the plate is uneven or worn, even a razor-sharp blade won’t deliver a clean cut. Therefore, effective sharpening always involves refreshing both these crucial components.
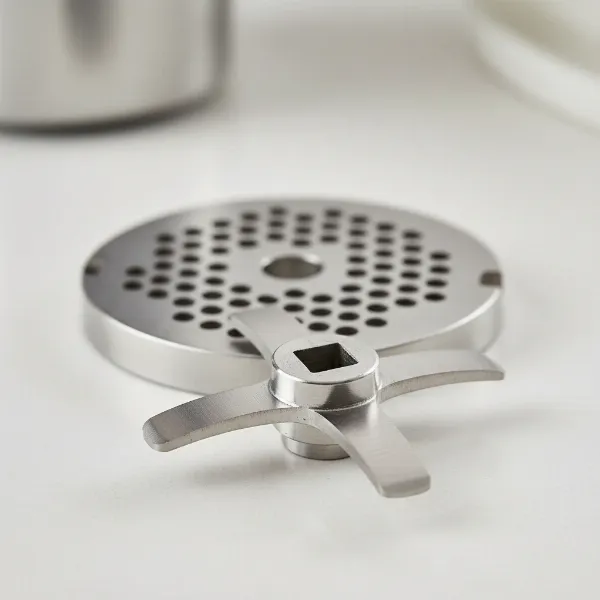 Close-up of a meat grinder blade and grinding plate components, showing their design and how they fit together.
Essential Arsenal: Tools for At-Home Blade Sharpening
You don’t need specialized, expensive equipment to bring your meat grinder blades back to life. Many effective tools are likely already in your home or easily acquired.
Primary Tools You’ll Need:
- Wet/Dry Sandpaper: This is arguably the most accessible and effective tool. You’ll need a range of grits:
- Coarse (100-180 grit): For initial shaping and removing nicks or significant dullness.
- Medium (400-600 grit): For refining the edge and preparing for honing.
- Fine (800-2000+ grit): For achieving a razor-sharp, polished edge. Automotive-grade wet sandpaper is often recommended for its consistent grit.
- A Perfectly Flat Surface: Essential for ensuring even sharpening. Options include a thick sheet of glass, a marble slab, a granite countertop, or a machinist’s block. The flatter, the better.
- Water or Honing Oil: To lubricate the sandpaper or sharpening stone, reduce friction, prevent clogging with metal particles, and achieve a smoother finish.
- Protective Gloves: Cut-resistant gloves are a must for safety when handling sharp blades.
- Damp Cloth: For cleaning and helping sandpaper adhere to your flat surface.
- Marker Pen (Optional): Useful for marking parts during disassembly to aid reassembly.
Optional Tools (Depending on Blade Type and Preference):
- Sharpening Stone (Whetstone): Ceramic or diamond sharpening stones are excellent alternatives to sandpaper, offering a dedicated surface for grinding. They require proper technique and lubrication.
- Rotary Tool (e.g., Dremel): Can be used for targeted sharpening on specific blade types, especially if severely dull or damaged. However, this method requires a steady hand, a low speed setting, and extreme caution. Always wear safety glasses and gloves when using power tools.
- Metal File: For very dull blades or initial coarse shaping, but generally less precise than sandpaper or a stone for fine edges.
Step-by-Step Mastery: Manual Sharpening with Sandpaper
The most common and effective method for sharpening meat grinder blades at home involves using wet/dry sandpaper on a flat surface. Follow these steps for best results:
1. Preparation is Key
Choose a well-lit, clean, and stable workspace. Lay your chosen flat surface (glass, granite) on your workbench or kitchen counter. Lightly wet the surface with a damp cloth, then place your coarsest grit sandpaper (e.g., 120-180 grit) onto the wet surface. The water will create suction, holding the sandpaper firmly in place.
2. Disassembly and Deep Clean
Safety first: If your grinder is electric, unplug it before disassembly. Carefully remove the components of the grinder head: the locking ring, grinding plate, blade, auger, and feed tube. Lay them out in the order they were removed, or use a marker pen to number them if you’re concerned about reassembly.
Thoroughly clean all parts with warm, soapy water and a brush to remove any meat residue, fat, or debris. This step is critical; any particles left on the blades or plate can interfere with the sharpening process and even scratch your sharpening surface. Dry all parts completely before proceeding.
3. Sharpening the Blade
Now, put on your protective gloves. Take your meat grinder blade.
- Coarse Grit (120-180): Place the blade flat against the coarse grit sandpaper, ensuring the entire cutting surface is in contact. Apply even, firm pressure. Move the blade in a circular or figure-eight pattern across the sandpaper for about 10-20 passes. The goal here is to remove any nicks, burrs, or significant dullness and establish a consistent, flat grind. You’ll see a dark residue on the sandpaper, which is metal being removed.
- Wipe and Repeat with Finer Grits: Wipe the blade clean with a damp cloth to remove metal filings. Replace the coarse sandpaper with the next finer grit (e.g., 400 grit). Repeat the flat, circular, or figure-eight motion, reducing pressure slightly as you go. Perform another 10-20 passes.
- Honing (800-2000+): Continue this process, progressively moving to finer grits (e.g., 600, then 800, and up to 2000 or more for a truly polished, razor-sharp edge). With each finer grit, reduce the pressure and the number of passes. The goal is to refine the edge and remove microscopic burrs.
4. Sharpening the Grinding Plate (Die)
This step is just as critical as sharpening the blade. The grinding plate must be perfectly flat and smooth to create a tight seal with the sharpened blade, allowing for a clean, efficient cut.
- Use the exact same method and grit progression as you did for the blade. Lay the grinding plate flat on the sandpaper, ensuring its entire mating surface is in full contact.
- Apply even pressure and move it in a circular or figure-eight motion.
- Work through the coarse, medium, and fine grits, wiping the plate clean between each grit change. Pay close attention to achieving a consistent, flat surface across the entire plate.
5. Final Checks and Reassembly
Once both the blade and the grinding plate have been sharpened and honed, wipe them meticulously clean to remove all metal dust and lubricant.
- Test for Sharpness: Carefully run your gloved thumb perpendicularly across the cutting edge of the blade. It should feel sharp and grab slightly, with no noticeable burrs. You can also try slicing a piece of paper; a truly sharp blade will cut cleanly without tearing.
- Reassemble: Reverse the disassembly steps, carefully fitting the auger, blade, and grinding plate back into the grinder head. Ensure the blade is properly seated against the plate. Secure with the locking ring.
- Test Run: Before grinding meat, perform a brief test run with the assembled grinder (without meat) to ensure all components are aligned and functioning smoothly.
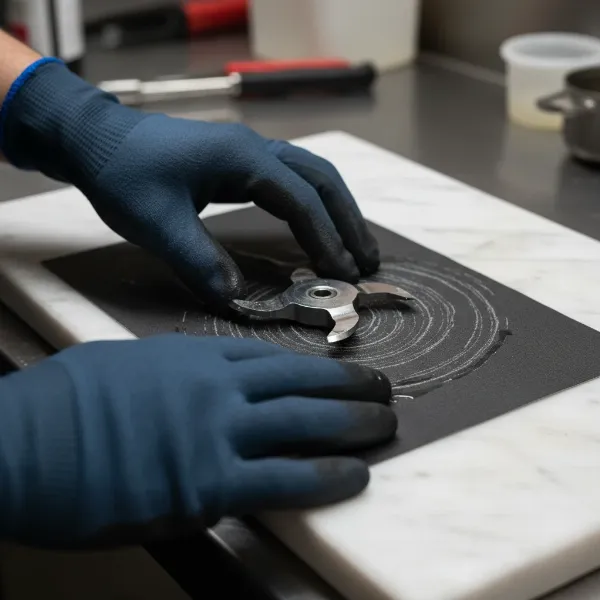 Person manually sharpening a meat grinder blade on wet sandpaper for optimal cutting performance.
Common Pitfalls and How to Avoid Them
Even with the right tools, some common mistakes can hinder your sharpening efforts or even damage your grinder:
- Neglecting the Grinding Plate: Sharpening only the blade is a common oversight. For an effective cut, the blade needs to work in perfect conjunction with a flat, smooth grinding plate. Always sharpen both.
- Uneven Pressure: Applying inconsistent pressure during sharpening can create an uneven edge or surface, leading to poor cutting performance. Strive for uniform pressure across the entire blade or plate.
- Using the Wrong Grit Progression: Starting too fine won’t remove nicks, while finishing too coarse will leave a dull edge. Follow the coarse-to-fine progression.
- Incorrect Sharpening Angle: Meat grinder blades are designed to grind flat against the plate. Do not try to introduce an angle when sharpening their cutting surfaces, as this will create a gap between the blade and the plate, causing the meat to smear rather than cut.
- Forgetting Safety: Blades are sharp! Always wear protective gloves and handle components with extreme care.
- Insufficient Cleaning: Metal filings left on the blade or plate can create scratches and prevent a truly sharp edge. Clean thoroughly between each grit and before reassembly.
- Rushing the Process: Sharpening takes patience. Rushing can lead to mistakes, uneven edges, or injury. Take your time for the best results.
Prolonging the Edge: Maintenance for Your Meat Grinder
Once your blades are sharp, proper maintenance will keep them that way for longer, reducing the frequency of sharpening:
- Clean Immediately After Each Use: Food residue and fat can be corrosive. Disassemble and thoroughly clean all components with warm, soapy water and a brush right after use.
- Ensure Complete Drying: Moisture is the enemy of sharp steel. Dry all parts meticulously, especially carbon steel flat blades, to prevent rust and corrosion.
- Proper Storage: Store your blades and plates in a dry, protected place. Consider wrapping them in a dry cloth or placing them in a dedicated container to shield them from moisture and prevent accidental dulling or chipping from other utensils.
- Grind Appropriate Foods: Avoid grinding bones, extremely large chunks of frozen meat, or other overly hard materials. These can rapidly dull or even chip your blades. Cut meat into manageable pieces and ensure it’s slightly thawed if frozen.
- Lubricate Moving Parts: Periodically apply food-grade lubricant to the auger and other moving parts to reduce friction. Less friction means less strain on the blades.
- Regular Inspections: Routinely check your blades and plate for any signs of wear, nicks, rust, or unevenness. Addressing minor issues early can prevent them from worsening.
When to Consider Replacement
While sharpening can extend the life of your meat grinder blades, there comes a point when replacement is the more practical and safer option. Look for these signs:
- Excessive Wear and Tear: If the blades or plate appear significantly thinner, have heavily rounded edges, or are warped, they may be beyond effective sharpening.
- Visible Cracks or Chips: Any cracks or chips on the cutting edges or plate indicate structural damage, which can pose a safety hazard and compromise grinding performance.
- Extensive Rust or Corrosion: While minor surface rust might be removed, deep or widespread corrosion can weaken the metal and make the blades unsafe for food processing.
- Persistent Dullness: If your blades fail to hold an edge or remain dull even after thorough sharpening attempts, it suggests they’ve reached the end of their useful life due to material degradation.
- Uneven Grinding Performance: Despite sharpening, if your grinder consistently produces uneven cuts or struggles with certain meats, it could mean the blades or plate are permanently misshapen or out of alignment.
Wrapping it Up
Sharpening your meat grinder blades and plates at home is a straightforward, rewarding task that significantly impacts your grinding experience. By understanding the importance of sharp components, gathering the right tools, and meticulously following the step-by-step process, you can maintain your equipment in prime condition. This not only ensures perfectly ground meat for all your culinary adventures but also extends the lifespan of your valuable appliance.
So, next time your meat grinder feels sluggish, don’t despair! Embrace the DIY spirit, sharpen those blades, and rediscover the joy of efficient, precise meat processing. What delicious creations will you craft with your freshly sharpened grinder?